通知设置 新通知
Python文件读写操作详解
空心菜 发表了文章 0 个评论 3286 次浏览 2016-08-11 13:15
文件打开流程
Python中文件操作可以分为三步:
- 打开文件,得到文件句柄并赋值给一个变量
- 通过句柄对文件进行操作
- 关闭文件
打开文件模式
打开文件的模式有:
- r,只读模式(默认)。
- w,只写模式。【不可读;不存在则创建;存在则删除内容;】
- a,追加模式。【可读; 不存在则创建;存在则只追加内容;】
- r+,可读写文件。【可读;可写;可追加】
- w+,写读
- a+,同a
- rU
- r+U
- rb
- wb
- ab
操作文件内容如下:
I took a pill in Ibiza

我在Ibiza岛上嗑药

To show Avicii I was cool

为了让Avicii觉得我很酷

And when I finally got sober, felt 10 years older

当我终于清醒过来了 仿佛已经是十年之后

But fuck it, it was something to do

但操他妈的 那也算是消遣了

I'm living out in LA

我住在LA

I drive a sports car just to prove

我开跑车只为了证明

I'm a real big baller cause I made a million dollars

我真的超屌能赚百万

And I spend it on girls and shoes

然后我把它们全部都花在妞和鞋上

But you don't wanna be high like me

但你不会想和我一样拥有这么多

Never really knowing why like me

我都不明白为什么人想要得到这么多

You don't ever wanna step of that roller coaster and be all alone

(一旦你拥有过之后)你就再也不想离开这过山车 再变得独自一人

You don't wanna ride the bus like this

你不会想要过这样的生活

Never knowing who to trust like this

像这样永远不知道能信任谁

You don't wanna be stuck up on that stage singing

你不会想在台上自我感觉良好地唱歌 受到万人追捧

Stuck up on that stage singing

不想这样骄傲地在台上唱歌

All I know are sad songs, sad songs

我只知道 我只想唱 那些悲伤的歌

Darling, all I know are sad songs, sad songs

宝贝儿 我真的只知道 只想唱 那些悲伤的歌
文件操作常用功能
1、read()、readline()、readlines()的区别
#!/usr/bin/env python3

# _*_coding:utf-8_*_

# Author: Lucky.chen


f = open('aa.txt', encoding='utf-8')

print(f)


# 打印出来的是一个文件句柄信息:<_io.TextIOWrapper name='aa.txt' mode='r' encoding='utf-8'>


print(f.read())   # 打印出来的就是文件所有的内容,全部加载到内存,读取出来

print(f.readline())   # 打印的是文件第一行的内容

print(f.readlines())  # 把文件内容每行当做一个列表的元素,放到一个列表中,打印的是一个列表

f.close()
2、文件指针
#!/usr/bin/env python3Result:
# _*_coding:utf-8_*_
# Author: Lucky.chen
f = open('aa.txt', encoding='utf-8')
print("第一次读取开始指针位置为%s".center(30, '*') % f.tell())
print(f.readline().strip()) # 打印的是文件第一行的内容
end_tell = f.tell() # 获取当前指针位置
print("第一次读取结束指针位置为%s".center(30, '*') % end_tell)
print("第二次读取开始指针位置为%s".center(30, '*') % f.tell())
print(f.readline().strip())
end_tell = f.tell() # 获取当前指针位置
print("第二次读取结束指针位置为%s".center(30, '*') % end_tell)
# 把指针调节到最开始重新重新读取
f.seek(0) # 把指针调节到最开头
print("重新读取开始指针位置为%s".center(30, '*') % f.tell())
print(f.readline().strip())
end_tell = f.tell()
print("重新读取结束指针位置为%s".center(30, '*') % end_tell)
f.close()
********第一次读取开始指针位置为0********

I took a pill in Ibiza

********第一次读取结束指针位置为23********

********第二次读取开始指针位置为23********

我在Ibiza岛上嗑药

********第二次读取结束指针位置为47********

********重新读取开始指针位置为0*********

I took a pill in Ibiza

********重新读取结束指针位置为23*********
3、encoding 显示打开文件的编码格式
#!/usr/bin/env python3Result:
# _*_coding:utf-8_*_
# Author: Lucky.chen
f = open('aa.txt')
print(f.encoding)
f.close()
f = open('aa.txt', 'r+', encoding='gbk')
print(f.encoding)
f.close()
UTF-8

gbk
4、seekable 判断一个文件是否是光标可移动文件,有些二进制文件是无法进行光标移动的。
#!/usr/bin/env python3Result:
# _*_coding:utf-8_*_
# Author: Lucky.chen
f = open('aa.txt', 'r+', encoding='utf-8')
Re = f.seekable()
if Re:
print("Allow Move Cursor")
f.close()
Allow Move Cursor
5、read() 如果不输入任何参数,读取整个文件,可以跟参数指定读取文件的字节数
#!/usr/bin/env python3Result:
# _*_coding:utf-8_*_
# Author: Lucky.chen
f = open('aa.txt', 'r+', encoding='utf-8')
# 读取三个字节
print(f.read(3))
print("*" * 30)
# 读取50个字节
print(f.read(50))
f.close()
I t

******************************

ook a pill in Ibiza

我在Ibiza岛上嗑药

To show Avicii I w
6、readable() 判断一个文件是否可读,返回布尔值
#!/usr/bin/env python3Result:
# _*_coding:utf-8_*_
# Author: Lucky.chen
f = open('aa.txt', 'r+', encoding='utf-8')
Re = f.readable()
if Re:
print("File Allow Read!")
else:
print("File Not Allow Read!")
f.close()
print('分割线'.center(30, '*'))
f = open('aa.txt', 'a', encoding='utf-8')
Re = f.readable()
if Re:
print("File Allow Read!")
else:
print("File Not Allow Read!")
f.close()
File Allow Read!f.writeble()和上面的一样,是用来测试文件的打开方式是否可读。
*************分割线**************
File Not Allow Read!
7、flush 强制刷新到内存
#!/usr/bin/env python3

# _*_coding:utf-8_*_

# Author: Lucky.chen

# load module

import sys

import time


# 模拟进度条

for i in range(61):

    sys.stdout.write('>')

    sys.stdout.flush()  # flush 强制刷新缓存到内存的数据写入硬盘

    time.sleep(0.1)
8、with语句
为了避免打开文件后忘记关闭,可以通过管理上下文,即:
with open('log','r', encoding='utf-8') as f:


...如此方式,当with代码块执行完毕时,内部会自动关闭并释放文件资源。在Python 2.7 后,with又支持同时对多个文件的上下文进行管理,即:
with open('log1') as obj1, open('log2') as obj2:

    pass
例子:比如要修改haproxy.cfg 文件然后还的回滚怎么做?with open('haproxy.cfg','r') as obj1,open('haproxy.cfg.new','w') as obj2:
for i in obj1.readlines():
i = i.strip()
print i
obj2.write(i)
obj2.write('\n')
#读取harpoxy.cfg每行然后存储到新的文件haproxy.cfg.new里!9、文件遍历
#!/usr/bin/env python3

# _*_coding:utf-8_*_

# Author: Lucky.chen

# load module


f = open("aa.txt", 'r', encoding="utf-8")


for index, line in enumerate(f.readlines()):

    # 先把文件内容以行为分割生成列表,数据量大不能用

    if index == 5:

        print("我是分割线".center(50, '-'))

        continue

    print(line.strip())


#  f.readlines()是把整个文件的每一行当做一个元素,存放在一个列表中,然后循环这个列表就可以了。

# 注:此种方式存在隐患,假如一个文件过大,会把整个内存撑爆

f.close()


f = open("aa.txt", 'r', encoding="utf-8")

count = 0

for line in f:

    count += 1

    if count == 3:

        print("我是第二个分割线".center(50, '-'))

        continue

    print(line.strip())


f.close()


# 直接for循环后面直接跟文件句炳,此时这个文件句炳是一个迭代器,这样读取是一行一行的读取,内存只会存放一行内容,故而不会涉及内存的问题。


# 两者的优缺点,第一种方法因为是列表,可以直接使用下标,对文件读取那行进行方便控制;第二种方法没有下标,只能自己写计数器,进行判断。
图解Python 集合
空心菜 发表了文章 2 个评论 4582 次浏览 2016-08-10 23:41
集合基本功能
集合是一个无序的,不重复的数据组合,用{}表示,它的主要作用如下:
- 去重,把一个列表变成集合,就会自动去重
- 关系测试,测试两组数据之前的交集、差集、并集、子集等关系
集合创建:
>>> set_job = set(['DEV', 'OPS', 'DBA', 'QA', 'Sales'])

>>> set_man = set(('lucky', 'jack', 'andy', 'tom', 'andy', 'jim'))

>>> print(set_job, type(set_job))

{'DEV', 'OPS', 'Sales', 'QA', 'DBA'}

>>> print(set_man, type(set_man))    # 天生去重,只有一个andy了

{'andy', 'jack', 'lucky', 'tom', 'jim'}
元素添加:
>>> set_job = set(['DEV', 'OPS', 'DBA', 'QA', 'Sales'])

>>> set_job.add('HR')       # add方法只能添加一个

>>> print(set_job)

{'QA', 'HR', 'Sales', 'DEV', 'OPS', 'DBA'}

>>> set_job.update(['FD', 'MD', 'MD'])

>>> print(set_job)

{'QA', 'HR', 'Sales', 'DEV', 'MD', 'OPS', 'FD', 'DBA'}

>>> set_job.update(('AD', 'PD'))  # update方法可以添加是列表或者元组,去重,如果添加的为一个单独字符串,则把字符串拆成字母添加到集合中

>>> print(set_job)

{'QA', 'HR', 'PD', 'Sales', 'DEV', 'MD', 'OPS', 'AD', 'FD', 'DBA'}
元素删除:
>>> set_job = {'QA', 'HR', 'PD', 'Sales', 'DEV', 'MD', 'OPS', 'AD', 'FD', 'DBA'}

>>> set_job.remove('PD')   # 删除指定元素

>>> set_job.remove('xx')   # 元素不存在则报错 KeyError

Traceback (most recent call last):

  File "", line 1, in

KeyError: 'xx'

>>> print(set_job)

{'QA', 'HR', 'MD', 'DEV', 'Sales', 'OPS', 'AD', 'FD', 'DBA'}

>>> set_job.pop()  # 随机删除一个元素

'QA'

>>> print(set_job)

{'HR', 'MD', 'DEV', 'Sales', 'OPS', 'AD', 'FD', 'DBA'}

>>> set_job.discard('OPS')  # 指定删除

>>> set_job.discard('xxx')  # 不存在返回None,不会报KeyError

>>> print(set_job)

{'HR', 'MD', 'DEV', 'Sales', 'AD', 'FD', 'DBA'}
其他:
>>> set_job = {'QA', 'HR', 'PD', 'Sales', 'DEV', 'MD', 'OPS', 'AD', 'FD', 'DBA'}

>>> len(set_job)  # 集合长度

10

>>> 'QA' in set_job  # 判断是否在集合中

True

>>> 'XXX' not in set_job # 不在集合中

True

>>> for i in set_job:   # 循环

...     print(i)
集合关系测试
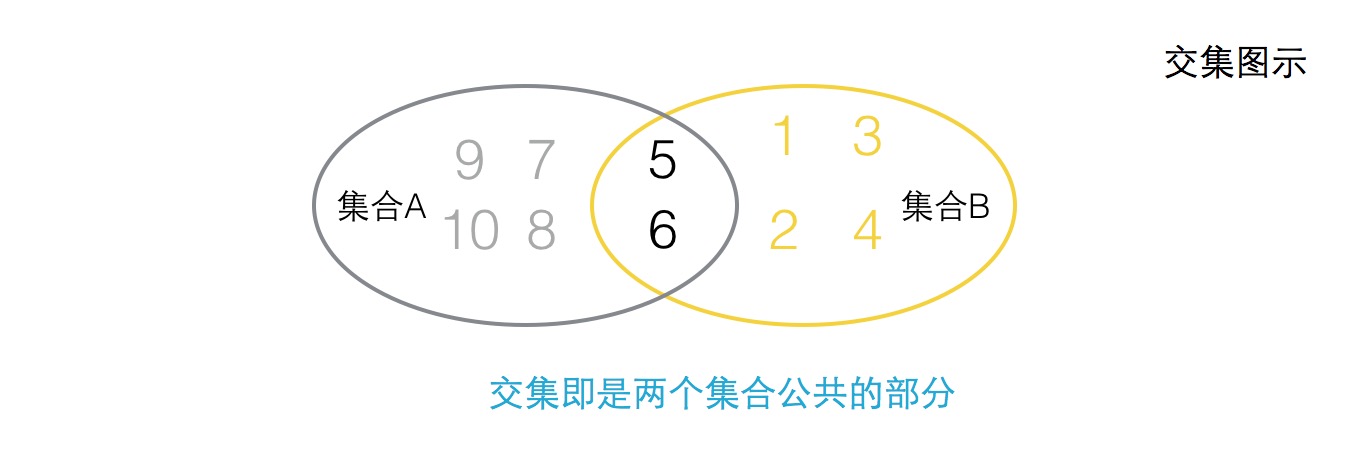
交集:
>>> set_a = {5, 6, 7, 8, 9, 10}

>>> set_b = {1, 2, 3, 4, 5, 6}

>>> print(set_a.intersection(set_b))   # 常规方式

{5, 6}

>>> print(set_a & set_b)   # 运算符(&)方式

{5, 6}
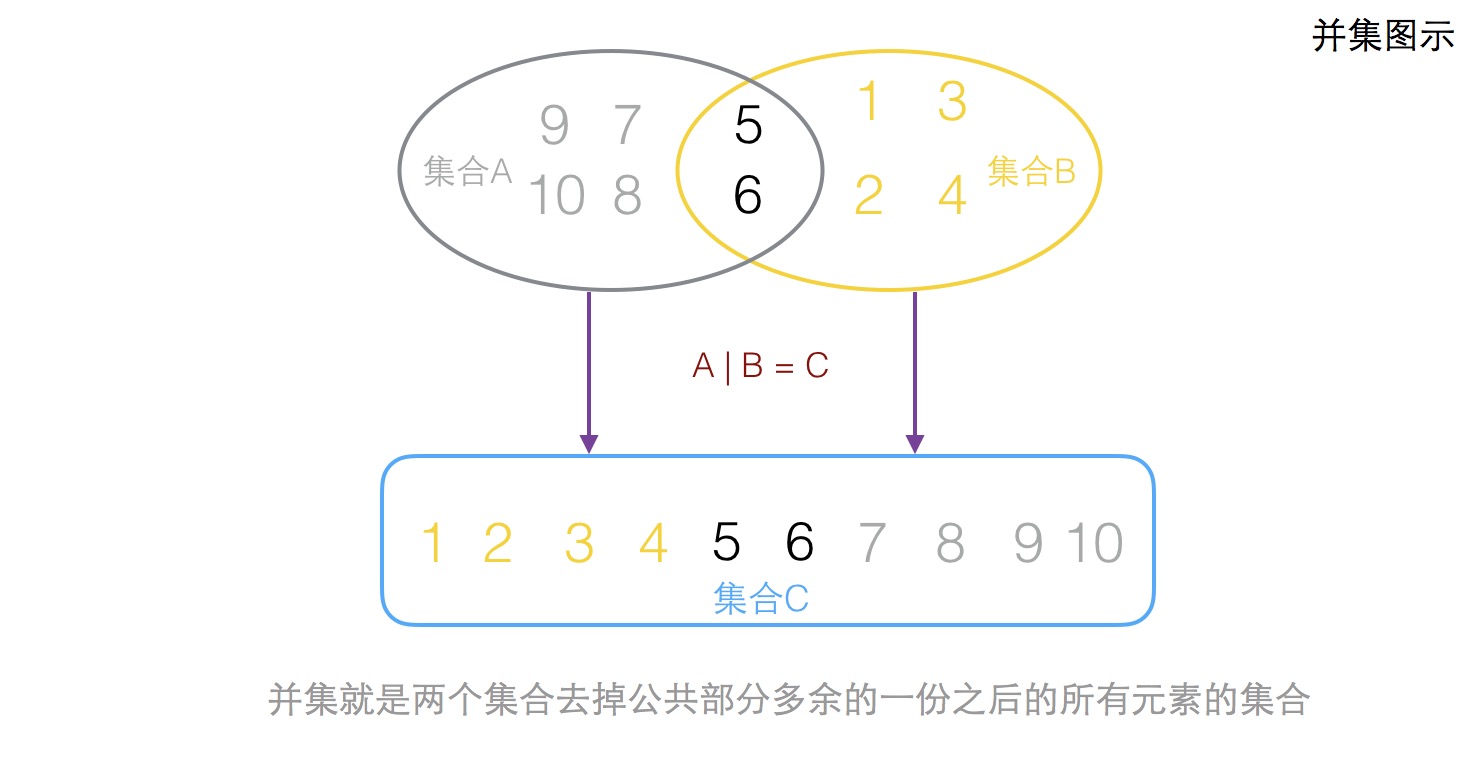
并集
>>> set_a = {5, 6, 7, 8, 9, 10}

>>> set_b = {1, 2, 3, 4, 5, 6}

>>> set_c = set_a.union(set_b)    # 关键字union做并集运算 先后顺序无关,谁并谁都可以

>>> print(set_c)

{1, 2, 3, 4, 5, 6, 7, 8, 9, 10}

>>>

>>> set_c = set_a | set_b     # 运算符关键符 | 做并集运算  先后顺序无关,谁并谁都可以

>>> print(set_c)

{1, 2, 3, 4, 5, 6, 7, 8, 9, 10}
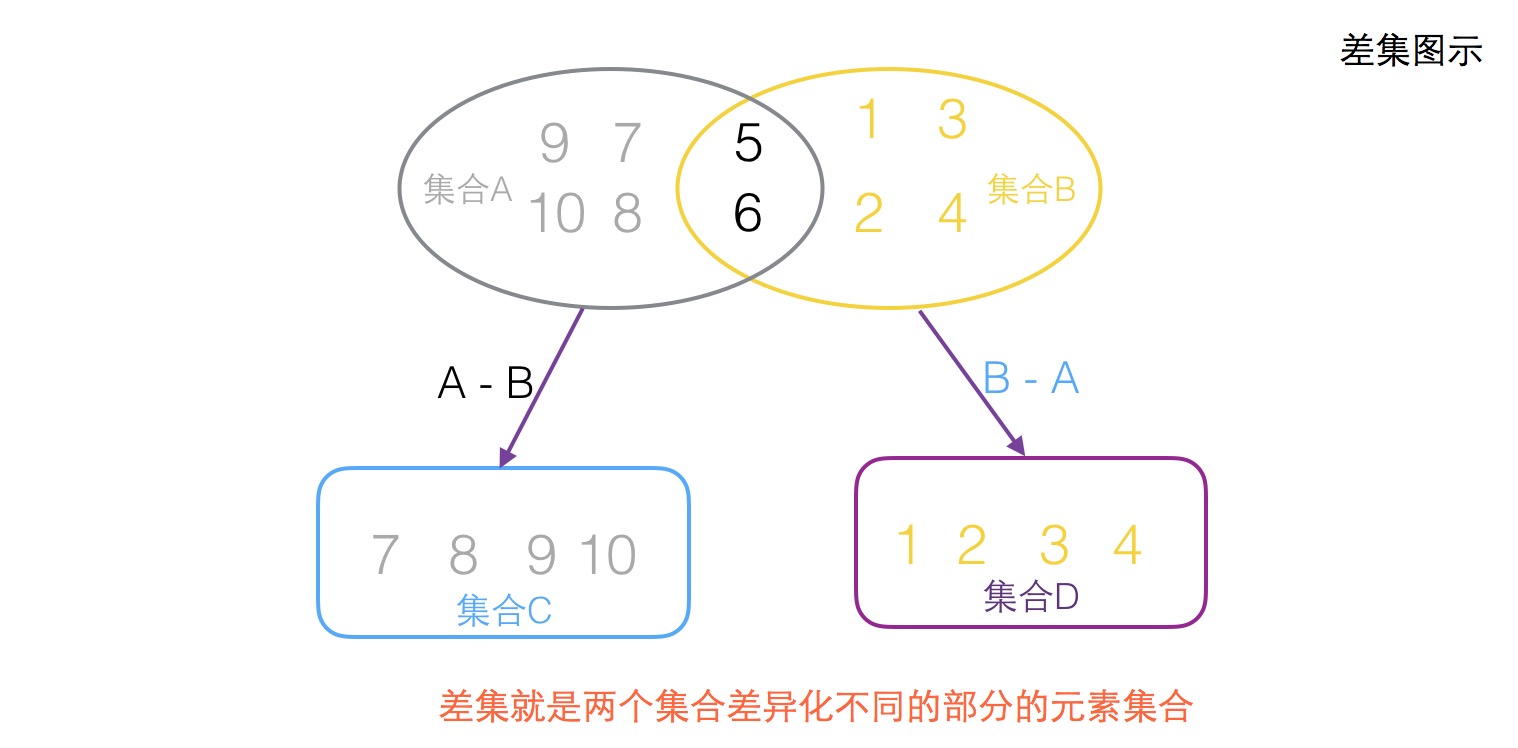
差集
>>> set_a = {5, 6, 7, 8, 9, 10}

>>> set_b = {1, 2, 3, 4, 5, 6}

>>> set_c = set_a - set_b   # a集合跟b集合做差集 关键符 -

>>> print(set_c)

{8, 9, 10, 7}

>>> set_d = set_b - set_a   # b集合跟a集合做差集 关键符 -

>>> print(set_d)

{1, 2, 3, 4}

>>> set_c = set_a.difference(set_b) # a集合跟b集合做差集 关键字difference

>>> print(set_c)

{8, 9, 10, 7}

>>> set_d = set_b.difference(set_a) # b集合跟a集合做差集 关键字difference

>>> print(set_d)

{1, 2, 3, 4}
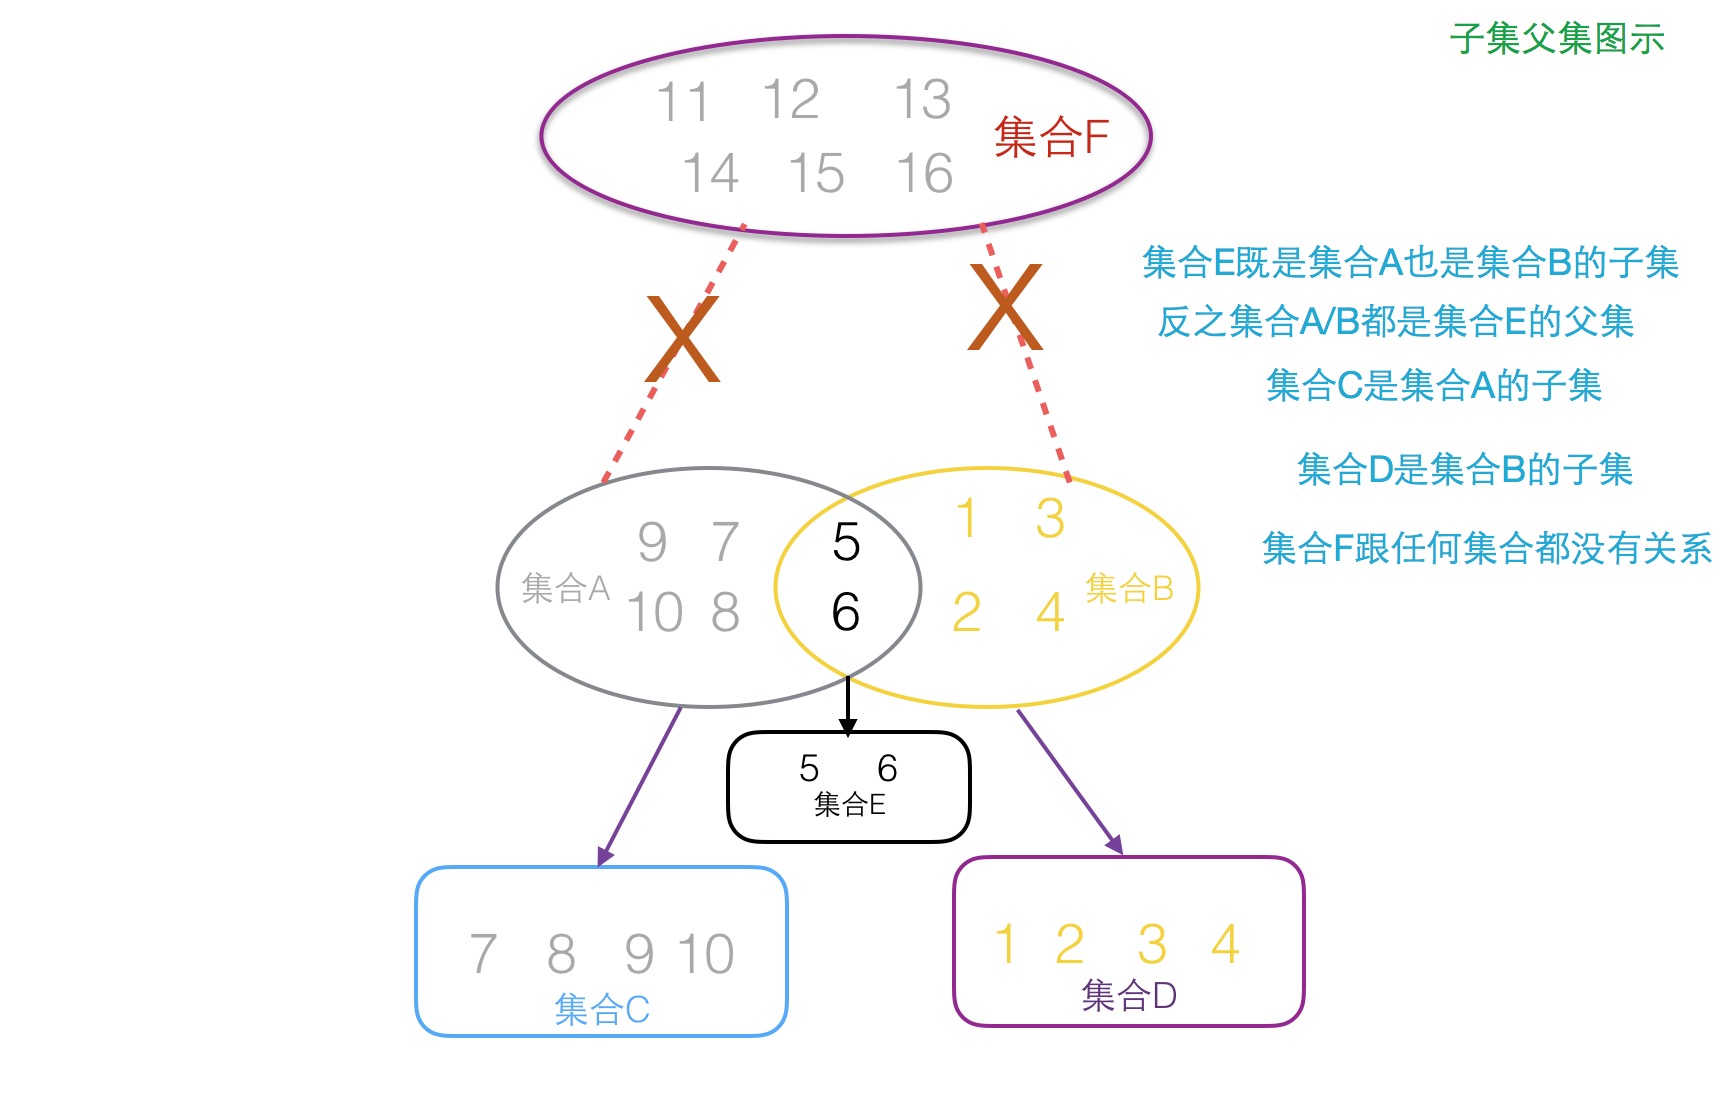
子集父集
拿苹果来打比方就是,把苹果掰开,然后掰开的一小部分就是子集,然后整个苹果就是父集
>>> set_a = {5, 6, 7, 8, 9, 10}

>>> set_b = {1, 2, 3, 4, 5, 6}

>>> set_c = {7, 8, 9, 10}

>>> set_d = {1, 2, 3, 4}

>>> set_e = {5, 6}

>>> set_f = {11, 12, 13, 14, 15, 16}

>>> set_c.issubset(set_a)   # 测试集合c是否是集合a的子集 放回布尔值  关键字issubset

True

>>> set_d.issubset(set_b)   # 测试集合d是否是集合b的子集 返回布尔值  issubset

True

>>> set_e.issubset(set_a)

True

>>> set_e.issubset(set_b)

True

>>> set_e <= set_a         # 测试集合e是否是集合a的子集 关键符 <=

True

>>> set_e <= set_b

True

>>> set_f.issuperset(set_a)  # 测试f集合是否是a集合的父集

False

>>> set_a.issuperset(set_e)  # 测试a集合是否是集合e的父集 关键字issuperset

True

>>> set_b >= set_e  # 测试集合b是否是集合e的父集 关键符 >=

True

>>> set_b >= set_d

True
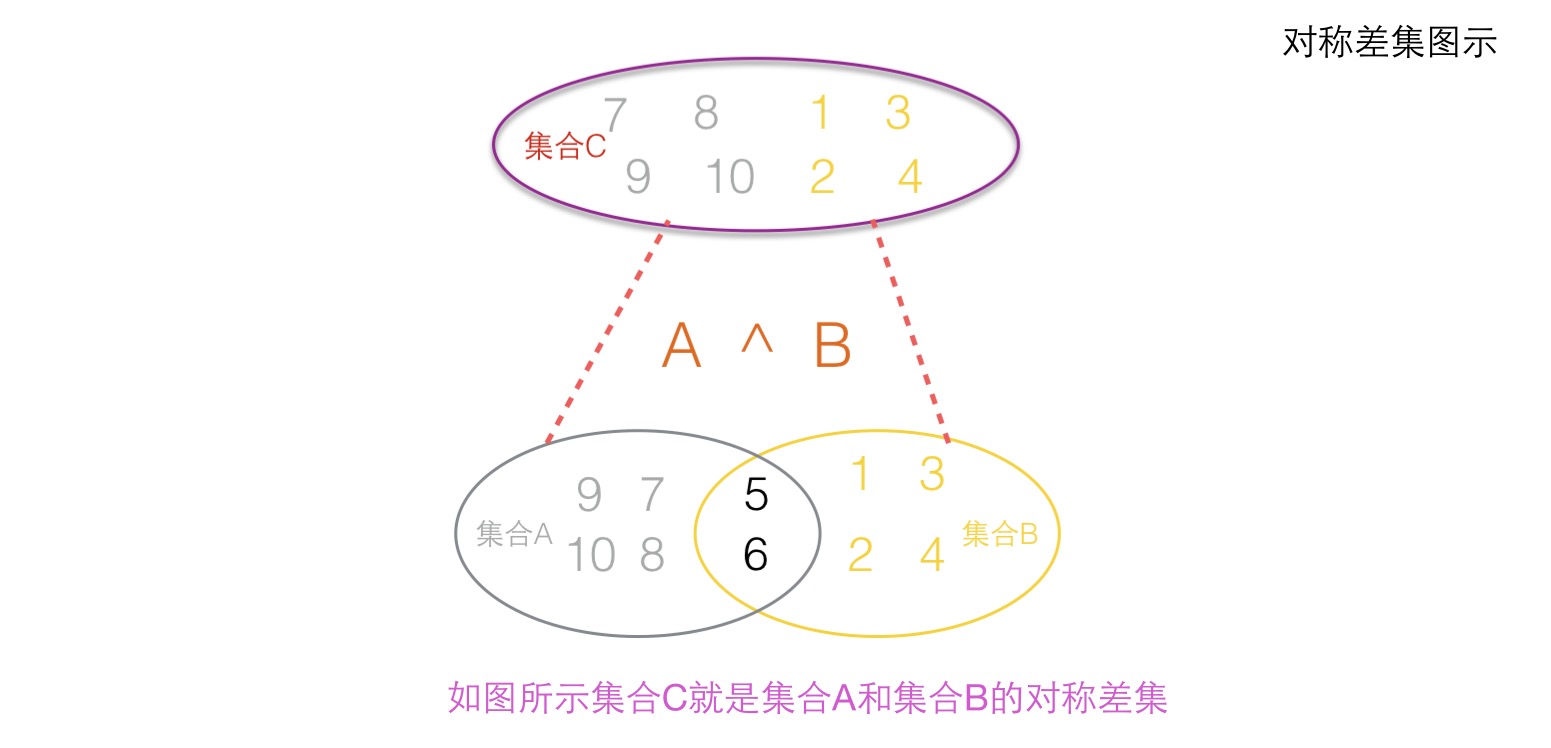
对称差集
对称差集就是两个集合去掉相同的部分,然后剩下的所有元素组成的集合
>>> set_a = {5, 6, 7, 8, 9, 10}

>>> set_b = {1, 2, 3, 4, 5, 6}

>>> set_c = set_a.symmetric_difference(set_b)  # 集合a和集合b做对称差集 关键字symmetric_difference

>>> print(set_c)

{1, 2, 3, 4, 7, 8, 9, 10}

>>> set_c = set_a ^ set_b  # 集合a和集合b做对称差集 关键符 ^

>>> print(set_c)

{1, 2, 3, 4, 7, 8, 9, 10}

>>> set_c = set_b ^ set_a

>>> print(set_c)

{1, 2, 3, 4, 7, 8, 9, 10}
所有方法:
class set(object):

    """

    set() -> new empty set object

    set(iterable) -> new set object


    Build an unordered collection of unique elements.

    """

    def add(self, *args, **kwargs): # real signature unknown

        """

        Add an element to a set.


        This has no effect if the element is already present.

        """

        pass


    def clear(self, *args, **kwargs): # real signature unknown

        """ Remove all elements from this set. """

        pass


    def copy(self, *args, **kwargs): # real signature unknown

        """ Return a shallow copy of a set. """

        pass


    def difference(self, *args, **kwargs): # real signature unknown

        """

        Return the difference of two or more sets as a new set.


        (i.e. all elements that are in this set but not the others.)

        """

        pass


    def difference_update(self, *args, **kwargs): # real signature unknown

        """ Remove all elements of another set from this set. """

        pass


    def discard(self, *args, **kwargs): # real signature unknown

        """

        Remove an element from a set if it is a member.


        If the element is not a member, do nothing.

        """

        pass


    def intersection(self, *args, **kwargs): # real signature unknown

        """

        Return the intersection of two sets as a new set.


        (i.e. all elements that are in both sets.)

        """

        pass


    def intersection_update(self, *args, **kwargs): # real signature unknown

        """ Update a set with the intersection of itself and another. """

        pass


    def isdisjoint(self, *args, **kwargs): # real signature unknown

        """ Return True if two sets have a null intersection. """

        pass


    def issubset(self, *args, **kwargs): # real signature unknown

        """ Report whether another set contains this set. """

        pass


    def issuperset(self, *args, **kwargs): # real signature unknown

        """ Report whether this set contains another set. """

        pass


    def pop(self, *args, **kwargs): # real signature unknown

        """

        Remove and return an arbitrary set element.

        Raises KeyError if the set is empty.

        """

        pass


    def remove(self, *args, **kwargs): # real signature unknown

        """

        Remove an element from a set; it must be a member.


        If the element is not a member, raise a KeyError.

        """

        pass


    def symmetric_difference(self, *args, **kwargs): # real signature unknown

        """

        Return the symmetric difference of two sets as a new set.


        (i.e. all elements that are in exactly one of the sets.)

        """

        pass


    def symmetric_difference_update(self, *args, **kwargs): # real signature unknown

        """ Update a set with the symmetric difference of itself and another. """

        pass


    def union(self, *args, **kwargs): # real signature unknown

        """

        Return the union of sets as a new set.


        (i.e. all elements that are in either set.)

        """

        pass


    def update(self, *args, **kwargs): # real signature unknown

        """ Update a set with the union of itself and others. """

        pass
Python菜鸟之路基础篇(三)
空心菜 发表了文章 0 个评论 2207 次浏览 2016-08-05 22:42
列表
列表(list)是Python以及其他语言中最常用到的数据结构之一。Python使用使用中括号 [ ] 来解析列表。列表是可变的(mutable)——可以改变列表的内容。
列表是一组有序项目的集合 ,可变的数据类型【可进行增删改查】; 列表中可以包含任何数据类型,也可包含另一个列表【可任意组合嵌套】 列表是以方括号“”包围的数据集合,不同成员以“,”分隔 列表可通过序号访问其中成员.
1、创建列表
>>> names = ['lucky', 'jack', 'tom', 'jim', 'erica']    #方法一

[quote]>> print(names)

['lucky', 'jack', 'tom', 'jim', 'erica'][/quote]


[quote]>> names = list(('jason', 'chris', 'andy', 'sunny', 'sun'))   #方法二

>>> print(names)

['jason', 'chris', 'andy', 'sunny', 'sun']
2、访问元素
通过下标访问列表中的元素,下标从0开始计数
>>> jobs = ['PM', 'UI', 'UE', 'OPS', 'DBA', 'DEV']

>>> jobs[1]

'UI'

>>> jobs[2]

'UE'

>>> jobs[4]

'DBA'

>>> jobs[-2]   # 还可以倒数着来,不过下标从-1开始

'DBA'
3、列表切片
>>> jobs = ['PM', 'UI', 'UE', 'OPS', 'DBA', 'DEV']利用下标取出的一个单独元素是str类型,而利用分片取出的是一个list类型。[/quote]
>>> jobs[1:4] # 取下标从1到4的元素,但是不包括4,列表切片的特征就是左开右闭,也就是左取右弃。
['UI', 'UE', 'OPS']
>>> jobs[1:-1] # 取下标为1到-1的元素,不包括-1,也就是最后一个元素不会被取出来。
['UI', 'UE', 'OPS', 'DBA']
>>> jobs[:] # 这个在切片符左右没有下标限制,所以就是代表全取
['PM', 'UI', 'UE', 'OPS', 'DBA', 'DEV']
>>> jobs[::] # 效果和上面一样,但是你会发现有两切片符,这是因为切片有一个步长的概念
['PM', 'UI', 'UE', 'OPS', 'DBA', 'DEV']
>>> jobs[0:3] # 取下标0到3的元素,但不包括3
['PM', 'UI', 'UE']
>>> jobs[:3] # 和上面效果一样
['PM', 'UI', 'UE']
>>> jobs[3:] # 从下标3开始,到最后一个元素
['OPS', 'DBA', 'DEV']
>>> jobs[3:-1] # 从下标3开始,到最后一个元素,但是不包括最后一个元素
['OPS', 'DBA']
>>> jobs[0::2] # 从下标0开始,按照2个步长取值
['PM', 'UE', 'DBA']
>>> jobs[::2] # 和上面效果一样
['PM', 'UE', 'DBA']
4、列表追加
>>> jobs = ['PM', 'UI', 'UE', 'OPS', 'DBA', 'DEV']

[quote]>> jobs.append('QA')  #添加到最后

>>> jobs

['PM', 'UI', 'UE', 'OPS', 'DBA', 'DEV', 'QA']
5、列表插入
>>> jobs = ['PM', 'UI', 'UE', 'OPS', 'DBA', 'DEV']

>>> jobs.insert(2, 'Sales')   # 从下标为2的元素后面插入,其实可以理解为我插入一个元素,下标为3

>>> jobs

['PM', 'UI', 'Sales', 'UE', 'OPS', 'DBA', 'DEV']

>>> jobs.insert(-1, 'QA')     # 也可以倒数着来

>>> jobs

['PM', 'UI', 'Sales', 'UE', 'OPS', 'DBA', 'QA', 'DEV']
6、修改元素
>>> jobs = ['PM', 'UI', 'UE', 'OPS', 'DBA', 'DEV']

>>> jobs[2] = 'QA'  # 把下标为2的元素替换成QA,根据下标然后给元素重新赋值

>>> jobs

['PM', 'UI', 'QA', 'OPS', 'DBA', 'DEV']

>>> jobs[-2] = 'Sales'  # 把下标为12的元素替换成Sales,根据下标然后给元素重新赋值

>>> jobs

['PM', 'UI', 'QA', 'OPS', 'Sales', 'DEV']
7、删除元素
>>> jobs = ['PM', 'UI', 'UE', 'OPS', 'DBA', 'DEV']remove方法删除一个元素,必须是在列表中的,否则会报错,del利用下标来删除元素,pop默认删除最后一个元素,也可以指定元素下标来删除。
>>> del jobs[-1] # del方法删除最后一个元素
>>> jobs
['PM', 'UI', 'UE', 'OPS', 'DBA']
>>> del jobs[1] # del方法删除下标为1的元素
>>> jobs
['PM', 'UE', 'OPS', 'DBA']
>>> jobs.remove("DBA") # 根据remove方法,指定你想删除的元素
>>> jobs
['PM', 'UE', 'OPS']
>>> jobs.pop() # pop方法,默认删除最后一个,返回删除元素
'OPS'
>>> jobs
['PM', 'UE']
>>> jobs.pop(0) # pop还可以指定元素下标,指定删除
'PM'
>>> jobs
['UE']
>>> jobs.clear() # clear 删除列表所有的元素,就是清空列表,变成为一个空列表
>>> jobs
8、扩展列表
>>> jobs = ['PM', 'UI', 'UE', 'OPS', 'DBA', 'DEV']

>>> job = ['Sales', 'QA', 'HR']

>>> jobs.extend(job)  # extend方法就是把job列表里面的元素一个个添加到jobs列表中。

>>> jobs

['PM', 'UI', 'UE', 'OPS', 'DBA', 'DEV', 'Sales', 'QA', 'HR']
9、列表拷贝
>>> jobs从上面可以看出列表的copy方法是一个浅copy的栗子,只会拷贝第一次,而多层嵌入的话,会随着源列表的变化为变化,关于深拷贝和浅拷贝后面详细介绍。
['PM', 'UI', 'UE', 'OPS', 'DBA', 'DEV']
>>> jobs_copy = jobs.copy() # 复制一份jobs列表
>>> jobs_copy
['PM', 'UI', 'UE', 'OPS', 'DBA', 'DEV']
>>> jobs = ['PM', 'UI', 'UE', 'OPS', ['DBA', 'QA', 'DEV']] # 嵌入式列表
>>> jobs_copy2 = jobs.copy()
>>> jobs_copy2
['PM', 'UI', 'UE', 'OPS', ['DBA', 'QA', 'DEV']]
>>> jobs[0] = 'HR' # 改变小标为0的元素
>>> jobs
['HR', 'UI', 'UE', 'OPS', ['DBA', 'QA', 'DEV']] # 改变了
>>> jobs_copy2
['PM', 'UI', 'UE', 'OPS', ['DBA', 'QA', 'DEV']] # 没变
>>> jobs[-1][0] = 'Sales' # 改变内嵌列表的下标为0的元素
>>> jobs
['HR', 'UI', 'UE', 'OPS', ['Sales', 'QA', 'DEV']] # 改变了
>>> jobs_copy2
['PM', 'UI', 'UE', 'OPS', ['Sales', 'QA', 'DEV']] # 改变了
10、列表统计
>>> jobs = ['PM', 'UI', 'OPS', 'UE', 'OPS', 'DBA', 'DEV']

>>> jobs.count('OPS')  # 因为列表是有序的一种数据类型,所以它的元素是可以重叠的,所以有元素统计。

2
11、排序和翻转
>>> jobs = ['PM', 'UI', 'OPS', 'UE', 'OPS', 'DBA', 'DEV', 1, 2, 3]sort()方法会修改原列表,而不是创建一个新的有序列表,reverse()也会修改原列表,但是你希望排序,但是又不希望修改原列表,你只能利用python中一个名为sorted()的内置函数来操作:
>>> jobs.sort()
Traceback (most recent call last):
File "", line 1, in
TypeError: unorderable types: int() < str() # Python3.0里不同数据类型不能放在一起排序了,擦
>>> jobs[-1] = '3'
>>> jobs[-2] = '2'
>>> jobs[-3] = '1'
>>> jobs
['DBA', 'DEV', 'OPS', 'OPS', 'PM', 'UE', 'UI', '1', '2', '3']
>>> jobs.sort()
>>> jobs
['1', '2', '3', 'DBA', 'DEV', 'OPS', 'OPS', 'PM', 'UE', 'UI']
>>> jobs.append('#')
>>> jobs.append('&')
>>> jobs.sort()
>>> jobs
['#', '&', '1', '2', '3', 'DBA', 'DEV', 'OPS', 'OPS', 'PM', 'UE', 'UI'] # 可以看出排序的顺序 特殊字符->数字->字母 这么一个优先级
>>> jobs.reverse() # 翻转最后到最前面
>>> jobs
['UI', 'UE', 'PM', 'OPS', 'OPS', 'DEV', 'DBA', '3', '2', '1', '&', '#']
>>> jobs = ['UI', 'UE', 'PM', 'OPS', 'OPS', 'DEV', 'DBA', '3', '2', '1', '&', '#']

>>> newlist = sorted(jobs)

>>> jobs

['UI', 'UE', 'PM', 'OPS', 'OPS', 'DEV', 'DBA', '3', '2', '1', '&', '#']

>>> newlist

['#', '&', '1', '2', '3', 'DBA', 'DEV', 'OPS', 'OPS', 'PM', 'UE', 'UI']
12、列表索引
>>> jobs = ['PM', 'UI', 'OPS', 'UE', 'OPS', 'DBA', 'DEV', 'UE']索引下标,只会返回第一个元素的下标,如果元素不在列表中,会报错,我们可以利用in这个关键之来判断元素是否在列表中。
>>> jobs.index('OPS')
2
>>> jobs.index('UE')
3
>>> jobs.index('xx')
Traceback (most recent call last):
File "", line 1, in
ValueError: 'xx' is not in list
>>> if 'OPS' in jobs:
... print(jobs.index('OPS'))
...
2
列表所有的方法如下:
class list(object):

	"""

	list() -> new empty list

	list(iterable) -> new list initialized from iterable's items

	"""

	def append(self, p_object): # real signature unknown; restored from __doc__

		""" L.append(object) -> None -- append object to end """

		pass[/quote]


	def clear(self): # real signature unknown; restored from __doc__

		""" L.clear() -> None -- remove all items from L """

		pass


	def copy(self): # real signature unknown; restored from __doc__

		""" L.copy() -> list -- a shallow copy of L """

		return


	def count(self, value): # real signature unknown; restored from __doc__

		""" L.count(value) -> integer -- return number of occurrences of value """

		return 0


	def extend(self, iterable): # real signature unknown; restored from __doc__

		""" L.extend(iterable) -> None -- extend list by appending elements from the iterable """

		pass


	def index(self, value, start=None, stop=None): # real signature unknown; restored from __doc__

		"""

		L.index(value, [start, [stop]]) -> integer -- return first index of value.

		Raises ValueError if the value is not present.

		"""

		return 0


	def insert(self, index, p_object): # real signature unknown; restored from __doc__

		""" L.insert(index, object) -- insert object before index """

		pass


	def pop(self, index=None): # real signature unknown; restored from __doc__

		"""

		L.pop([index]) -> item -- remove and return item at index (default last).

		Raises IndexError if list is empty or index is out of range.

		"""

		pass


	def remove(self, value): # real signature unknown; restored from __doc__

		"""

		L.remove(value) -> None -- remove first occurrence of value.

		Raises ValueError if the value is not present.

		"""

		pass


	def reverse(self): # real signature unknown; restored from __doc__

		""" L.reverse() -- reverse [i]IN PLACE[/i] """

		pass


	def sort(self, key=None, reverse=False): # real signature unknown; restored from __doc__

		""" L.sort(key=None, reverse=False) -> None -- stable sort [i]IN PLACE[/i] """

		pass
13、列表的遍历
在Python中常用循环对象来遍历列表,在这里for循环自动调用next()方法,将该方法的返回值赋予给循环对象i。循环检测到StopIteration的时候才结束。相对于序列,用循环对象的好处在于:不用在循环还没有开始的时候,就生成好要使用的元素。所使用的元素可以在循环过程中逐次生成。这样,节省了空间,提高了效率,编程更灵活。
#!/usr/bin/env python3

# _[i]_coding:utf-8_[/i]_

# Author: Lucky.chen


jobs = ['UI', 'UE', 'PM', 'OPS', 'OPS', 'DEV', 'DBA', '3', '2', '1', '&', '#']


for i in jobs:

    print(i)  # 自动调用迭代器,自动检测StopIteration


# 在上面的程序中,无法知道当前访问元素的索引,于是有如下代码:

for i in range(len(jobs)):

    print(jobs[i])


# 同时需要索引,又结合迭代器,就可以采用内置的enumerate函数,代码如下:

for index, i in enumerate(jobs):

    print(index, i)[/i]
扩展:(表推导方法)
表推导(list comprehension)是快速生成列表的方法。它的语法简单,很有实用价值。
[i]L = [x**2 for x in range(10)]

print(L)


Result:

[0, 1, 4, 9, 16, 25, 36, 49, 64, 81][/i]
zip函数
如果你多个等长的序列,然后想要每次循环时从各个序列分别取出一个元素,可以利用zip()方便地实现:
[i]t1 = [1, 2, 3]

t2 = [9, 8, 7]

t3 = ['a', 'b', 'c']

for (a, b, c) in zip(t1, t2, t3):

    print(a, b, c)


Result:

1 9 a

2 8 b

3 7 c[/i]
每次循环时,从各个序列分别从左到右取出一个元素,合并成一个tuple,然后tuple的元素赋予给a,b,c
[i]#!/usr/bin/env python3

# _[i]_coding:utf-8_[/i]_

# Author: Lucky.chen


ShopName = ['iphone', 'MacPro', 'iWatch']

money = [5500, 12000, 3800]


Car =

for it in zip(ShopName, money):

    Car.append(it)

print(Car)


Result:

[('iphone', 5500), ('MacPro', 12000), ('iWatch', 3800)][/i]
元组
元组其实跟列表差不多,也是存一组数,只不是它一旦创建,便不能再修改,所以又叫只读列表,用小括号()表示。
元组创建:
>>> tup1 = () # 创建空元组元组与字符串类似,下标索引从0开始,可以进行截取,组合等。[/quote]
[quote]>> tup2 = ('DEV', 'DBA', 1, 2, 3) # 中括号方式
>>> tup3 = "x", "y", "z" # 字符串排列方式
>>>
# 元组中只包含一个元素时,需要在元素后面添加逗号
>>> tup4 = ('openskill')
>>> print(tup4)
openskill
>>> tup5 = ('openskill.cn',)
>>> print(tup5)
('openskill.cn',)
访问元组
元组可以使用下标索引来访问元组中的值,如下实例:
#!/usr/bin/env python3Result:
# _[i]_coding:utf-8_[/i]_
# Author: Lucky.chen
tup1 = ('Python', 'PHP', 1989, 1994)
tup2 = (1, 2, 3, 4, 5, 6, 7 )
print("tup1[0]: ", tup1[0])
print("tup2[1:5]: ", tup2[1:5])
tup1[0]:  Python

tup2[1:5]:  (2, 3, 4, 5)
修改元组
元组中的元素值是不允许修改的,但我们可以对元组进行连接组合,如下实例:
#!/usr/bin/env python3Resutl:
# _[i]_coding:utf-8_[/i]_
# Author: Lucky.chen
tup1 = (200000, 400000)
tup2 = ('MG', 'JD')
# 以下修改元组元素操作是非法的。
# tup1[0] = 100;
# 创建一个新的元组
tup3 = tup1 + tup2
print(tup3)
[/code]
删除元组
元组中的元素值是不允许删除的,但我们可以使用del语句来删除整个元组,如下实例:
#!/usr/bin/env python3以上实例元组被删除后,输出变量会有异常信息,输出如下所示:
# _[i]_coding:utf-8_[/i]_
# Author: Lucky.chen
tup = ('dog', 'cat', 3000, 2000)
print(tup)
del tup
print("After deleting tup : ")
print(tup)
After deleting tup :
Traceback (most recent call last):
File "/Users/crh/PycharmProjects/s14/day3/qixi.py", line 10, in
print(tup)
NameError: name 'tup' is not defined[/code]
元组运算符
与字符串一样,元组之间可以使用 + 号和 * 号进行运算。这就意味着他们可以组合和复制,运算后会生成一个新的元组。
元组索引,截取
因为元组也是一个序列,所以我们可以访问元组中的指定位置的元素,也可以截取索引中的一段元素,如下所示:
L = ('spam', 'Spam', 'SPAM!')
无关闭分隔符
任意无符号的对象,以逗号隔开,默认为元组,如下实例:
#!/usr/bin/env python3以上实例运行结果:
# _[i]_coding:utf-8_[/i]_
# Author: Lucky.chen
print('abc', -4.24e93, 18+6.6j, 'xyz')
x, y = 1, 2
print("Value of x , y : ", x, y)
abc -4.24e+93 (18+6.6j) xyz

Value of x , y :  1 2
元组内置方法
a = (1, 2, 3, 4, 3, 2, 1, 4)


print(a.count(2))    # count方法统计元素的个数

print(a.index(2))    # index检索元素的下标,默认是第一个元素

print(a.index(2, 4, 6))  # 可以指定下标范围来检索
系统内置函数
Python元组包含了以下内置函数
字典
字典是另一种可变容器模型,且可存储任意类型对象。
字典的每个键值(key=>value)对用冒号(:)分割,每个对之间用逗号(,)分割,整个字典包括在花括号({})中 ,使用就像我们上学用的字典,通过笔划、字母来查对应页的详细内容,格式如下所示:
d = {key1 : value1, key2 : value2 }字典的特性:- []dict是无序的[/][]key必须是唯一的,天生去重[/]
元素添加
>>> d = {'name': 'lucky', 'job': 'IT', 'gender': 'man'}

[quote]>> d['address'] = 'BJ'

>>> print(d)

{'gender': 'man', 'job': 'IT', 'name': 'lucky', 'address': 'BJ'}
元素修改
>>> d = {'gender': 'man', 'job': 'IT', 'name': 'lucky', 'address': 'BJ'}

>>> d['address'] = 'SH'

>>> print(d)

{'gender': 'man', 'job': 'IT', 'name': 'lucky', 'address': 'SH'}[/quote]


# 把北京修改为上海
元素删除
>>> d = {'gender': 'man', 'job': 'IT', 'name': 'lucky', 'address': 'BJ'}

[quote]>> d.pop('gender')    # 标准删除一个,如果元素不存在会报错

'man'

>>> print(d)

{'job': 'IT', 'name': 'lucky', 'address': 'BJ'}

>>>

>>> del d['job']     # 内置函数删除,如果元素不存在会报错

>>> print(d)

{'name': 'lucky', 'address': 'BJ'}

>>>

>>> d.popitem()   # 随机删除,如果字典为空报错

('name', 'lucky')

>>> print(d)

{'address': 'BJ'}

>>> del d   # 删除整个字典
元素查找
>>> info = {'gender': 'man', 'job': 'IT', 'name': 'lucky', 'address': 'BJ'}

>>> 'job' in info    # 判断元素是否在字典中

True

>>> info.get('job')  # 获取

'IT'

>>> info['name']     # 跟列表获取index一样

'lucky'

>>> info['phone']    # 如果不存在的key会报错

Traceback (most recent call last):

	File "", line 1, in

KeyError: 'phone'

>>> info.get('phone') # get方法则不会

>>> if 'job' in info: info.get('job')  # 标准获取方法

...

'IT'
多级字典嵌套
#!/usr/bin/env python3

# _[i]_coding:utf-8_[/i]_

# Author: Lucky.chen[/quote]


av_catalog = {

    "欧美": {

        "www.youporn.com": ["很多免费的,世界最大的","质量一般"],

        "www.youjizz.com": ["都是免费的,挺多", "质量还不错"],

        "www.pornhub.com": ["很多免费的,也很大","质量比yourporn高点"],

        "letmedothistoyou.com": ["多是自拍,高质量图片很多","资源不多,更新慢"],

        "x-art.com": ["质量很高,真的很高","全部收费,屌比请绕过"]

    },

    "日韩": {

        "tokyo-hot":["质量怎样不清楚,个人已经不喜欢日韩范了","听说是收费的"]

    },

    "大陆": {

        "1024": ["全部免费,真好,好人一生平安","服务器在国外,慢"],

        "720lu": ["很多免费的,小众", "访问速度还行"]

    }

}


# 嵌套逻辑就是 AV层---->国家层---->网站层---->说明层(列表)

# 一切皆可嵌套


av_catalog["大陆"]["1024"][1] += ",可以用爬虫爬下来"

print(av_catalog["大陆"]["1024"])


# 执行结果

['全部免费,真好,好人一生平安', '服务器在国外,慢,可以用爬虫爬下来']
其他方法
>>> info = {'gender': 'man', 'job': 'IT', 'name': 'lucky', 'address': 'BJ'}

[quote]>> info.clear()   # 清空字典

>>> print(info)

{}

>>> info = {'gender': 'man', 'job': 'IT', 'name': 'lucky', 'address': 'BJ'}

>>> cinfo = info.copy()  # 字典浅copy

>>> print(info, cinfo)

({'gender': 'man', 'job': 'IT', 'name': 'lucky', 'address': 'BJ'}, {'gender': 'man', 'job': 'IT', 'name': 'lucky', 'address': 'BJ'})

>>> print(info)

{'gender': 'man', 'job': 'IT', 'name': 'lucky', 'address': 'BJ'}

>>> print(cinfo)

{'gender': 'man', 'job': 'IT', 'name': 'lucky', 'address': 'BJ'}

>>> info = {'gender': 'man', 'job': 'IT', 'name': 'lucky', 'address': ['BJ', 'SH']}

>>> cinfo = info.copy()

>>> info['address'][1] = 'TJ'

>>> print(info)

{'gender': 'man', 'job': 'IT', 'name': 'lucky', 'address': ['BJ', 'TJ']}

>>> print(cinfo)

{'gender': 'man', 'job': 'IT', 'name': 'lucky', 'address': ['BJ', 'TJ']}

>>> info['address'] = 'BJ'

>>> print(cinfo)

{'gender': 'man', 'job': 'IT', 'name': 'lucky', 'address': ['BJ', 'TJ']}

>>> print(info)

{'gender': 'man', 'job': 'IT', 'name': 'lucky', 'address': 'BJ'}

>>>

>>> dict.fromkeys([1,2,3],'testd')    # 通过一个列表生成默认dict,有个没办法解释的坑,少用吧这个

{1: 'testd', 2: 'testd', 3: 'testd'}

>>> info.items() # 把key和value 编程一个元组放到列表中

[('gender', 'man'), ('job', 'IT'), ('name', 'lucky'), ('address', 'BJ')]

>>> info.keys()  # 获取所有的key

['gender', 'job', 'name', 'address']

>>>

>>> info.setdefault('wage', '2000') # 添加一个元素,如果存在则不添加

'2000'

>>> info

{'wage': '2000', 'gender': 'man', 'job': 'IT', 'name': 'lucky', 'address': 'BJ'}

>>> info.setdefault('gender', 'woman')

'man'

>>> info

{'wage': '2000', 'gender': 'man', 'job': 'IT', 'name': 'lucky', 'address': 'BJ'}

>>> info.values() # 获取所有的value

['2000', 'man', 'IT', 'lucky', 'BJ']

>>> db = {'db': 'mysql', 'job': 'IT'}

>>> info.update(db)  # 更新字典,相当于合并,但是相同的key的不会合并过来

>>> info

{'wage': '2000', 'job': 'IT', 'name': 'lucky', 'address': 'BJ', 'gender': 'man', 'db': 'mysql'}所有方法说明如下:class dict(object):
"""
dict() -> new empty dictionary
dict(mapping) -> new dictionary initialized from a mapping object's
(key, value) pairs
dict(iterable) -> new dictionary initialized as if via:
d = {}
for k, v in iterable:
d[k] = v
dict(**kwargs) -> new dictionary initialized with the name=value pairs
in the keyword argument list. For example: dict(one=1, two=2)
"""
def clear(self): # real signature unknown; restored from __doc__
""" D.clear() -> None. Remove all items from D. """
pass[/quote]
def copy(self): # real signature unknown; restored from __doc__
""" D.copy() -> a shallow copy of D """
pass
@staticmethod # known case
def fromkeys([i]args, [/i]*kwargs): # real signature unknown
""" Returns a new dict with keys from iterable and values equal to value. """
pass
def get(self, k, d=None): # real signature unknown; restored from __doc__
""" D.get(k[,d]) -> D[k] if k in D, else d. d defaults to None. """
pass
def items(self): # real signature unknown; restored from __doc__
""" D.items() -> a set-like object providing a view on D's items """
pass
def keys(self): # real signature unknown; restored from __doc__
""" D.keys() -> a set-like object providing a view on D's keys """
pass
def pop(self, k, d=None): # real signature unknown; restored from __doc__
"""
D.pop(k[,d]) -> v, remove specified key and return the corresponding value.
If key is not found, d is returned if given, otherwise KeyError is raised
"""
pass
def popitem(self): # real signature unknown; restored from __doc__
"""
D.popitem() -> (k, v), remove and return some (key, value) pair as a
2-tuple; but raise KeyError if D is empty.
"""
pass
def setdefault(self, k, d=None): # real signature unknown; restored from __doc__
""" D.setdefault(k[,d]) -> D.get(k,d), also set D[k]=d if k not in D """
pass
def update(self, E=None, **F): # known special case of dict.update
"""
D.update([E, ]**F) -> None. Update D from dict/iterable E and F.
If E is present and has a .keys() method, then does: for k in E: D[k] = E[k]
If E is present and lacks a .keys() method, then does: for k, v in E: D[k] = v
In either case, this is followed by: for k in F: D[k] = F[k]
"""
pass
def values(self): # real signature unknown; restored from __doc__
""" D.values() -> an object providing a view on D's values """
pass
字典的遍历
#方法1

for key in info:

    print(key,info[key])


#方法2

for k,v in info.items(): #会先把dict转成list,数据里大时莫用

    print(k,v)
未完待续,下面介绍set集合。。。。。。。。
Python菜鸟之路基础篇(二)
空心菜 发表了文章 0 个评论 2568 次浏览 2016-08-05 10:19
简单模块初识
很多人都说Python的扩展性很强,有很多第三方的类库,那这些类库到底怎么使用呢,其实在Python语言中不管是内置的类库和其他开发扩展的类库,在Python中我们习惯把它叫做「模块」。那模块该怎么用呢?不着急下面我们简单介绍几个常用的内库「内裤吗?」。
1、sys (系统内裤)
#!/usr/bin/env python3Result:
# _[i]_coding:utf-8_[/i]_
# Author: Lucky.chen
import sys
# Python全局环境变量路径
print(sys.path)
# 打印传递给脚本的第二个参数
print(sys.argv[2])
['/Users/crh/PycharmProjects/app', '/usr/local/Cellar/python3/3.5.1/Frameworks/Python.framework/Versions/3.5/lib/python35.zip', '/usr/local/Cellar/python3/3.5.1/Frameworks/Python.framework/Versions/3.5/lib/python3.5', '/usr/local/Cellar/python3/3.5.1/Frameworks/Python.framework/Versions/3.5/lib/python3.5/plat-darwin', '/usr/local/Cellar/python3/3.5.1/Frameworks/Python.framework/Versions/3.5/lib/python3.5/lib-dynload', '/usr/local/lib/python3.5/site-packages']说明一下Python的环境变量,比如我们导入一个模块它先到你本路径找有没有,然后回到Python的环境路径下再去找,一般扩展的模块安装后都会在site-packages的路径下。
2
2、os(系统内裤)
#!/usr/bin/env python3Result:
# _[i]_coding:utf-8_[/i]_
# Author: Lucky.chen
import os
# 调用系统命令
os.system("df -h")
Filesystem      Size   Used  Avail Capacity  iused    ifree %iused  Mounted on

/dev/disk1     233Gi   80Gi  153Gi    35% 20947137 40038205   34%   /

devfs          181Ki  181Ki    0Bi   100%      626        0  100%   /dev

map -hosts       0Bi    0Bi    0Bi   100%        0        0  100%   /net

map auto_home    0Bi    0Bi    0Bi   100%        0        0  100%   /home
3、sys、os结合玩一玩:
#!/usr/bin/env python3

# _[i]_coding:utf-8_[/i]_

# Author: Lucky.chen


import os

import sys


# 把用户传入的参数当做命令执行

os.system(''.join(sys.argv[1:]))
4、自己编写简单模块
Python tab补全模块:
Linux版本:
#!/usr/bin/env python3Mac版:
# python startup file
import sys
import readline
import rlcompleter
import atexit
import os
# tab completion
readline.parse_and_bind('tab: complete')
# history file
histfile = os.path.join(os.environ['HOME'], '.pythonhistory')
try:
readline.read_history_file(histfile)
except IOError:
pass
atexit.register(readline.write_history_file, histfile)
del os, histfile, readline, rlcompleter
# linux and python3 on mac写完保存后就可以导入使用:
import sys
import readline
import rlcompleter
if sys.platform == 'darwin' and sys.version_info[0] == 2:
readline.parse_and_bind("bind ^I rl_complete")
else:
readline.parse_and_bind("tab: complete")
>>> import tab你会发现,上面自己写的tab.py模块只能在当前目录下导入,如果想在系统的何何一个地方都使用怎么办呢? 此时你就要把这个tab.py放到python全局环境变量目录里啦,基本一般都放在一个叫 site-packages 目录下,这个目录在不同的OS里放的位置不一样,用 print(sys.path) 可以查看python环境变量列表。
[quote]>> import os
>>> os.
Display all 234 possibilities? (y or n)
>>> os.sy
os.symlink( os.sys os.sysconf( os.sysconf_names os.system(
>>> os.sy
os.symlink( os.sys os.sysconf( os.sysconf_names os.system(
>>> os.sy
基础数据类型认识
A、数字
2 是一个整数的例子。数学中表示复数的虚数是n,而Python中跟大数据计算一样统一用的是j。
长整数 不过是大一些的整数。
3.23和52.3E-4是浮点数的例子。E标记表示10的幂。在这里,52.3E-4表示52.3 * 10-4。
(-5+4j)和(2.3-4.6j)是复数的例子,其中-5,4为实数,j为虚数,数学中表示复数是什么?。
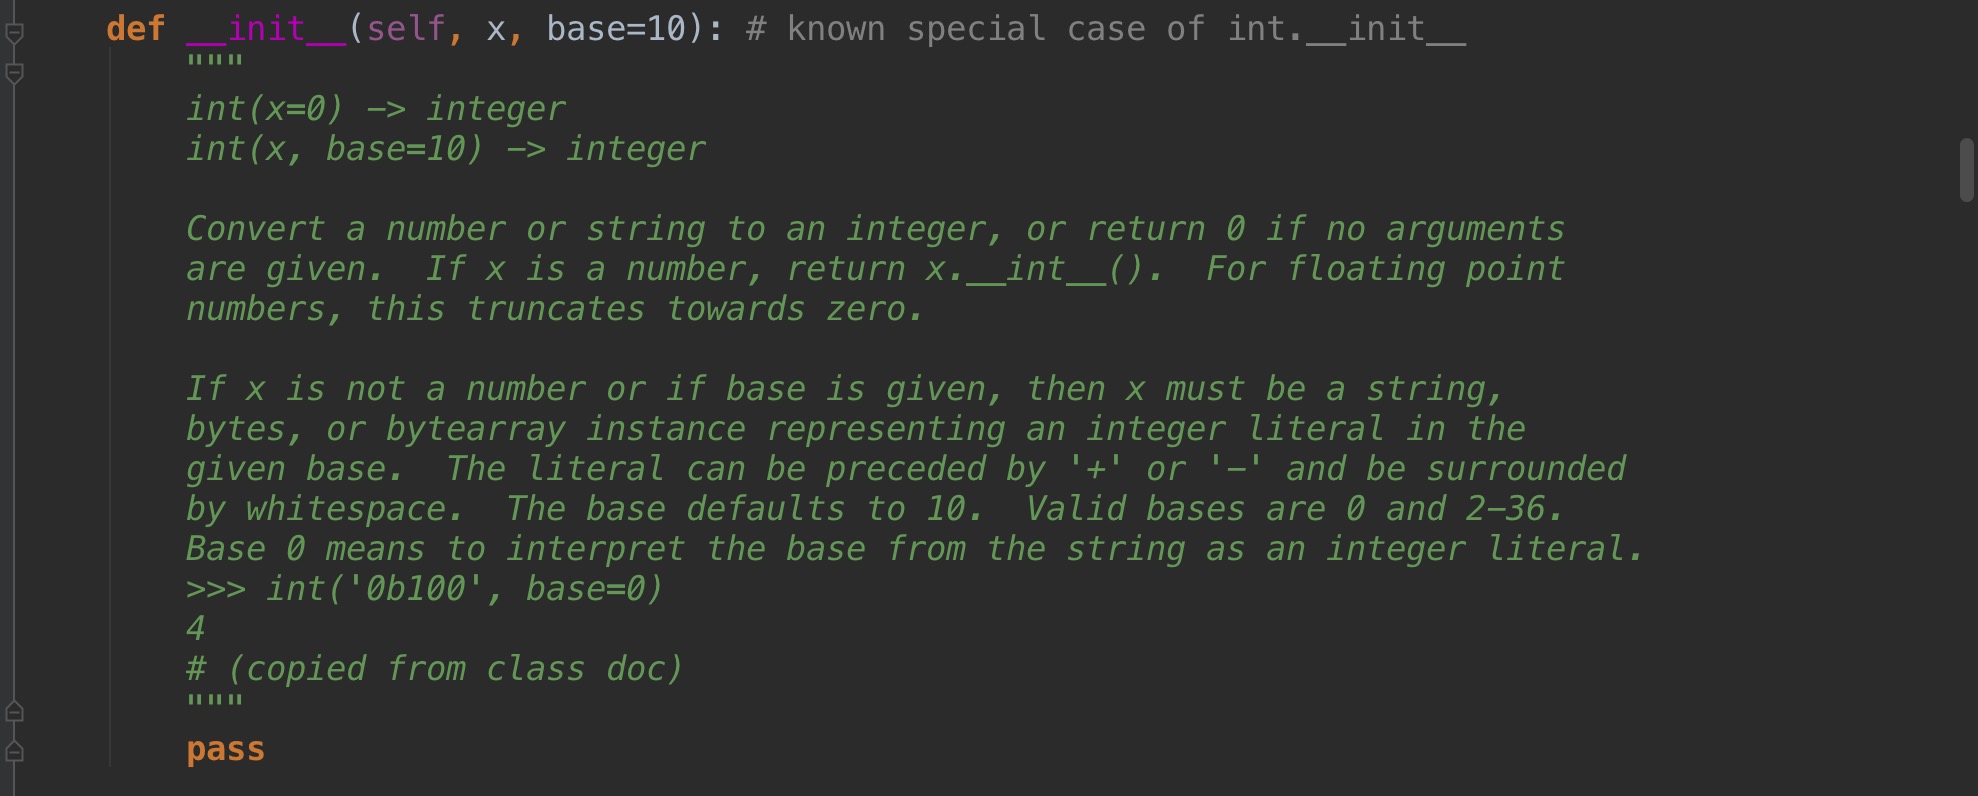
1、int(整型)
在32位机器上,整数的位数为32位,取值范围为-2[b]31~2[/b]31-1,即-2147483648~2147483647
在64位系统上,整数的位数为64位,取值范围为-2[b]63~2[/b]63-1,即-9223372036854775808~9223372036854775807所以不同的操作系统中数据的长度是有限制范围的,就好像32位系统最多支持4GB内存一样。
在我们里面12、34、56、100000等都是整型。
#!/usr/bin/env python3其他具体功能可以查看帮助:
# _[i]_coding:utf-8_[/i]_
# Author: Lucky.chen[/quote]
a = '3'
print(type(a))
b = int(a)
print(type(a))
2、long(长整型)
跟C语言不同,Python的长整数没有指定位宽,即:Python没有限制长整数数值的大小,但实际上由于机器内存有限,我们使用的长整数数值不可能无限大。
注意,自从Python2.2起,如果整数发生溢出,Python会自动将整数数据转换为长整数,所以如今在长整数数据后面不加字母L也不会导致严重后果了。如:9223372036854775808、922337203685477580800 默认在Python2版本里面超过263 就是长整型,而Python3.中都是整型。
>>> print(type(2[/b]63))[b]3、float(浮点型)
[quote]>> print(type(2**62))
浮点数用来处理实数,即带有小数的数字。类似于C语言中的double类型,占8个字节(64位),其中52位表示底,11位表示指数,剩下的一位表示符号。例如:1.2 、0.98、100.38 都是浮点类型
#!/usr/bin/env python3

# _[i]_coding:utf-8_[/i]_

# Author: Lucky.chen[/quote]


a = 3

print(type(a))


b = float(a)


print(type(b), b)
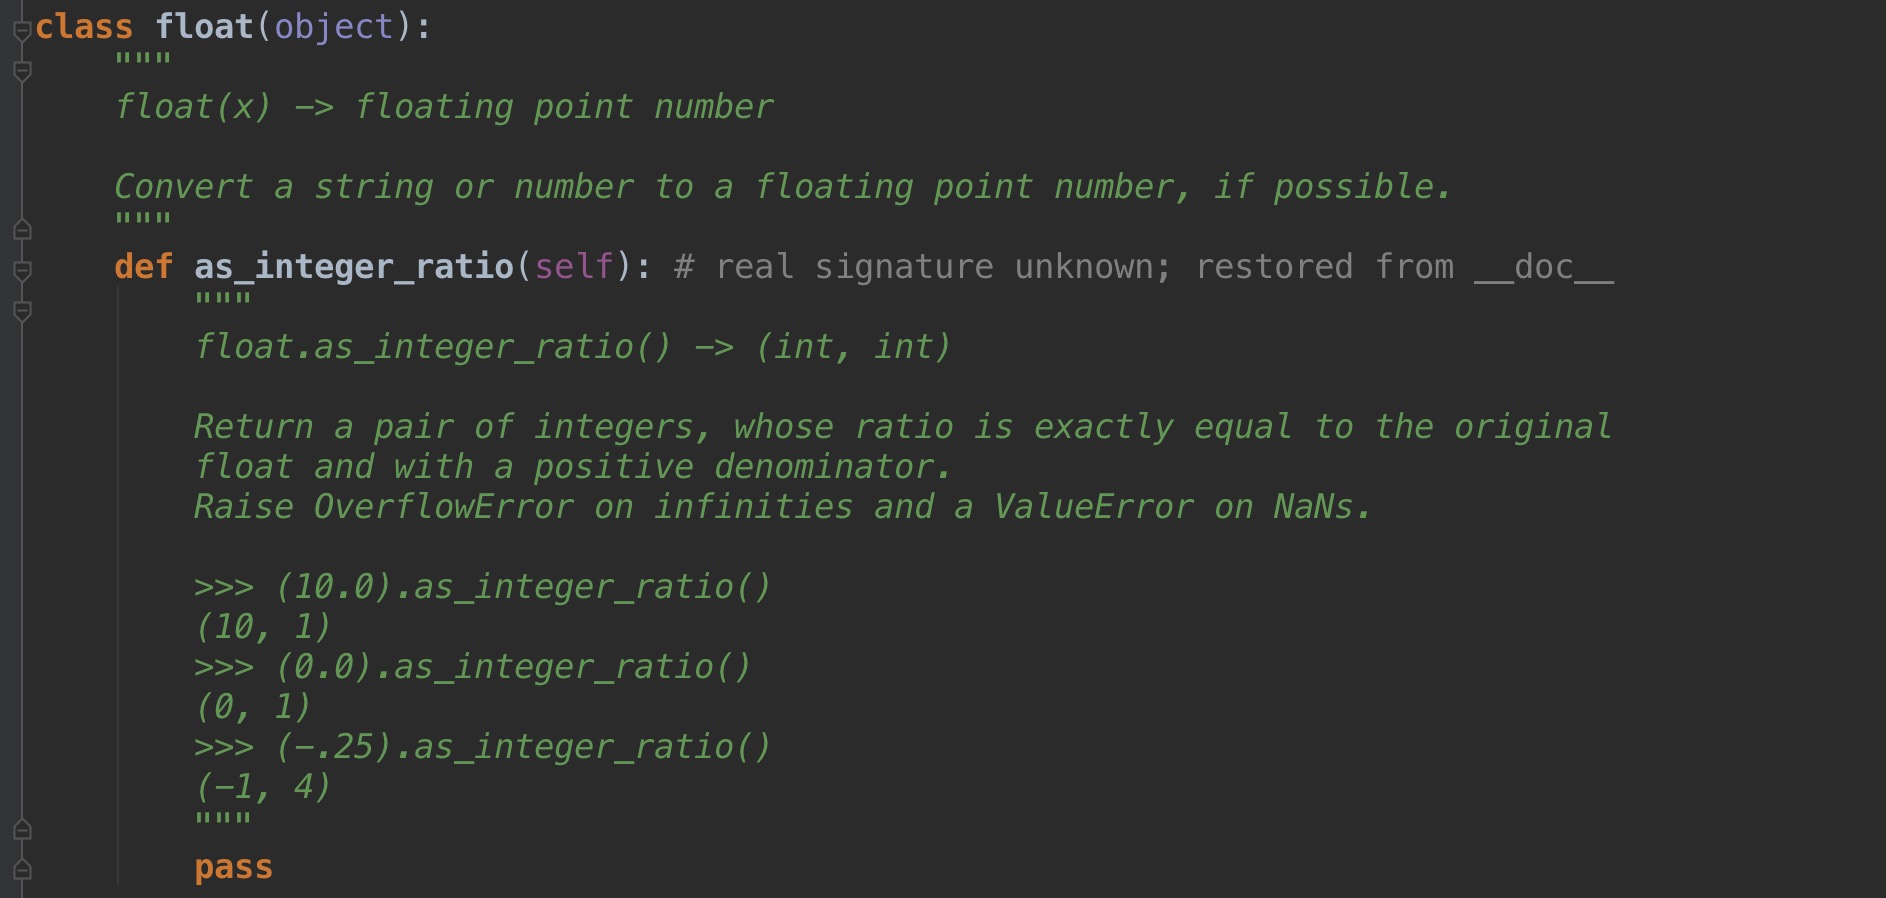
具体更多功能查看帮助:
3.0
4、complex(复数)
复数由实数部分和虚数部分组成,一般形式为x+yj,其中的x是复数的实数部分,y是复数的虚数部分,这里的x和y都是实数。注:Python中存在小数字池:-5 ~ 257
比如:1+2j,3+6j等都是复数
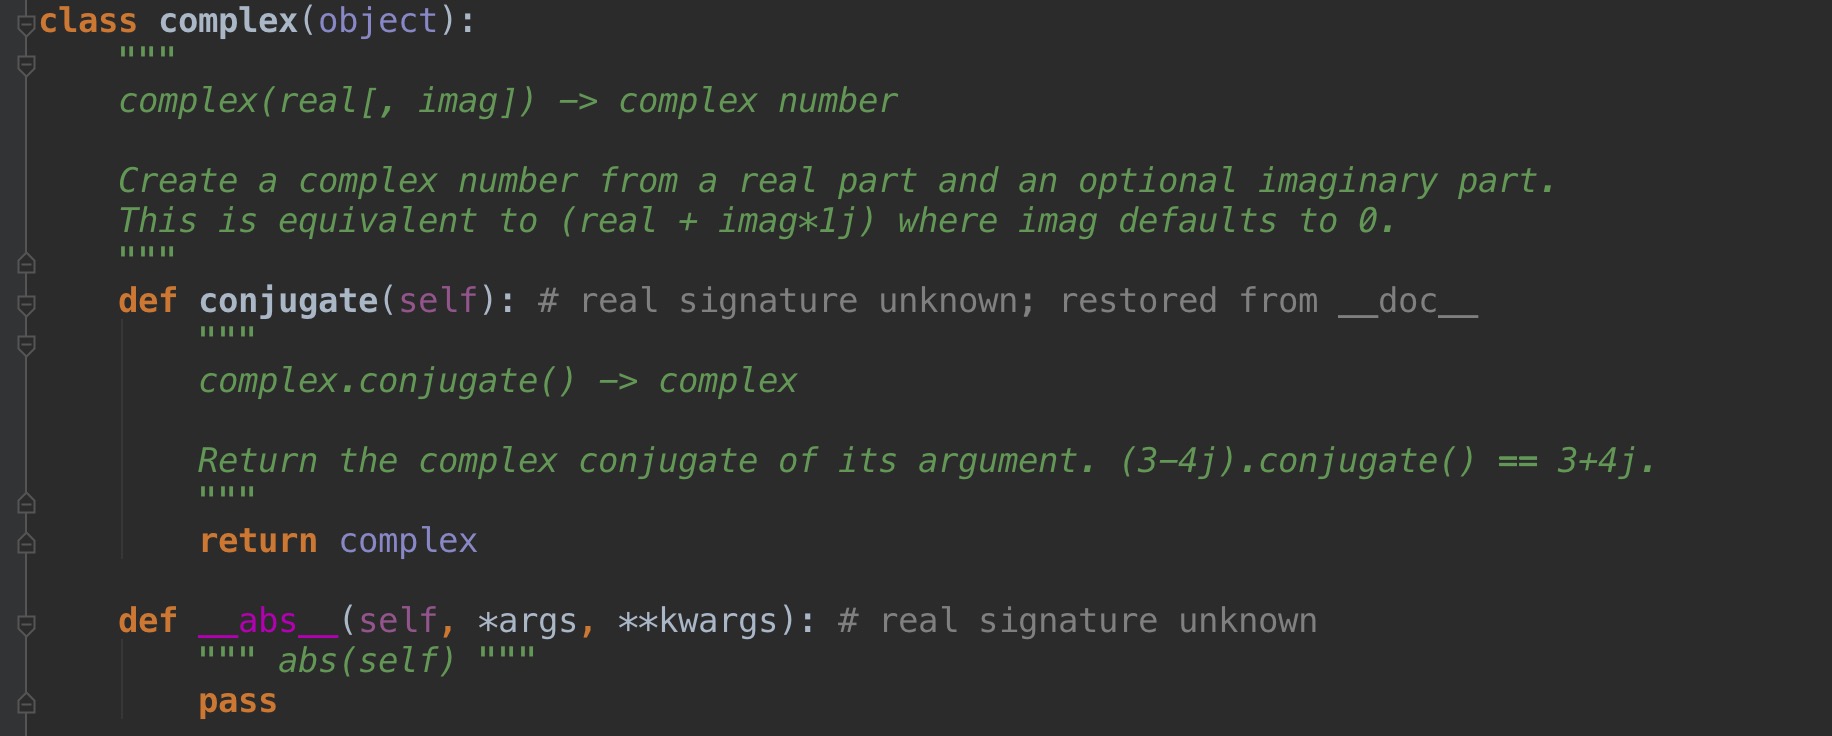
#!/usr/bin/env python3具体更多功能查看帮助:
# _[i]_coding:utf-8_[/i]_
# Author: Lucky.chen
a = (3-4j).conjugate()
print(a)
print(type(a))
# 结果
(3+4j)
B、布尔值
在Python的世界里面有一个叫布尔值的东西,其实就是 真或假 1 或 0,简单点就是True和False。

在其他的配置或者语言里面,我们都知道把某个东西打开需要把他调试为True,关闭则设置为False。

在Python里面也是一样True就代表为真,条件成立;False就代表为假,条件不成立;1代表为真,0

代表假。
#!/usr/bin/env python3

# _[i]_coding:utf-8_[/i]_

# Author: Lucky.chen


a, b = 1, 0


if a:

    print("a is True")

else:

    print("a is False")


if b:

    print("b is True")

else:

    print("b is False")


# 结果

a is True

b is False
C、字符串
1、拼接
在之前的文章http://openskill.cn/article/415 里已经介绍过了字符串拼接的方法如:+ % format函数等。
Python中的字符串在C语言中体现为是一个字符数组,每次创建字符串时候需要在内存中开辟一块连续的空,并且一旦需要修改字符串的话,就需要再次开辟空间,万恶的+号每出现一次就会在内从中重新开辟一块空间。所以最好不要用+比较好
name = "lucky"PS: 字符串是 %s;整数 %d;浮点数%f
print "i am %s " % name
#输出: i am lucky
2、字符串常用功能介绍
移除空白:
rstrip 去掉右边的空格以及tab制表符
def rstrip(self, [i]args, [/i]*kwargs): # real signature unknown

        """

        Strip trailing bytes contained in the argument.


        If the argument is omitted or None, strip trailing ASCII whitespace.

        """

        pass
msg = " my name is lucky "lstrip 去掉左边的空格以及tab制表符
print("[i][b][/i]" + msg.lstrip() + "[/b]*")
Result:
[i][b][/i] my name is lucky[/b]*
def lstrip(self, chars=None): # real signature unknown; restored from __doc__

        """

        S.lstrip([chars]) -> str


        Return a copy of the string S with leading whitespace removed.

        If chars is given and not None, remove characters in chars instead.

        """

        return ""
msg = " my name is lucky "strip 去除字符串两边的空格和换行
info = " game is\tlol\tover!"
print("[b][i]" + msg.lstrip() + "[/b][/i]")
print("[b][i]" + info.lstrip() + "[/b][/i]")
Result:
[b][i]my name is lucky [/b][/i]
[b][i]game is lol over![/b][/i]
def strip(self, chars=None): # real signature unknown; restored from __doc__

        """

        S.strip([chars]) -> str


        Return a copy of the string S with leading and trailing

        whitespace removed.

        If chars is given and not None, remove characters in chars instead.

        """

        return ""
msg = "  ox\nB  "


print("[b][i]" + msg.strip() + "[/b][/i]")


Result:

***ox

B***
分割:
splitlines 使用回车符进行字符串分片,最后得到一个列表
def splitlines(self, keepends=None): # real signature unknown; restored from __doc__

        """

        S.splitlines([keepends]) -> list of strings


        Return a list of the lines in S, breaking at line boundaries.

        Line breaks are not included in the resulting list unless keepends

        is given and true.

        """

        return
msg = "niu\nbai"rsplit 是从右开始切片,当不指定从哪个分隔符数开始,默认和split没有区别,但是指定了从第几个分隔符之后,就会有所不同了
print(msg.splitlines())
Result:
['niu', 'bai']
def rsplit(self, sep=None, maxsplit=-1): # real signature unknown; restored from __doc__

        """

        S.rsplit(sep=None, maxsplit=-1) -> list of strings


        Return a list of the words in S, using sep as the

        delimiter string, starting at the end of the string and

        working to the front.  If maxsplit is given, at most maxsplit

        splits are done. If sep is not specified, any whitespace string

        is a separator.

        """

        return
msg = "wo is wo wo tou wo is wo is lucky"split 使用指定分隔符对字符串进行分割,最后得到一个列表
print(msg.rsplit('wo', 2))
Result:
['wo is wo wo tou ', ' is ', ' is lucky']
从0开始数,到第二个wo之后开始分隔。
def split(self, sep=None, maxsplit=-1): # real signature unknown; restored from __doc__

        """

        S.split(sep=None, maxsplit=-1) -> list of strings


        Return a list of the words in S, using sep as the

        delimiter string.  If maxsplit is given, at most maxsplit

        splits are done. If sep is not specified or is None, any

        whitespace string is a separator and empty strings are

        removed from the result.

        """

        return
msg = "1a2a3a4a5"

print(msg.split('a'))


Result:

['1', '2', '3', '4', '5']
长度:
ljust 打印固定长度的字符串,如果不够在字符串的右边补全指定字符达到制定长度
def ljust(self, width, fillchar=None): # real signature unknown; restored from __doc__

        """

        S.ljust(width[, fillchar]) -> str


        Return S left-justified in a Unicode string of length width. Padding is

        done using the specified fill character (default is a space).

        """

        return ""
msg = "lucky"rjust 打印固定长度的字符串,如果不够在字符串的左边补充指定字符
print(msg.ljust(30, 'G'))
Result:
luckyGGGGGGGGGGGGGGGGGGGGGGGGG
def rjust(self, width, fillchar=None): # real signature unknown; restored from __doc__

        """

        S.rjust(width[, fillchar]) -> str


        Return S right-justified in a string of length width. Padding is

        done using the specified fill character (default is a space).

        """

        return ""
msg = "lucky"zfill 打印指定长度字符串,不够的使用0在左边补全
print(msg.rjust(30, 'G'))
Result:
GGGGGGGGGGGGGGGGGGGGGGGGGlucky
def zfill(self, width): # real signature unknown; restored from __doc__

        """

        S.zfill(width) -> str


        Pad a numeric string S with zeros on the left, to fill a field

        of the specified width. The string S is never truncated.

        """

        return ""
msg = "lucky"

print(msg.zfill(30))


Result:

0000000000000000000000000lucky
索引:
find 查找一个字符或字符组合在一个字符串中的索引位置,索引位置从0开始,而且找到了第一个就不会往下找了,字符串可以根据索引进行切片
def find(self, sub, start=None, end=None): # real signature unknown; restored from __doc__

        """

        S.find(sub[, start[, end]]) -> int


        Return the lowest index in S where substring sub is found,

        such that sub is contained within S[start:end].  Optional

        arguments start and end are interpreted as in slice notation.


        Return -1 on failure.

        """

        return 0
msg = "lucky.chen@126.com"

print(msg.find('c'))

print("[i]" [/i] 20)

print(msg.find('c', 3, 10))

print("[i]" [/i] 20)

print(msg.find('c', 8, 19))


Result:

2

********************

6

********************

15
index 返回某个字符在字符串中的下标
def index(self, sub, start=None, end=None): # real signature unknown; restored from __doc__

        """

        S.index(sub[, start[, end]]) -> int


        Like S.find() but raise ValueError when the substring is not found.

        """

        return 0
name = 'lucky'rfind 查找一个字符串中某个字符所在的索引,如果这个字符串中有多个这个字符,那么会找到最右边的那个字符
print(name.index('u'))
print(name.index('c', 0, 4))
Result:
1
2
def rfind(self, sub, start=None, end=None): # real signature unknown; restored from __doc__

        """

        S.rfind(sub[, start[, end]]) -> int


        Return the highest index in S where substring sub is found,

        such that sub is contained within S[start:end].  Optional

        arguments start and end are interpreted as in slice notation.


        Return -1 on failure.

        """

        return 0
msg = "lucky.chen@126.com"

print(msg.rfind('c'))

print("[i]" [/i] 10)

print(msg.rfind('c', 1, 6))


if msg.rfind('c', 22, 23) == -1:

    print("failure")

else:

    print("OK")


Result:

15

**********

2

failure
rindex 跟rfind差不多
def rindex(self, sub, start=None, end=None): # real signature unknown; restored from __doc__

        """

        S.rindex(sub[, start[, end]]) -> int


        Like S.rfind() but raise ValueError when the substring is not found.

        """

        return 0
msg = "lucky.chen@126.com"

print(msg.rindex('c'))

print("[i]" [/i] 10)

print(msg.rindex('c', 1, 6))


Result:

15

**********

2
大小写:
capitalize 大写字符串首字母
def capitalize(self): # real signature unknown; restored from __doc__

        """

        S.capitalize() -> str


        Return a capitalized version of S, i.e. make the first character

        have upper case and the rest lower case.

        """

        return ""
msg = "lol"islower 判断字符串是不是不包含大写,返回是布尔值
print(msg.capitalize())
Result:
Lol
def islower(self): # real signature unknown; restored from __doc__

        """

        S.islower() -> bool


        Return True if all cased characters in S are lowercase and there is

        at least one cased character in S, False otherwise.

        """

        return False
msg = "lol"istitle 判断一个字符串是否为title,字符串首字母大写就为title,返回时布尔值
print(msg.islower())
print("[i]" [/i] 10)
msg = "Wo I Lol"
print(msg.islower())
Result:
True
**********
False
def istitle(self): # real signature unknown; restored from __doc__

        """

        S.istitle() -> bool


        Return True if S is a titlecased string and there is at least one

        character in S, i.e. upper- and titlecase characters may only

        follow uncased characters and lowercase characters only cased ones.

        Return False otherwise.

        """

        return False
msg = "lol"isupper 判断字符串是否为全部大写,返回布尔值
print(msg.istitle())
print("[i]" [/i] 10)
msg = "Wo I Lol"
print(msg.istitle())
Result:
False
**********
True
def isupper(self): # real signature unknown; restored from __doc__

        """

        S.isupper() -> bool


        Return True if all cased characters in S are uppercase and there is

        at least one cased character in S, False otherwise.

        """

        return False
msg = "12lol"upper 把字符串都变换为大写
print(msg.isupper())
print("[i]" [/i] 10)
msg = "Wo I Lol"
print(msg.isupper())
print("[i]" [/i] 10)
msg = "12WINE"
print(msg.isupper())
Result:
False
**********
False
**********
True
def upper(self): # real signature unknown; restored from __doc__

        """

        S.upper() -> str


        Return a copy of S converted to uppercase.

        """

        return ""
msg = "12lol"lower 把所有的字符串都变为小写
print(msg.upper())
msg = " Lucky is Good! "
print("[size=16]#" + msg.upper() + "[/size]#")
Result:
12LOL
[size=16]# LUCKY IS GOOD! [/size]#
def lower(self): # real signature unknown; restored from __doc__

        """

        S.lower() -> str


        Return a copy of the string S converted to lowercase.

        """

        return ""
msg = "12lol"swapcase 大小写互换
print(msg.lower())
msg = " Lucky is Good! "
print("[size=16]#" + msg.lower() + "[/size]#")
Result:
12lol
[size=16]# lucky is good! [/size]#
def swapcase(self): # real signature unknown; restored from __doc__

        """

        S.swapcase() -> str


        Return a copy of S with uppercase characters converted to lowercase

        and vice versa.

        """

        return ""
msg = "12lOl"

print(msg.swapcase())

msg = "  Lucky is Good!  "

print("[size=16]#" + msg.swapcase() + "[/size]#")


Result:

12LoL

[size=16]#  lUCKY IS gOOD!  [/size]#
判断:
isalnum 判断这个字符串是否为单单有阿拉伯字母和数字组成,返回布尔值
def isalnum(self): # real signature unknown; restored from __doc__

        """

        S.isalnum() -> bool


        Return True if all characters in S are alphanumeric

        and there is at least one character in S, False otherwise.

        """

        return False
sb = "123xx^ff"isalpha 判断字符串是否由纯英文,包括大小字母,返回布尔值
ub = "123meting"
u = "123"
b = "meting"
print(sb.isalnum())
print(ub.isalnum())
print(u.isalnum())
print(b.isalnum())
Result:
False
True
True
True
def isalpha(self): # real signature unknown; restored from __doc__

        """

        S.isalpha() -> bool


        Return True if all characters in S are alphabetic

        and there is at least one character in S, False otherwise.

        """

        return False
ub = "123meting"isdigit 判断是不是一个整数,返回布尔值
u = "123"
b = "meting"
print(ub.isalpha())
print(u.isalpha())
print(b.isalpha())
Result:
False
False
True
def isdigit(self): # real signature unknown; restored from __doc__

        """

        S.isdigit() -> bool


        Return True if all characters in S are digits

        and there is at least one character in S, False otherwise.

        """

        return False
ub = "123meting"isidentifier 判断是否是一个合法的标识符也可以叫做是否是一个合法的变量名
u = "123"
b = "123.0"
print(ub.isdigit())
print(u.isdigit())
print(b.isdigit())
Result:
False
True
False
def isidentifier(self): # real signature unknown; restored from __doc__

        """

        S.isidentifier() -> bool


        Return True if S is a valid identifier according

        to the language definition.


        Use keyword.iskeyword() to test for reserved identifiers

        such as "def" and "class".

        """

        return False
ub = "123meting"isnumeric 判断字符串是否只有数字,返回布尔值
u = "Fun"
b = "123.0"
print(ub.isidentifier())
print(u.isidentifier())
print(b.isidentifier())
Result:
False
True
False
def isnumeric(self): # real signature unknown; restored from __doc__

        """

        S.isnumeric() -> bool


        Return True if there are only numeric characters in S,

        False otherwise.

        """

        return False
ub = "123meting"isprintable 如果字符串中有制表符\t,返回布尔值
u = "123.0"
b = "123"
print(ub.isnumeric())
print(u.isnumeric())
print(b.isnumeric())
Result:
False
False
True
def isprintable(self): # real signature unknown; restored from __doc__

        """

        S.isprintable() -> bool


        Return True if all characters in S are considered

        printable in repr() or S is empty, False otherwise.

        """

        return False
msg = "Lucky is Good\t Man"isspace 判断字符串是否是一个以上空格,返回布尔值
if msg.isprintable():
print(msg)
else:
print("have 制表符")
Result:
have 制表符
def isspace(self): # real signature unknown; restored from __doc__

        """

        S.isspace() -> bool


        Return True if all characters in S are whitespace

        and there is at least one character in S, False otherwise.

        """

        return False
msg = " "   # 一个空格

if msg.isspace():

    print("是空格")

else:

    print("不是空格")


msg = "   "   # 三个空格

if msg.isspace():

    print("是空格")

else:

    print("不是空格")


Result:

是空格

是空格
其他:
count 统计字符串中某个字符出现的次数,返回整型结果
def count(self, sub, start=None, end=None): # real signature unknown; restored from __doc__

        """

        S.count(sub[, start[, end]]) -> int


        Return the number of non-overlapping occurrences of substring sub in

        string S[start:end].  Optional arguments start and end are

        interpreted as in slice notation.

        """

        return 0
msg = "lucky.chen@126.com"center 美观打印,打印包括现有变量在内的30个字符串, 如果字符串不够实用相应的字符前后补全
print(msg.count('c'))
print("[i]" [/i] 10)
print(msg.count('c', 3, 8))
Result:
3
**********
1
def center(self, width, fillchar=None): # real signature unknown; restored from __doc__

        """

        S.center(width[, fillchar]) -> str


        Return S centered in a string of length width. Padding is

        done using the specified fill character (default is a space)

        """

        return ""
msg = "Shopping List"encond 编码转换,在py3中把字符串转为二进制
print(msg.center(50, '*'))
Result:
**************[i][b][/i]Shopping List[/b]*****************
def encode(self, encoding='utf-8', errors='strict'): # real signature unknown; restored from __doc__

        """

        S.encode(encoding='utf-8', errors='strict') -> bytes


        Encode S using the codec registered for encoding. Default encoding

        is 'utf-8'. errors may be given to set a different error

        handling scheme. Default is 'strict' meaning that encoding errors raise

        a UnicodeEncodeError. Other possible values are 'ignore', 'replace' and

        'xmlcharrefreplace' as well as any other name registered with

        codecs.register_error that can handle UnicodeEncodeErrors.

        """

        return b""
msg = "葫芦娃"endswith 判断一个字符串以什么结尾,返回布尔值
print(msg.encode(encoding='utf-8', errors='strict'))
Result:
b'\xe8\x91\xab\xe8\x8a\xa6\xe5\xa8\x83'
def endswith(self, suffix, start=None, end=None): # real signature unknown; restored from __doc__

        """

        S.endswith(suffix[, start[, end]]) -> bool


        Return True if S ends with the specified suffix, False otherwise.

        With optional start, test S beginning at that position.

        With optional end, stop comparing S at that position.

        suffix can also be a tuple of strings to try.

        """

        return False
msg = "lucky.chen@126.com"expandtabs 如果字符串中包含一个\t的字符,如果包含则把\t变成8个空格,当然也可以指定个数
if msg.endswith('126.com'):
print("Mail is True")
else:
print("Mail is False")
if msg.endswith('@', 8, 11):
print(msg.find('@', 8, 11))
Result:
Mail is True
10
def expandtabs(self, tabsize=8): # real signature unknown; restored from __doc__

        """

        S.expandtabs(tabsize=8) -> str


        Return a copy of S where all tab characters are expanded using spaces.

        If tabsize is not given, a tab size of 8 characters is assumed.

        """

        return ""
msg = "Lol is\tGood Game"format 这是一种文件格式化的输出,可以是变量值也可以是下标索引的方法
print(msg.expandtabs())
print(msg.expandtabs(tabsize=1))
print(msg.expandtabs(tabsize=20))
Result:
Lol is Good Game
Lol is Good Game
Lol is Good Game
def format([i]args, [/i]*kwargs): # known special case of str.format

        """

        S.format([i]args, [/i]*kwargs) -> str


        Return a formatted version of S, using substitutions from args and kwargs.

        The substitutions are identified by braces ('{' and '}').

        """

        pass
msg = """**********[i][b][/i] Shopping List [/b]*************format_map 其实跟format功能是一样的,只不过传入的是字典,这个也有一个好处,就是你希望把你字典中的数据格式化输出,直接传入字典就好。
book: {Book}
bike: {Bike}
food: {Food} """
print(msg.format(Book=1, Bike=2, Food=3))
print("#" * 50)
msg = """**********[i][b][/i] Shopping List [/b]*************
book: {0}
bike: {1}
food: {1} """
print(msg.format(100, 200))
Result:
**********[i][b][/i] Shopping List [/b]*************
book: 1
bike: 2
food: 3
###############################################[size=16]#[/size]
**********[i][b][/i] Shopping List [/b]*************
book: 100
bike: 200
food: 200
def format_map(self, mapping): # real signature unknown; restored from __doc__

        """

        S.format_map(mapping) -> str


        Return a formatted version of S, using substitutions from mapping.

        The substitutions are identified by braces ('{' and '}').

        """

        return ""
msg = """**********[i][b][/i] Shopping List [/b]*************join 常用的方法,把一个列表拼成一个字符串,中间用某个字符串分隔
book: {Book}
bike: {Bike}
food: {Food} """
print(msg.format_map({'Book': 38, 'Bike': 800, 'Food': 1000}))
Result:
**********[i][b][/i] Shopping List [/b]*************
book: 38
bike: 800
food: 1000
def join(self, iterable): # real signature unknown; restored from __doc__

        """

        S.join(iterable) -> str


        Return a string which is the concatenation of the strings in the

        iterable.  The separator between elements is S.

        """

        return ""
a = ['1', '2', '3', '4'] # 元素必须要是str类型maketrans 这个方法要配合translate方法使用,对数据进行加密/反解
print(':'.join(a))
Result:
1:2:3:4
def maketrans(self, [i]args, [/i]*kwargs): # real signature unknown

        """

        Return a translation table usable for str.translate().


        If there is only one argument, it must be a dictionary mapping Unicode

        ordinals (integers) or characters to Unicode ordinals, strings or None.

        Character keys will be then converted to ordinals.

        If there are two arguments, they must be strings of equal length, and

        in the resulting dictionary, each character in x will be mapped to the

        character at the same position in y. If there is a third argument, it

        must be a string, whose characters will be mapped to None in the result.

        """

        pass
s = "Hello World!"replace 替换字符串字符,也可以指定替换的次数
#加密
p = s.maketrans("abcdefg", "3!@#$%^")
print(p)
# 解密,打出真实的p的内容
print(s.translate(p))
Result:
{97: 51, 98: 33, 99: 64, 100: 35, 101: 36, 102: 37, 103: 94}
H$llo Worl#!
def replace(self, old, new, count=None): # real signature unknown; restored from __doc__

        """

        S.replace(old, new[, count]) -> str


        Return a copy of S with all occurrences of substring

        old replaced by new.  If the optional argument count is

        given, only the first count occurrences are replaced.

        """

        return ""
msg = 'abcbcacba'startswith 判断以什么开头,返回布尔值
print(msg.replace('a', 'w'))
print(msg.replace('a','c', 3))
Result:
wbcbcwcbw
cbcbcccbc
def startswith(self, prefix, start=None, end=None): # real signature unknown; restored from __doc__

        """

        S.startswith(prefix[, start[, end]]) -> bool


        Return True if S starts with the specified prefix, False otherwise.

        With optional start, test S beginning at that position.

        With optional end, stop comparing S at that position.

        prefix can also be a tuple of strings to try.

        """

        return False
msg = "lucky"title 把一个字符串变为一个title,首字母大写
print(msg.startswith('l'))
print(msg.startswith('c', 2, 4))
Result:
True
True
def title(self): # real signature unknown; restored from __doc__

        """

        S.title() -> str


        Return a titlecased version of S, i.e. words start with title case

        characters, all remaining cased characters have lower case.

        """

        return ""
msg = " shopping list "translate 配合maketrans进行字符串的交换
print(msg.title())
Result:
Shopping List
def translate(self, table): # real signature unknown; restored from __doc__

        """

        S.translate(table) -> str


        Return a copy of the string S in which each character has been mapped

        through the given translation table. The table must implement

        lookup/indexing via __getitem__, for instance a dictionary or list,

        mapping Unicode ordinals to Unicode ordinals, strings, or None. If

        this operation raises LookupError, the character is left untouched.

        Characters mapped to None are deleted.

        """

        return ""
name = "lucky"

f = name.maketrans('abcde', '12345')


# 加密文

print(f)


# 解密,明文

print('test'.translate(f))


Result:

{97: 49, 98: 50, 99: 51, 100: 52, 101: 53}

t5st
bytes类型
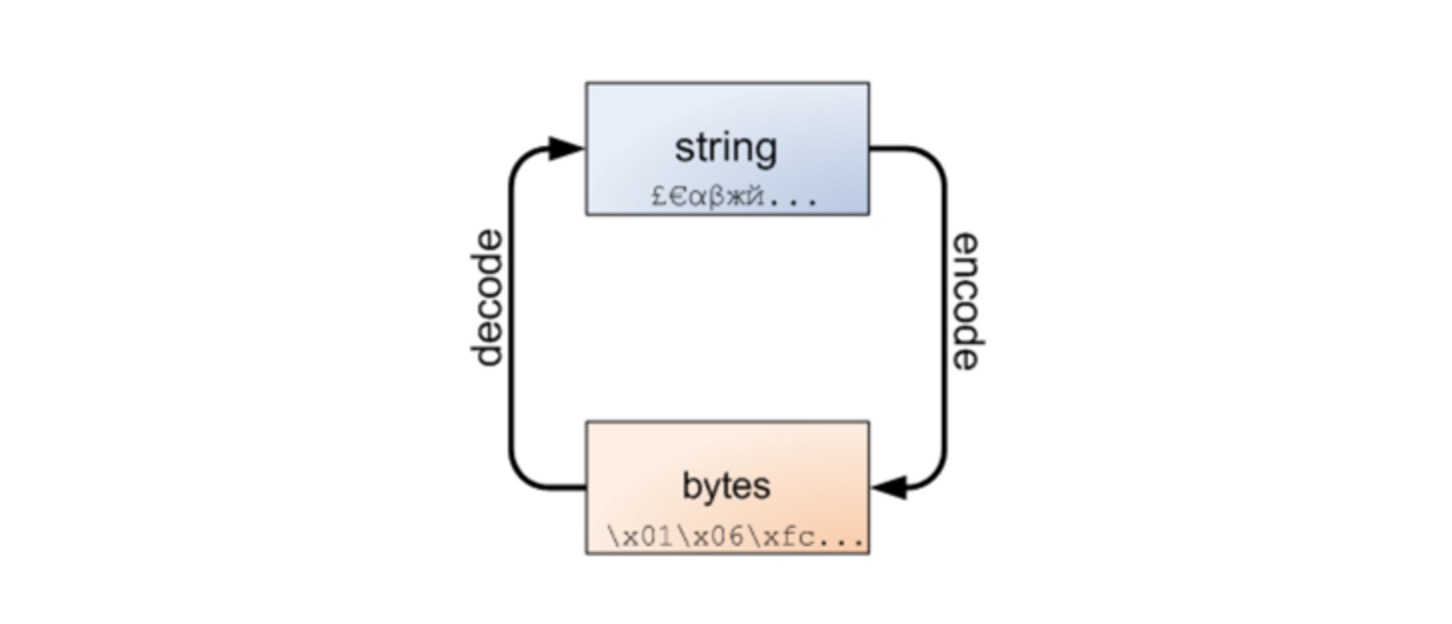
Python 3最重要的新特性大概要算是对文本和二进制数据作了更为清晰的区分。文本总是Unicode,由str类型表示,二进制数据则由bytes类型表示。Python 3不会以任意隐式的方式混用str和bytes(类似int和long之间自动转换),正是这使得两者的区分特别清晰。你不能拼接字符串和字节包,也无法在字节包里搜索字符串(反之亦然),也不能将字符串传入参数为字节包的函数(反之亦然)。这是件好事。不管怎样,字符串和字节包之间的界线是必然的,下面的图解非常重要,务请牢记于心:
在python中二进制的数据都是bytes的数据类型,文本都是字符串的数据类型,字符串可以编码成字节包,而字节包可以解码成字符串:
#!/usr/bin/env python3

# _[i]_coding:utf-8_[/i]_

# Author: Lucky.chen


msg = "康师傅"


print(msg.encode("utf-8"))  # 如果不指定编码格式,默认为utf-8

# b'\xe5\xba\xb7\xe5\xb8\x88\xe5\x82\x85'


print(b'\xe5\xba\xb7\xe5\xb8\x88\xe5\x82\x85'.decode("utf-8"))

# 康师傅
数据运算
算数运算:
比较运算:
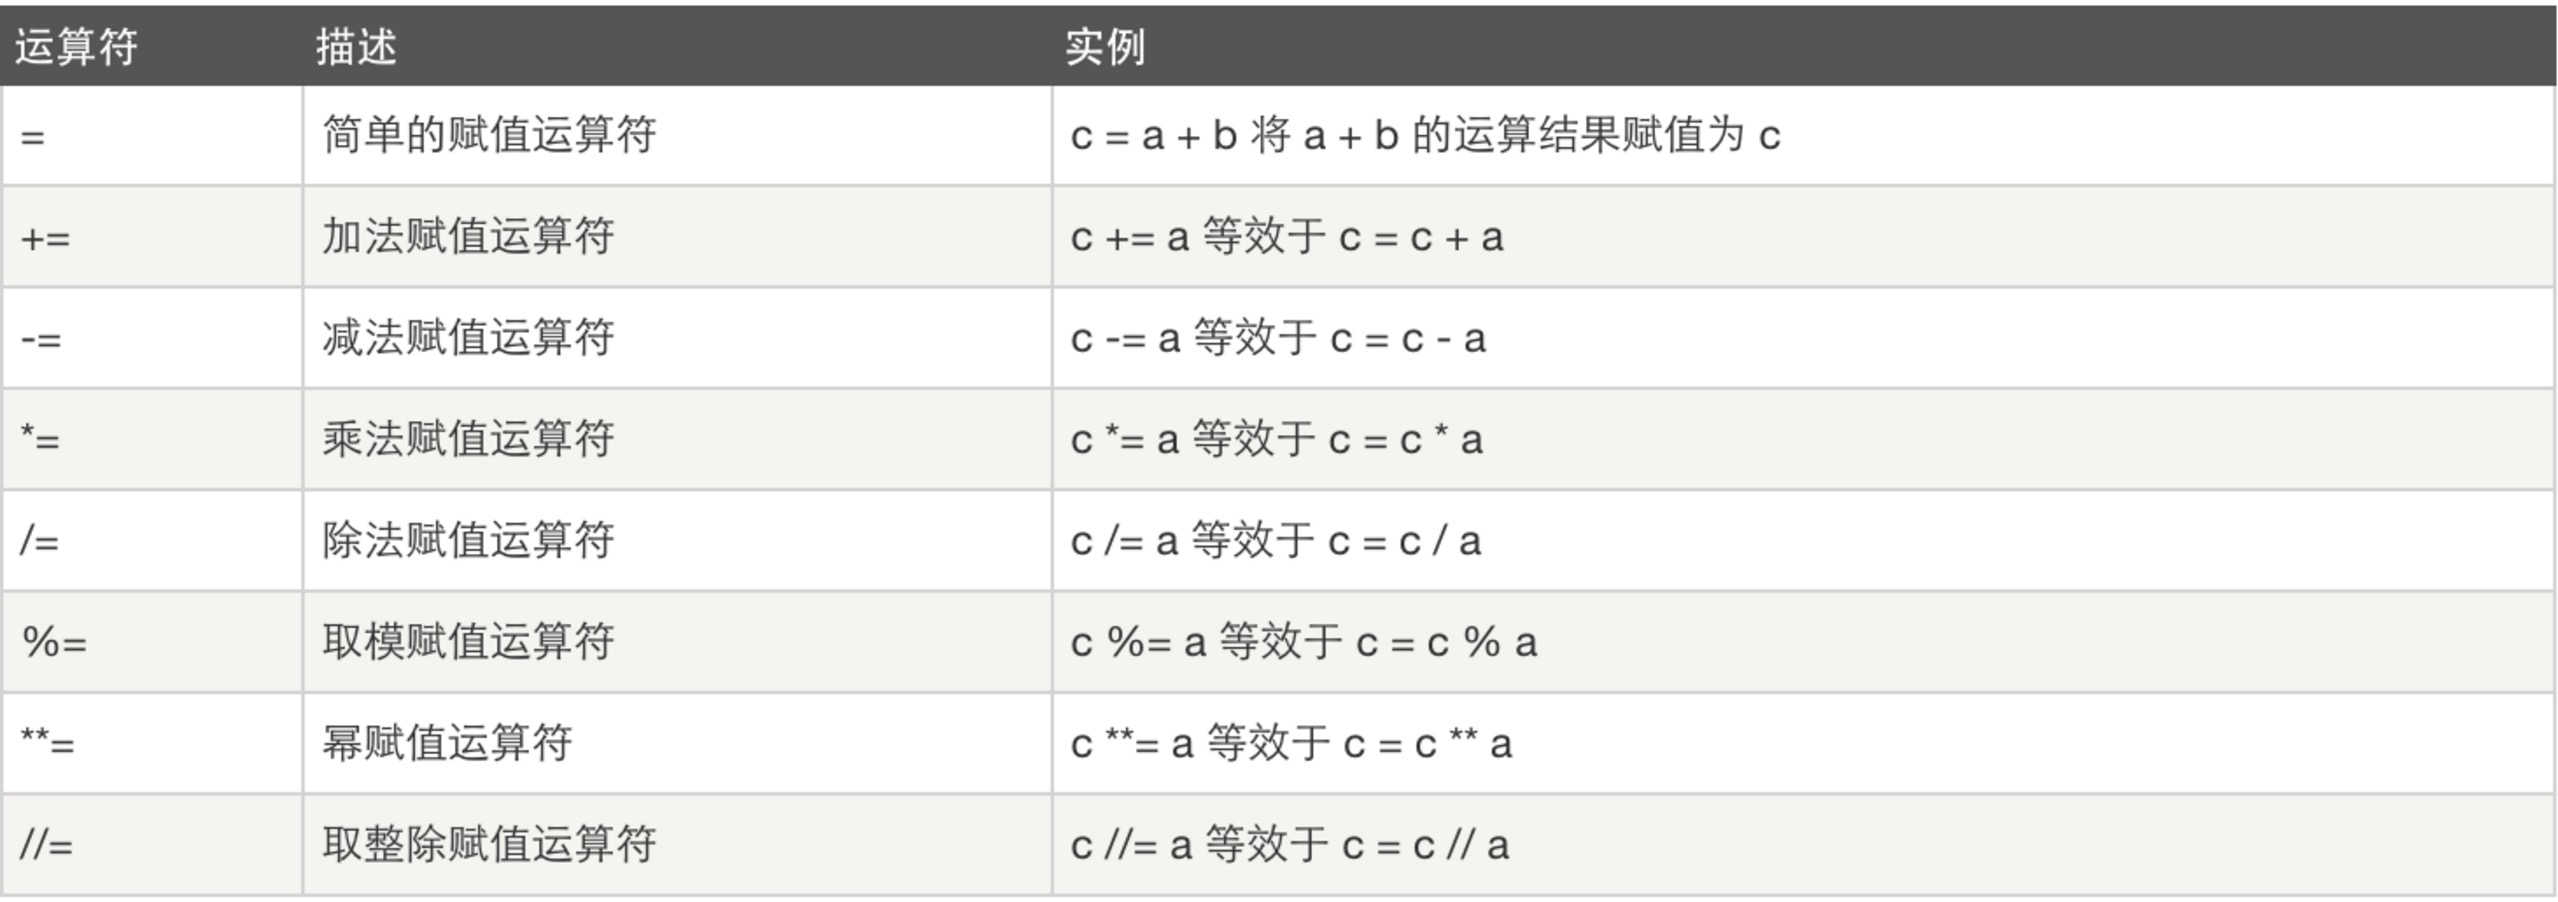
赋值运算:
逻辑运算:
成员运算:
身份运算:
位运算:
#!/usr/bin/python运算符优先级:
a = 60 # 60 = 0011 1100
b = 13 # 13 = 0000 1101
c = 0
c = a & b; # 12 = 0000 1100
print "Line 1 - Value of c is ", c
c = a | b; # 61 = 0011 1101
print "Line 2 - Value of c is ", c
c = a ^ b; # 49 = 0011 0001
print "Line 3 - Value of c is ", c
c = ~a; # -61 = 1100 0011
print "Line 4 - Value of c is ", c
c = a << 2; # 240 = 1111 0000
print "Line 5 - Value of c is ", c
c = a >> 2; # 15 = 0000 1111
print "Line 6 - Value of c is ", c
更多内容参考:猛击这里!
三元运算:
result = 值1 if 条件 else 值2如果条件为真:result = 值1
如果条件为假:result = 值2
#!/usr/bin/env python3如果不熟悉这种方法,只能老实的写if ... elif .... else 语句等!
# _[i]_coding:utf-8_[/i]_
# Author: Lucky.chen
a, b, c = 1, 2, 3
d = a if a > b else c
# 如果a大于b 则把的值赋给d, 如果a不大于b, 则把c的值直接赋给d
print(d)
Result:
3
用Python从网页提取的文本,转换成str格式后,怎么逐行处理呢?
空心菜 回复了问题 2 人关注 2 个回复 5203 次浏览 2016-07-27 11:51
Python菜鸟之路基础篇(一)
空心菜 发表了文章 3 个评论 4986 次浏览 2016-07-26 00:55
Hello World
学习任何一门语言,我想大家写的以一句就是hello world吧,下面我们来看看Python的hello world
创建一个hello.py的文件:
print ("Hello World")然后执行命令:python hello.py ,输出crh:Python crh$ python3 hello.py
Hello World
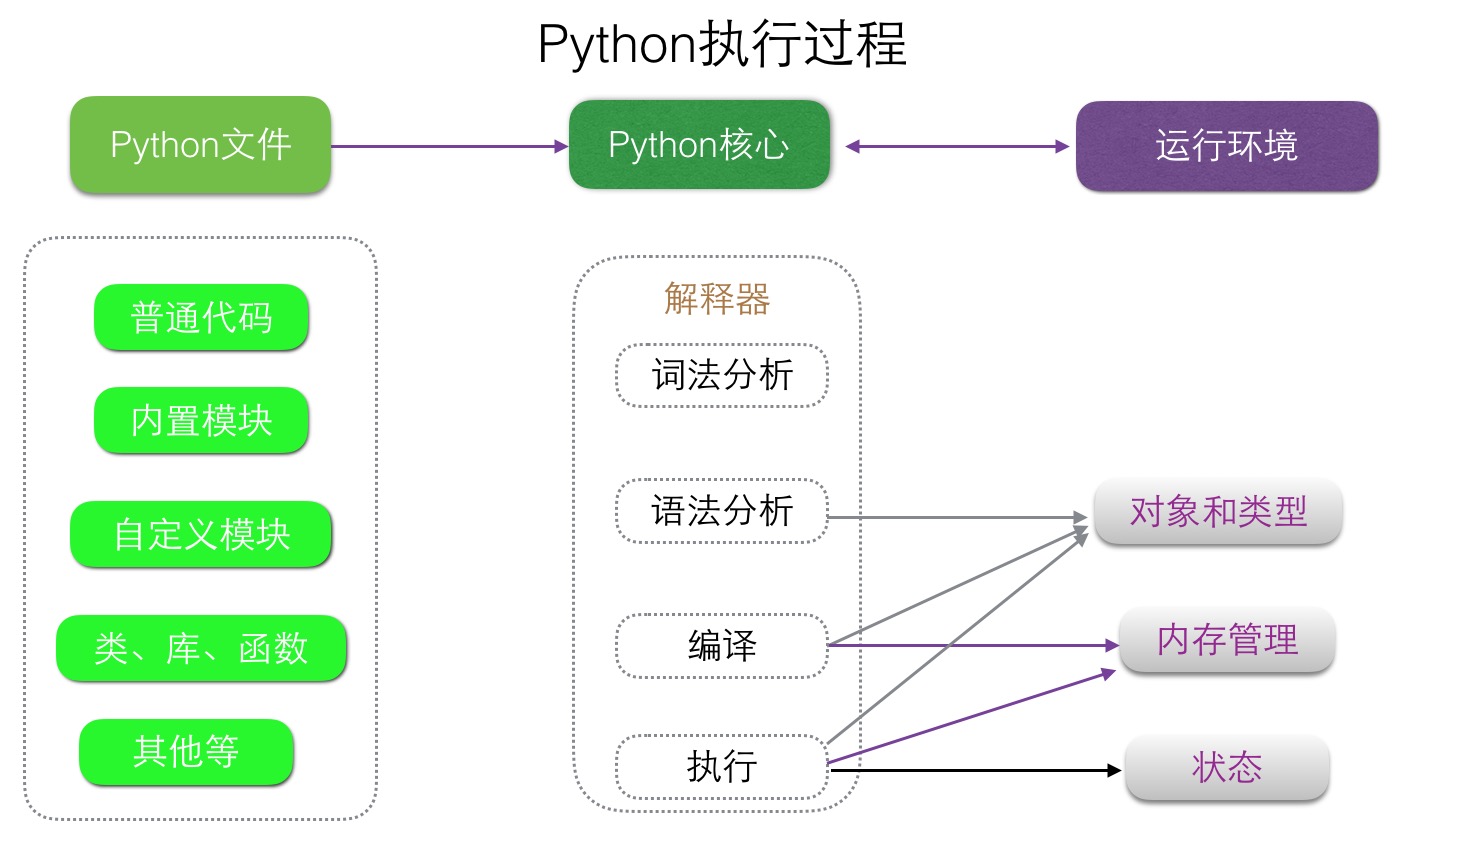
Python执行过程为: 把代码读到内存 ---->词法语法分析 ---->放到编译器 ----> 生成字节码 ---->执行字节码 ---->生成机器码---->CPU执行,图示如下:
指定解释器
在上面情况,我们指定Python3 来执行hello.py
如果想要类似于执行shell脚本一样执行python脚本,例: ./hello.py ,那么就需要在 hello.py 文件的头部指定解释器,如下:
crh:Python crh$ cat hello.py像上面这样,然后给hello.py文件添加执行权限(chmod +x hello.py)就可以像执行shell脚本一样./hello.py 即可。
#!/usr/bin/env python3
print ("Hello World")
***像上面是利用Linux env命令通过环境变量去找到你想用的Python命令,如果你指定用某个Python版本的话一可以写绝对路径,比如:/usr/bin/python or /usr/local/bin/python3
在交互器中执行
除了把程序写在文件里,还可以直接调用python自带的交互器运行代码,进行调试和测试
crh:Python crh$ python3

Python 3.5.1 (default, Dec 26 2015, 18:08:53)

[GCC 4.2.1 Compatible Apple LLVM 7.0.2 (clang-700.1.81)] on darwin

Type "help", "copyright", "credits" or "license" for more information.

[quote]>> print ("Hello World")

Hello World

>>>
变量
在一个计算机程序中引用变量是用来存储信息和操作的。他们还提供一种标签数据与一个描述性的名称,所以我们的程序可以被读者和我们自己更清楚地理解。它有助于认为变量保存信息的容器。他们的唯一目的是标签和数据存储在内存中。这些数据可以通过使用程序引用。
声明变量
#_[i]_coding:utf-8_[/i]_如上面所示声明了一个变量name,他的值是"Lucky chen"
name = "Lucky chen"
我们再来看一组连续赋值的过程:
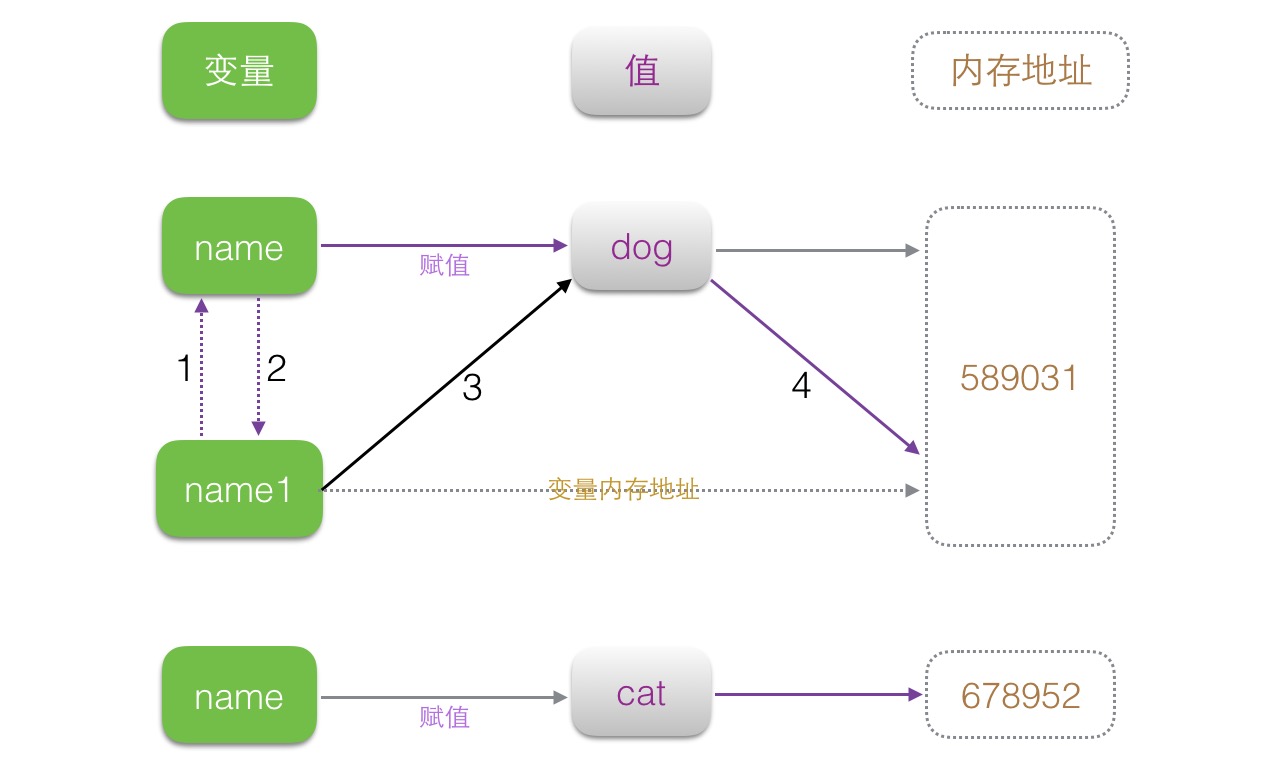
>>> name = "crh"如上所示,为什么name1 = name 当后续把name变量的值改变了,为什么name1的值没有随着改变呢,如下看看你就明白了:
>>> name1 = name
>>> print (name,name1)
crh crh
>>> name = "Lucky"
>>> print (name1,name)
crh Lucky
>>> name = "crh" #首先在内存中打开一块内存空间存储name变量值如上所示,我们可以看出,nama1其实就是借助name变量做一个变量的赋值,通过name变量得到值所在内存中的内存地址后,从而变成了一个正常的赋值过程。而不换随着name变量的内存空间地址的改变而改变。示意图如下:
>>> id(name) #查看变量name的内存地址
4412833952
>>> name1 = name #把我们把name赋值给name1变量
>>> id(name1) #然后查看name1变量的内存地址 (跟name变量的内存地址一样)
4412833952
>>> name = "lucky" #重新打开一个内存空间存储name的变量值
>>> id(name) #查看新的name变量值的内存地址
4412834176
>>> id(name1) #查看name1变量内存地址
4412833952
交互输入
用户输入就是程序和用户的交互,程序等待用户输入一个参数然后重新继续进行:
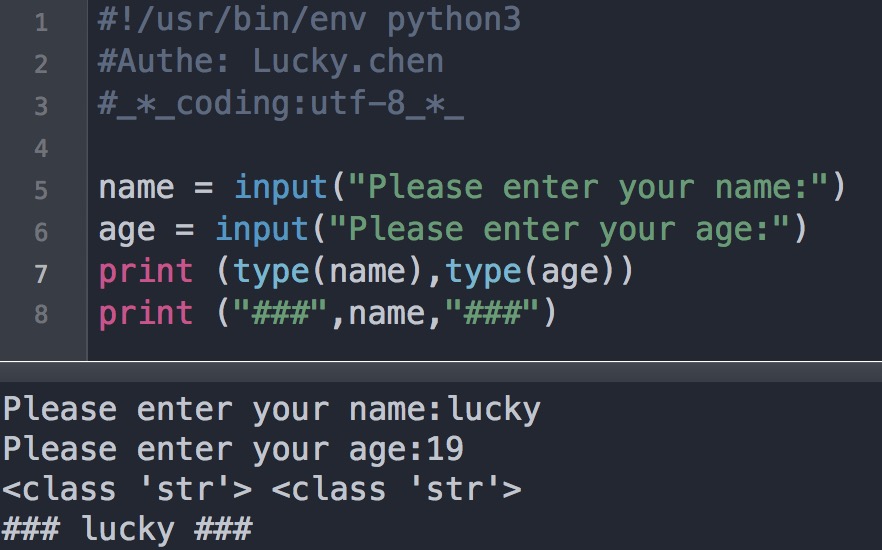
#!/usr/bin/env python3

#Authe: Lucky.chen

#_[i]_coding:utf-8_[/i]_


name = input("Please enter your name:")

print ("[size=16]#",name,"[/size]#")
如上图所示,默认Python3下的input函数用户输入的所有东西都当做字符串处理,所以你输入的年龄希望它是整数类型,还需要int()一下。
在python2中input这个函数,用户默认输入的是什么格式的参数,Python就当作是什么类型处理,Python2中获取用户输入参数的函数还有一个叫做raw_input(),这个函数默认也是字符串处理。可以看出Python3为了简洁统一,在Python3中已经不存在了raw_input()函数,input()一个函数完全可以做到所有使用。
平常如果我们用针对密码、密码串之类的交互的话,一般用户的输入时隐藏或者*****的,输入密码时,在Python下如果你需要你输入的东西不可见,可以利用getpass 模块中的 getpass方法来处理:
#!/usr/bin/env python3[/size]
#Authe: Lucky.chen
#_[i]_coding:utf-8_[/i]_[/quote]
#导入getpass模块
import getpass
# 将用户输入的内容赋值给 name 变量
pwd = getpass.getpass("请输入密码:")
# 打印输入的内容
print("Password is [size=16]",pwd,"***print end")[/size]
#比如我输入110119,执行过程和结果如下:
请输入密码:
Password is [size=16] 110119 ***print end
注释和拼接
注释:
单行注释:# 开头就好,跟shell一样
多行注释:成对的三个单引号 ''' 注释内容 ''' 或者 成对的三个双引号 """ 注释内容 """
>>> ''' My name is lucky '''

' My name is lucky '

[quote]>> """ My age is 23 """

' My age is 23 '

>>> # Good Idea

...

>>> msg = """ My info is :

... age: 23

... name: lucky

... job: IT"""

>>> print (msg)

 My info is :

age: 23

name: lucky

job: IT

>>>
拼接:
1、难受的 "+"
>>> name = "lucky"如上所示 "+"拼接只能是字符串,如果是整型、或者是浮点都会报错。
>>> age = 23
>>> job = "IT"
>>>
>>> msg = """ Info of """ +name + """
... Name:""" +name + """
... Age:""" +age + """
... Job:""" +job
Traceback (most recent call last):
File "", line 4, in
TypeError: Can't convert 'int' object to str implicitly
>>>
>>> name = "lucky"
>>> age = "23"
>>> job = "IT"
>>> msg = """ Info of """ +name + """
... Name:""" +name + """
... Age:""" +age + """
... Job:""" +job
>>> print (msg)
Info of lucky
Name:lucky
Age:23
Job:IT
>>>
2、百分号(%)
Code:
#!/usr/bin/env python3.5Result:
#auther: lucky.chen[/quote]
name = input("Please input your name: ")
age = input("Please input your age:")
job = input("Please input your job:")
salary = input("Please input your salary:")
msg = """------------ info of %s
Name: %s
Age: %s
Job: %s
Salary: %s
""" % (name,name,age,job,salary)
print (msg)
Please input your name: lucky

Please input your age:23

Please input your job:IT

Please input your salary:40000

------------ info of lucky

Name: lucky

Age: 23

Job: IT

Salary: 40000
3、使用format函数
情况一:使用变量格式化
Code:
#!/usr/bin/env python3.5Result:
#auther: lucky.chen
name = input("Please input your name: ")
age = input("Please input your age:")
job = input("Please input your job:")
salary = input("Please input your salary:")
msg = """------------ info of {_Name}
Name: {_Name}
Age: {_Age}
Job: {_Job}
Salary: {_Salary}
""".format(_Name=name,_Age=age,_Job=job,_Salary=salary)
print (msg)
Please input your name: crh情况二:使用下脚标
Please input your age:23
Please input your job:IT
Please input your salary:45000
------------ info of crh
Name: crh
Age: 23
Job: IT
Salary: 45000
#!/usr/bin/env python3.5Result:
#auther: lucky.chen
name = input('please input your name:')
age = input('please input your age:')
job = input('please input your job:')
salary = input('please input your salary:')
msg = '''
------------info of {0}-----------
Name: {0}
Age: {1}
Job: {2}
Salary: {3}
'''.format(name,age,job,salary)
print (msg)
please input your name:chenronghuaformat是比较好的方式,有时候我们必须使用format方法,所以掌握了format就好。
please input your age:23
please input your job:OPS
please input your salary:50000
------------info of chenronghua-----------
Name: chenronghua
Age: 23
Job: OPS
Salary: 50000
流程控制
一、流程控制这里先介绍 if ...... else and if ...... elif ..... else
1、if ..... else(用户认证登录)
Code:
#!/usr/bin/env python3.5Result:
#auther: lucky.chen
name = input("Please input your name:")
passwd = input("Please input your password:")
if name == "crh" and passwd == "123456":
print (" \033[32mWelcome login OPS Management platform\033[0m ")
else:
print ("\033[31mYour UserName or Password Error\033[0m")
Please input your name:crh

Please input your password:34

Your UserName or Password Error
2、if ..... elfi ...... else
Code:
#!/usr/bin/env python3.5Result:
#auther: lucky.chen
age = int(input("Pleast input your age:"))
if age < 18:
print (" \033[32m You're too young \033[0m ")
elif age > 18 and age < 30:
print ("\033[31m You still have many chance comes at a time when youth waiting for you \033[0m")
else:
print ("\033[33m Before you is too old to do \033[0m")
Pleast input your age:23

 You still have many chance comes at a time when youth waiting for you
二、for 循环遍历
#!/usr/bin/env python3.5range函数也可以设置步长值,比如我们要打印出1-10中的所有偶数(默认步长为1)
#auther: lucky.chen
for num in range(5):
print ("loop is:",num)
# Result is:
loop is: 0
loop is: 1
loop is: 2
loop is: 3
loop is: 4
#!/usr/bin/env python3.5除掉range函数我们还可以使用xrange函数,为什么要这里要介绍xrange呢,因为xrange相对于range来说性能比较优越,因为xrange不需要一上来就开辟一块很大的内存空间,具体可以参考我之前发布的文章:Python中xrange和range的异同 ,但是好像Python3.*中没有了xrange函数。
#auther: lucky.chen
for num in range(0,11,2):
print ("loop is:",num)
# Result
loop is: 0
loop is: 2
loop is: 4
loop is: 6
loop is: 8
loop is: 10
for...else...循环介绍,不止if中有else,在for循环中也是可以用else的,在for循环中的else就是当前面的循环正常执行完后,没有跳出,后面的else代码将被执行。
crh:Python crh$ cat for.py

#!/usr/bin/env python3

#Auther: lucky.chen


for num in range(4):

    print ("Loop is:",num)

else:

    print ("normal")

crh:Python crh$ ./for.py

Loop is: 0

Loop is: 1

Loop is: 2

Loop is: 3

normal

crh:Python crh$
crh:Python crh$ cat for.py三、while循环遍历
#!/usr/bin/env python3
#Auther: lucky.chen
for num in range(4):
if num > 2:
break
print ("Loop is:",num)
else:
print ("normal")
crh:Python crh$ ./for.py
Loop is: 0
Loop is: 1
Loop is: 2
crh:Python crh$
while 循环它的原理是:当条件为真的时候运行,当条件为假的时候停止!没有一个规定次数,不设置条件就永远循环下去。
#!/usr/bin/env python3.5

#auther: lucky.chen


import time

count = 0

while True:

    count +=1

    print ("loop",count)

    time.sleep(3)

#这个循环3秒钟自+1后,无线循环只要这个条件为”真“,就无限循环下去
#!/usr/bin/env python3.5While ...... else
#auther: lucky.chen
import time
num = 0
while num < 3:
num +=1
print ("Num is:",num)
time.sleep(3)
#这个循环每3秒循环一次,当条件num < 3的时候为真(自己设置的条件),当num不小于3的时候为假(false)循环停止.
#!/usr/bin/env python3.5

#auther: lucky.chen


while 1:

    if num == 4:

        print ("I think stop")

        break

    print (num)

    num += 1

else:

    print ("stop")
四、break和continue介绍
break在循环中的作用是跳出所在的循环体,不在进行循环,而continue是跳出所在循环体中的本次循环,后续没有完的循环继续。Code:
#!/usr/bin/env python3.5Result:
#auther: lucky.chen
num = 1
print ("test break for loop start")
for n in range(5):
if n == num:
break
print (n)
print ("\n")
print ("test continue for loop start")
for n in range(5):
if n == num:
continue
print (n)
test break for loop start

0


test continue for loop start

0

2

3

4
猜数字游戏:
#!/usr/bin/env python3.5Result:
#auther: lucky.chen
#load module (random)
import random
TryNum = 0
RandNum = random.randrange(10)
print (RandNum)
while TryNum < 3:
GuessNum = int(input("请猜测从0到9之间的一个中奖数字:"))
if GuessNum >= 10:
print ("你输入的数字不在中奖号码范围内,请重新输入!")
continue
if GuessNum == RandNum:
print ("恭喜你猜对了,你将获得小米电视一台!")
break
elif GuessNum > RandNum:
print ("你猜的数字太大了可以再往小了猜")
else:
print ("你猜的数字太小了可以往大了猜")
TryNum += 1
else:
print ("不好意思你三次机会用完了,Game over!")
#先随机到0-9中筛选出以为数字,然后用户三次机会猜测一个中奖号码,如果用户输入的数字不在范围内,则让用户再次输入.
4

请猜测从0到9之间的一个中奖数字:11

你输入的数字不在中奖号码范围内,请重新输入!

请猜测从0到9之间的一个中奖数字:11

你输入的数字不在中奖号码范围内,请重新输入!

请猜测从0到9之间的一个中奖数字:11

你输入的数字不在中奖号码范围内,请重新输入!

请猜测从0到9之间的一个中奖数字:11

你输入的数字不在中奖号码范围内,请重新输入!

请猜测从0到9之间的一个中奖数字:2

你猜的数字太小了可以往大了猜

请猜测从0到9之间的一个中奖数字:5

你猜的数字太大了可以再往小了猜

请猜测从0到9之间的一个中奖数字:4

恭喜你猜对了,你将获得小米电视一台!
五、嵌套循环
While for:
#!/usr/bin/env python3.5Result:
#auther: lucky.chen
count = 1
while count < 4:
print("count var lt 4")
print ("#########################[size=16]#")[/size]
for n in range(3):
print ("for num is:",n)
print ("****************************")
count += 1
count var lt 4

#########################[size=16]#[/size]

for num is: 0

for num is: 1

for num is: 2

****************************

count var lt 4

#########################[size=16]#[/size]

for num is: 0

for num is: 1

for num is: 2

****************************

count var lt 4

#########################[size=16]#[/size]

for num is: 0

for num is: 1

for num is: 2

****************************
死循环:
#!/usr/bin/env python3.5如上我们给出了一个死循环的例子,但是如果如果我们需要跳出循环应该怎么做,如果用break可以做到吗?
#auther: lucky.chen
import time
while True:
print ("One Loop")
time.sleep(1)
while True:
print ("Two Loop")
time.sleep(1)
while True:
print ("Three Loop")
time.sleep(1)
#这是一个死循环,第一次执行这段code的时候,依次往下执行,单到了第三个while的时候,就一直是true,所以一直在执行第三个while下的code.
#结果如下:
One Loop
Two Loop
Three Loop
Three Loop
Three Loop
Three Loop
..........
..........
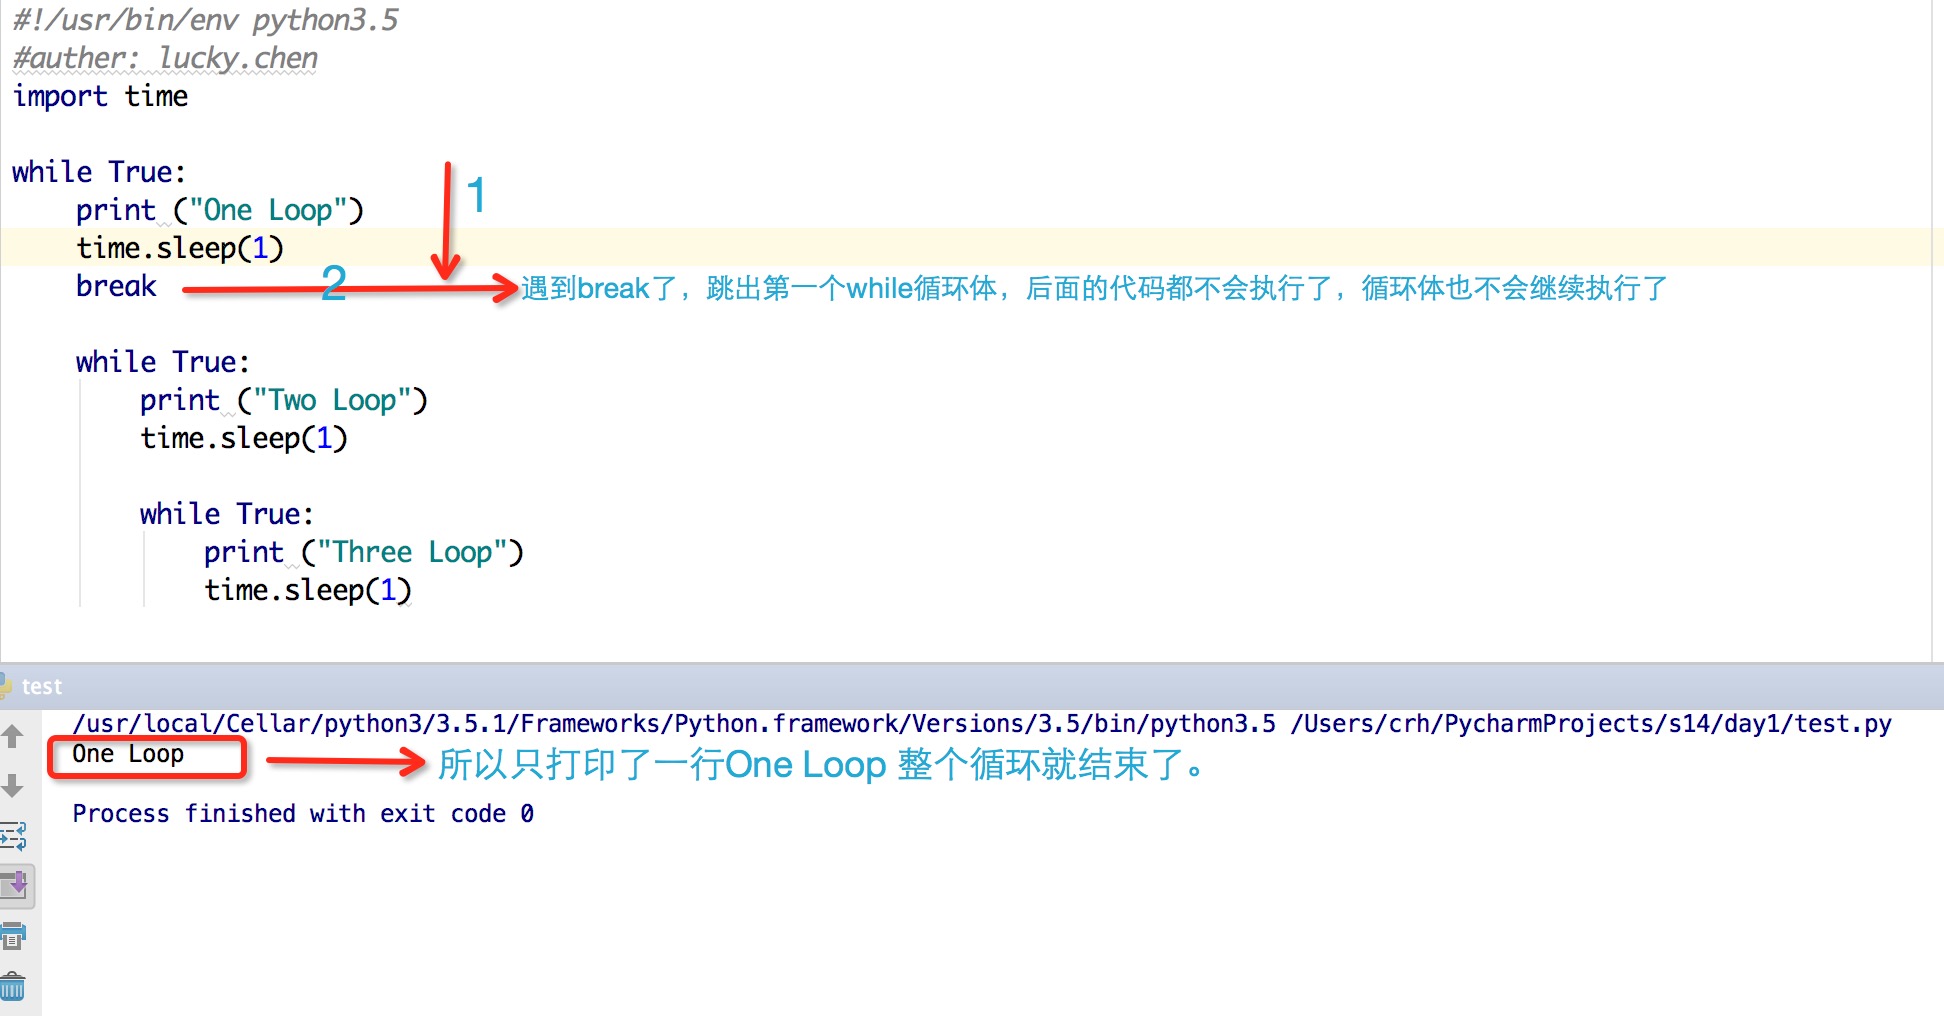
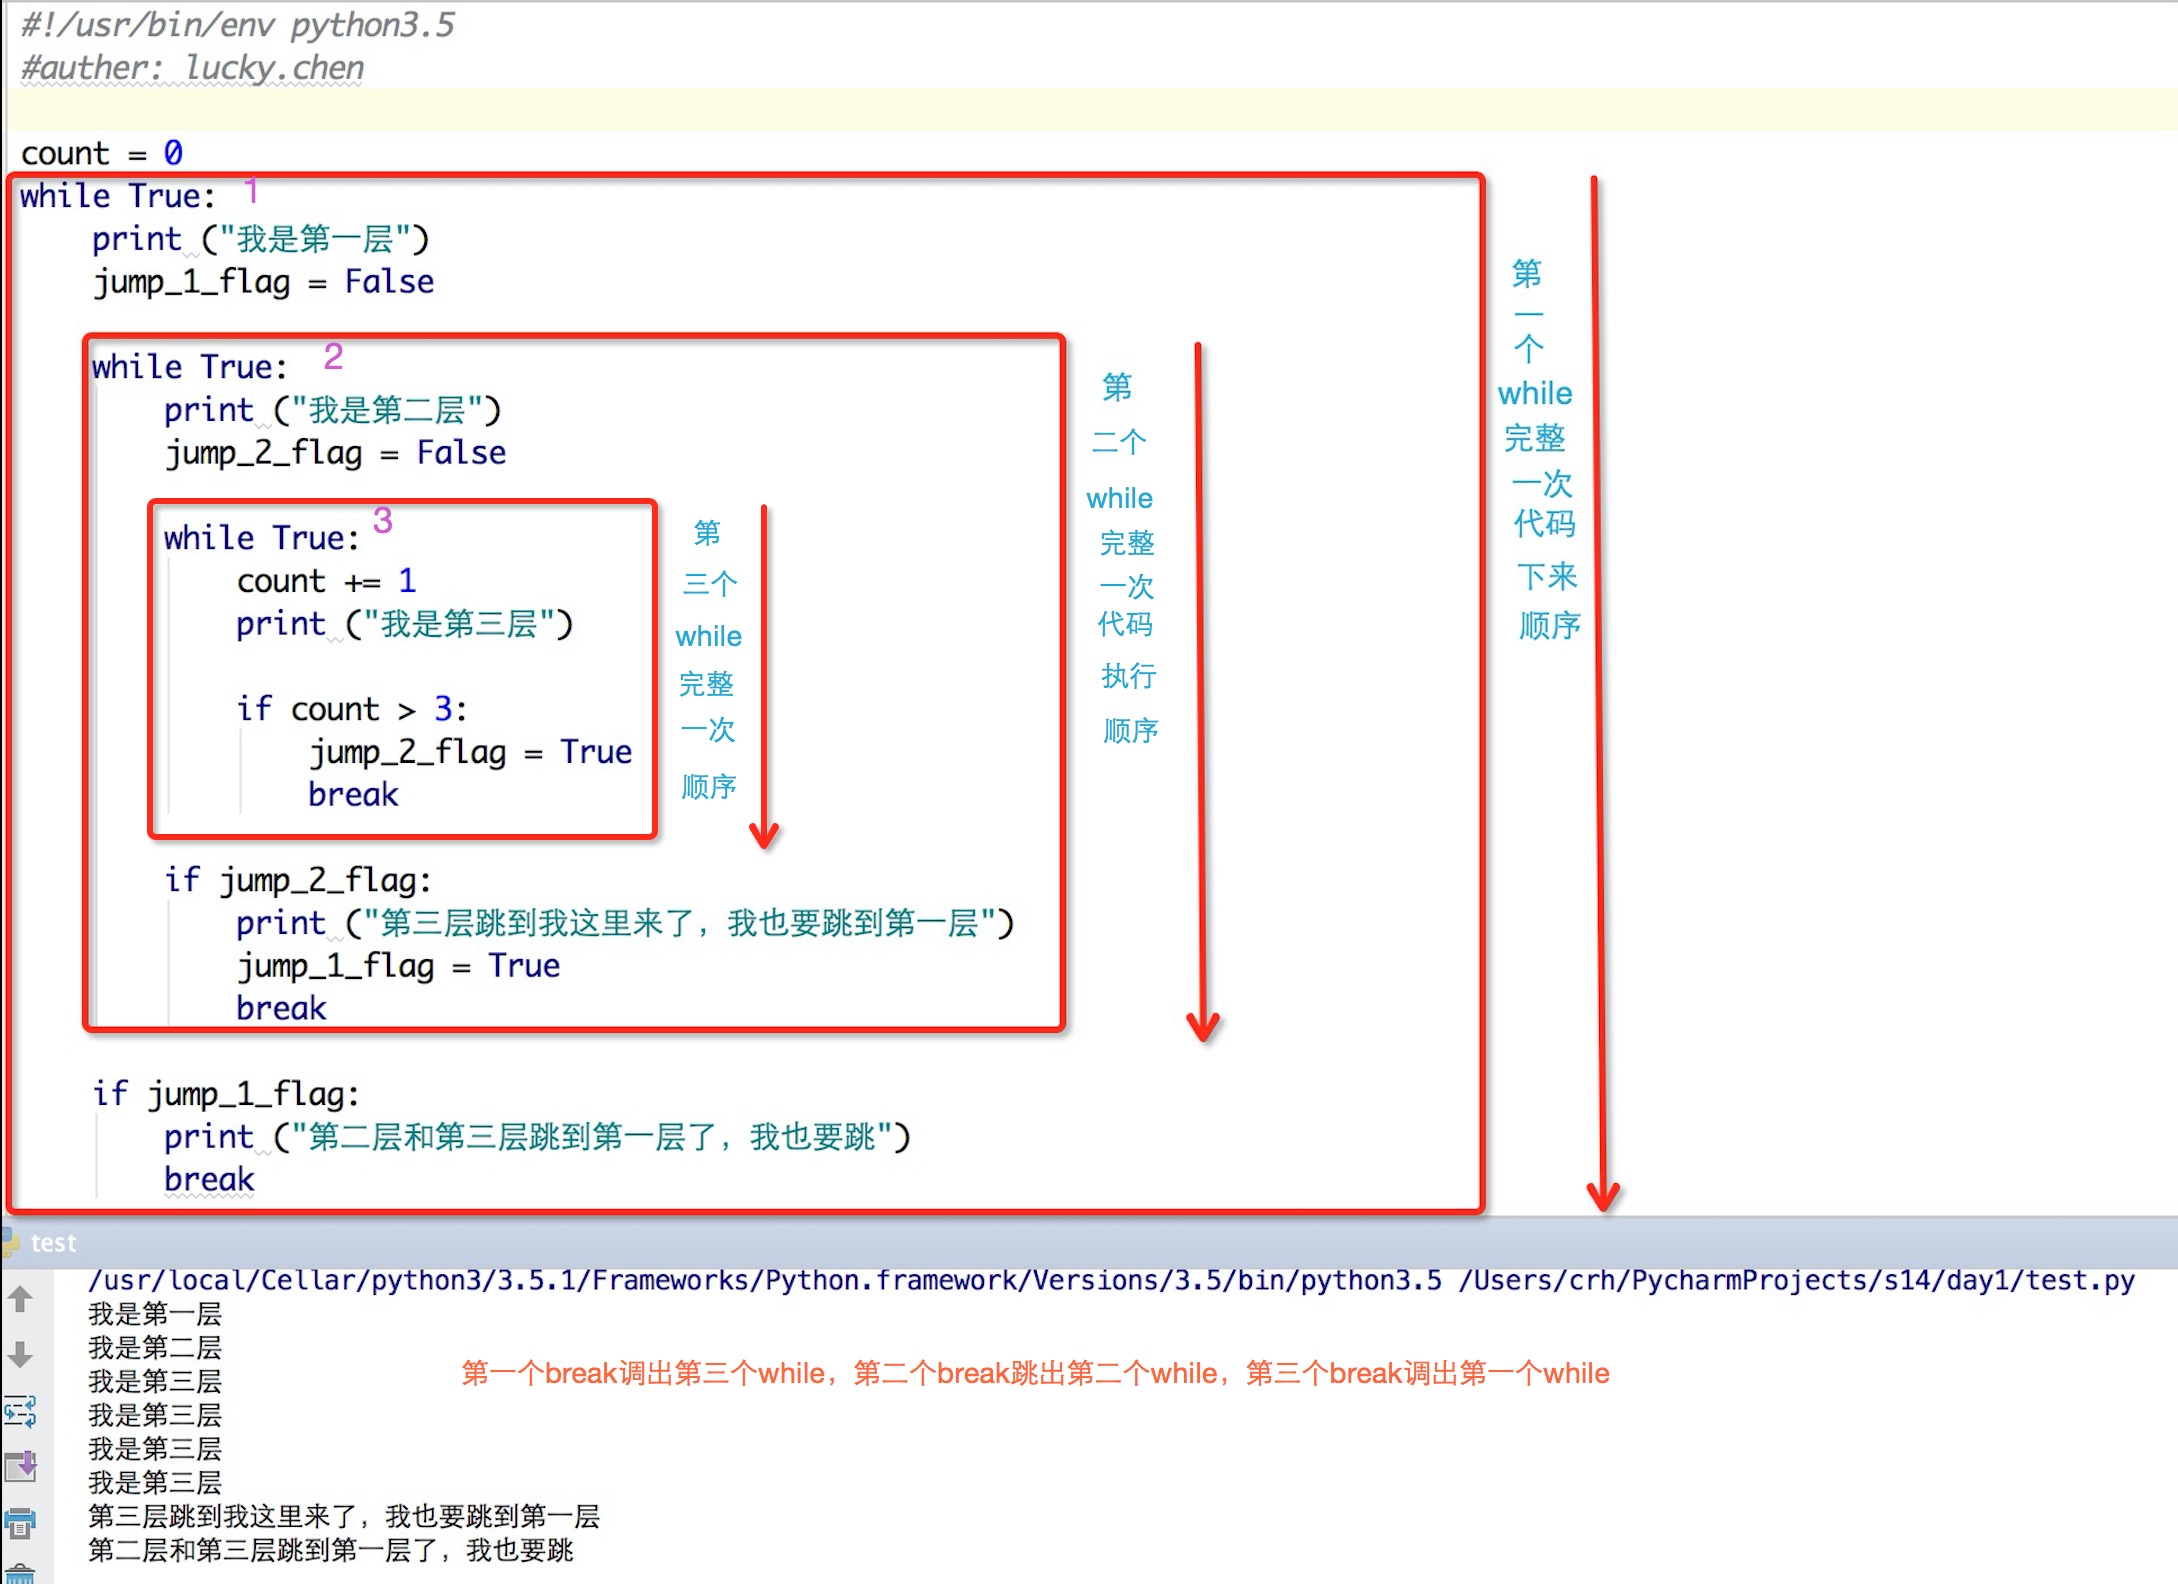
1、第一个while后加break分析
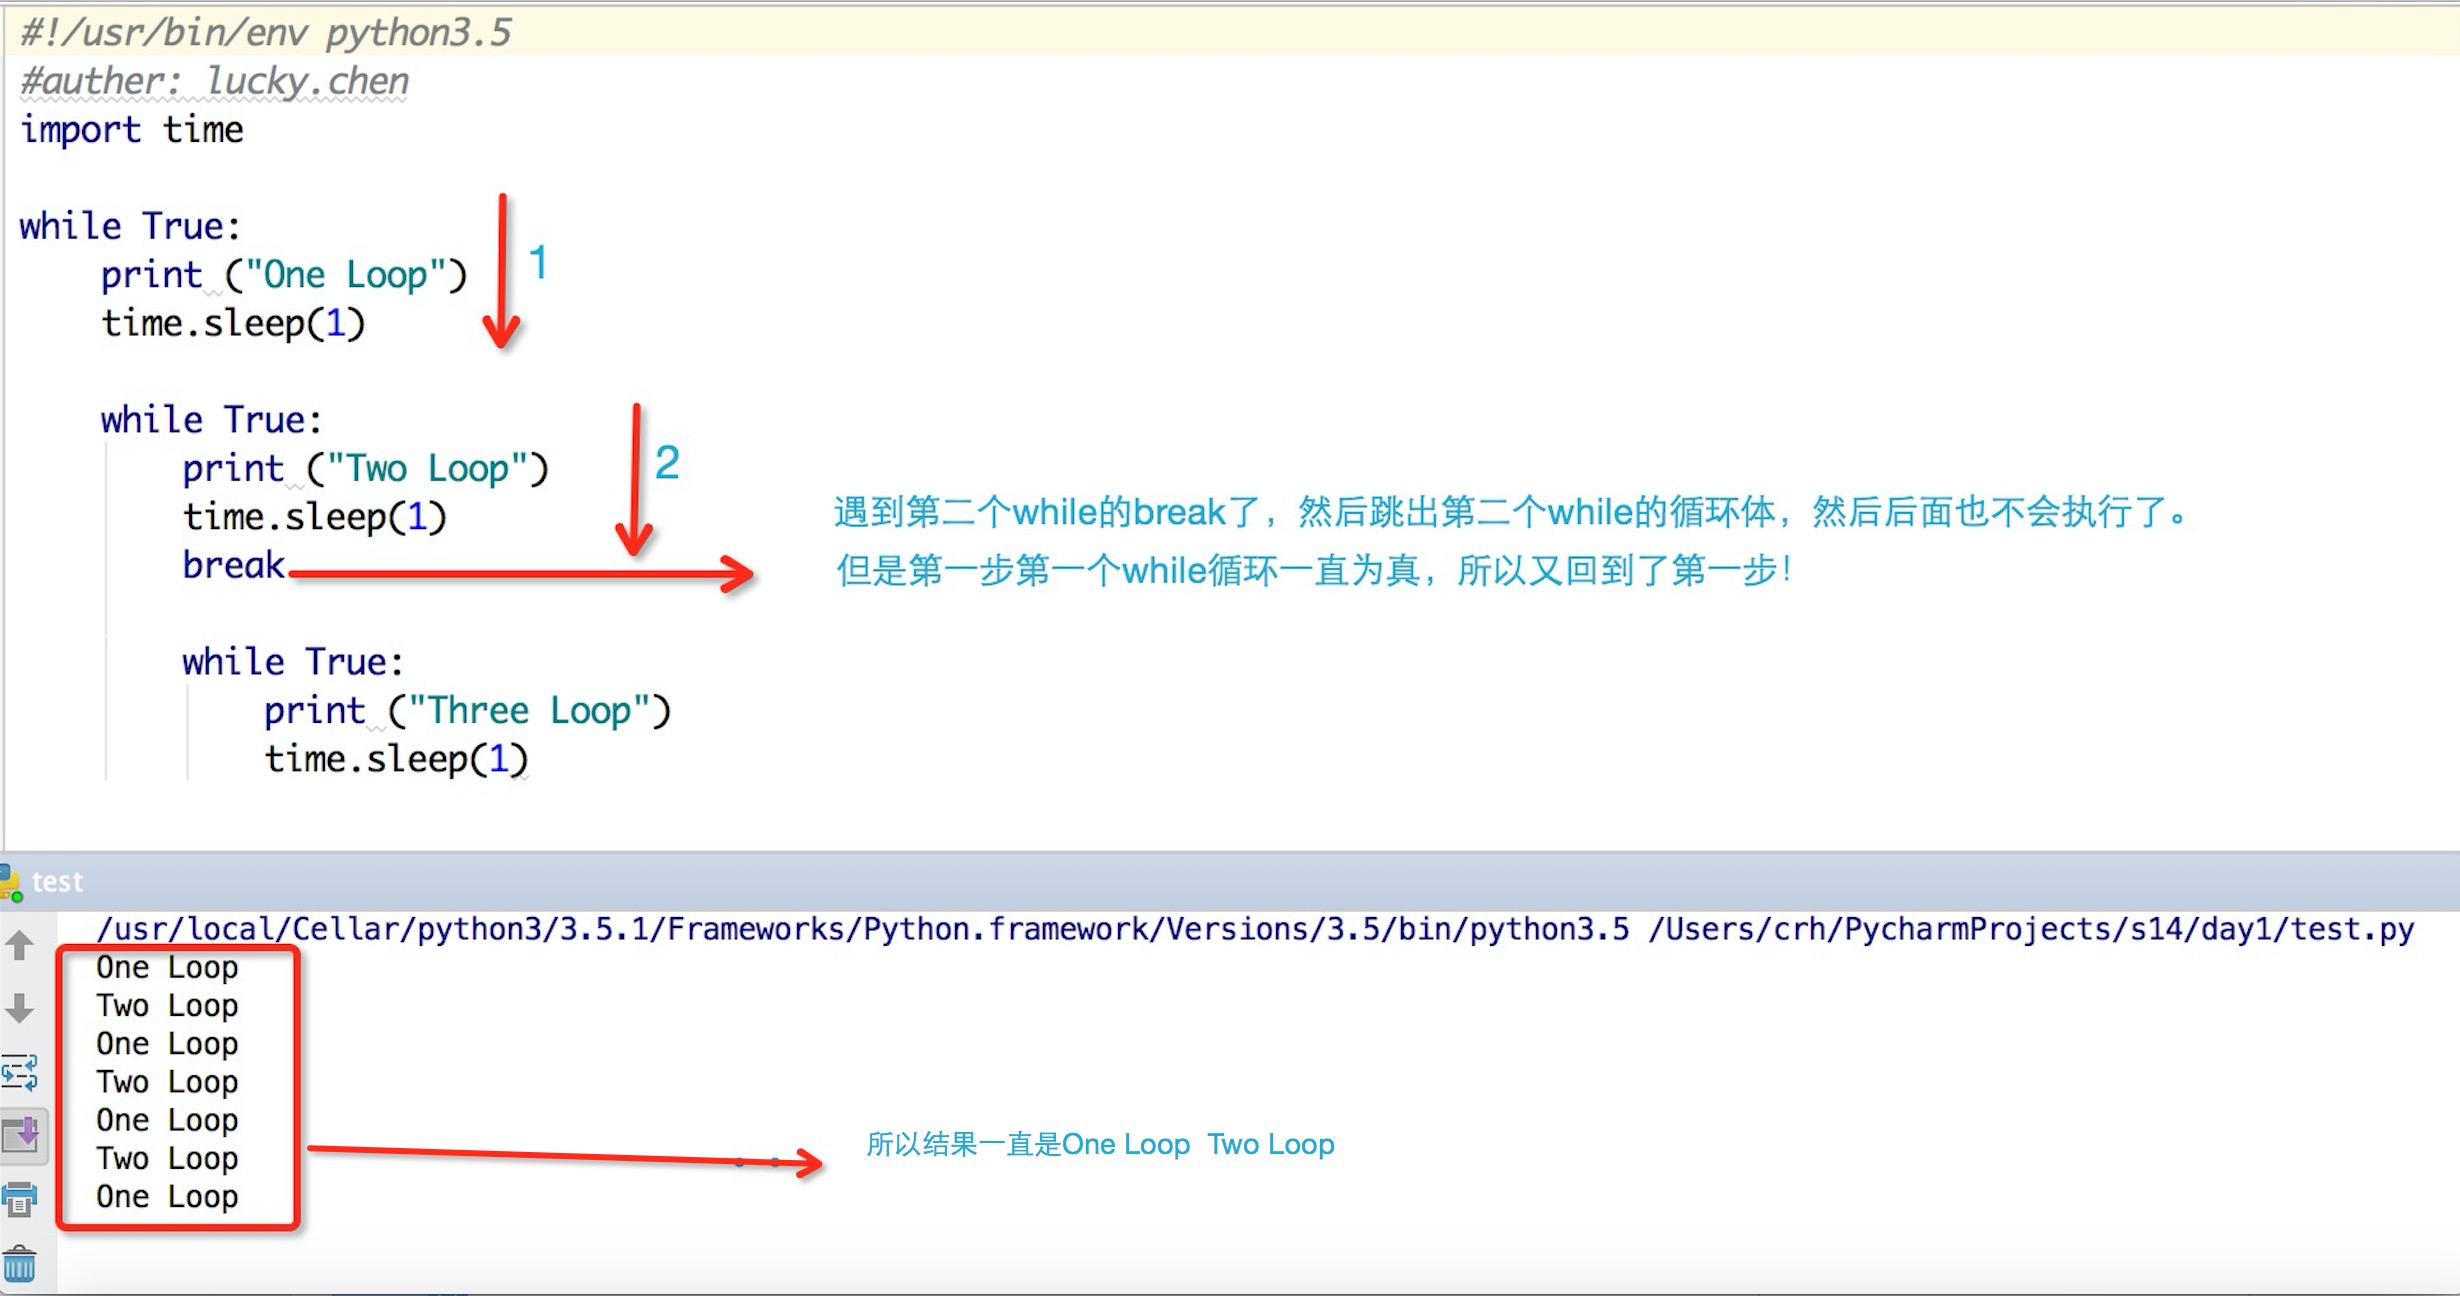
2、第二个while后加break分析
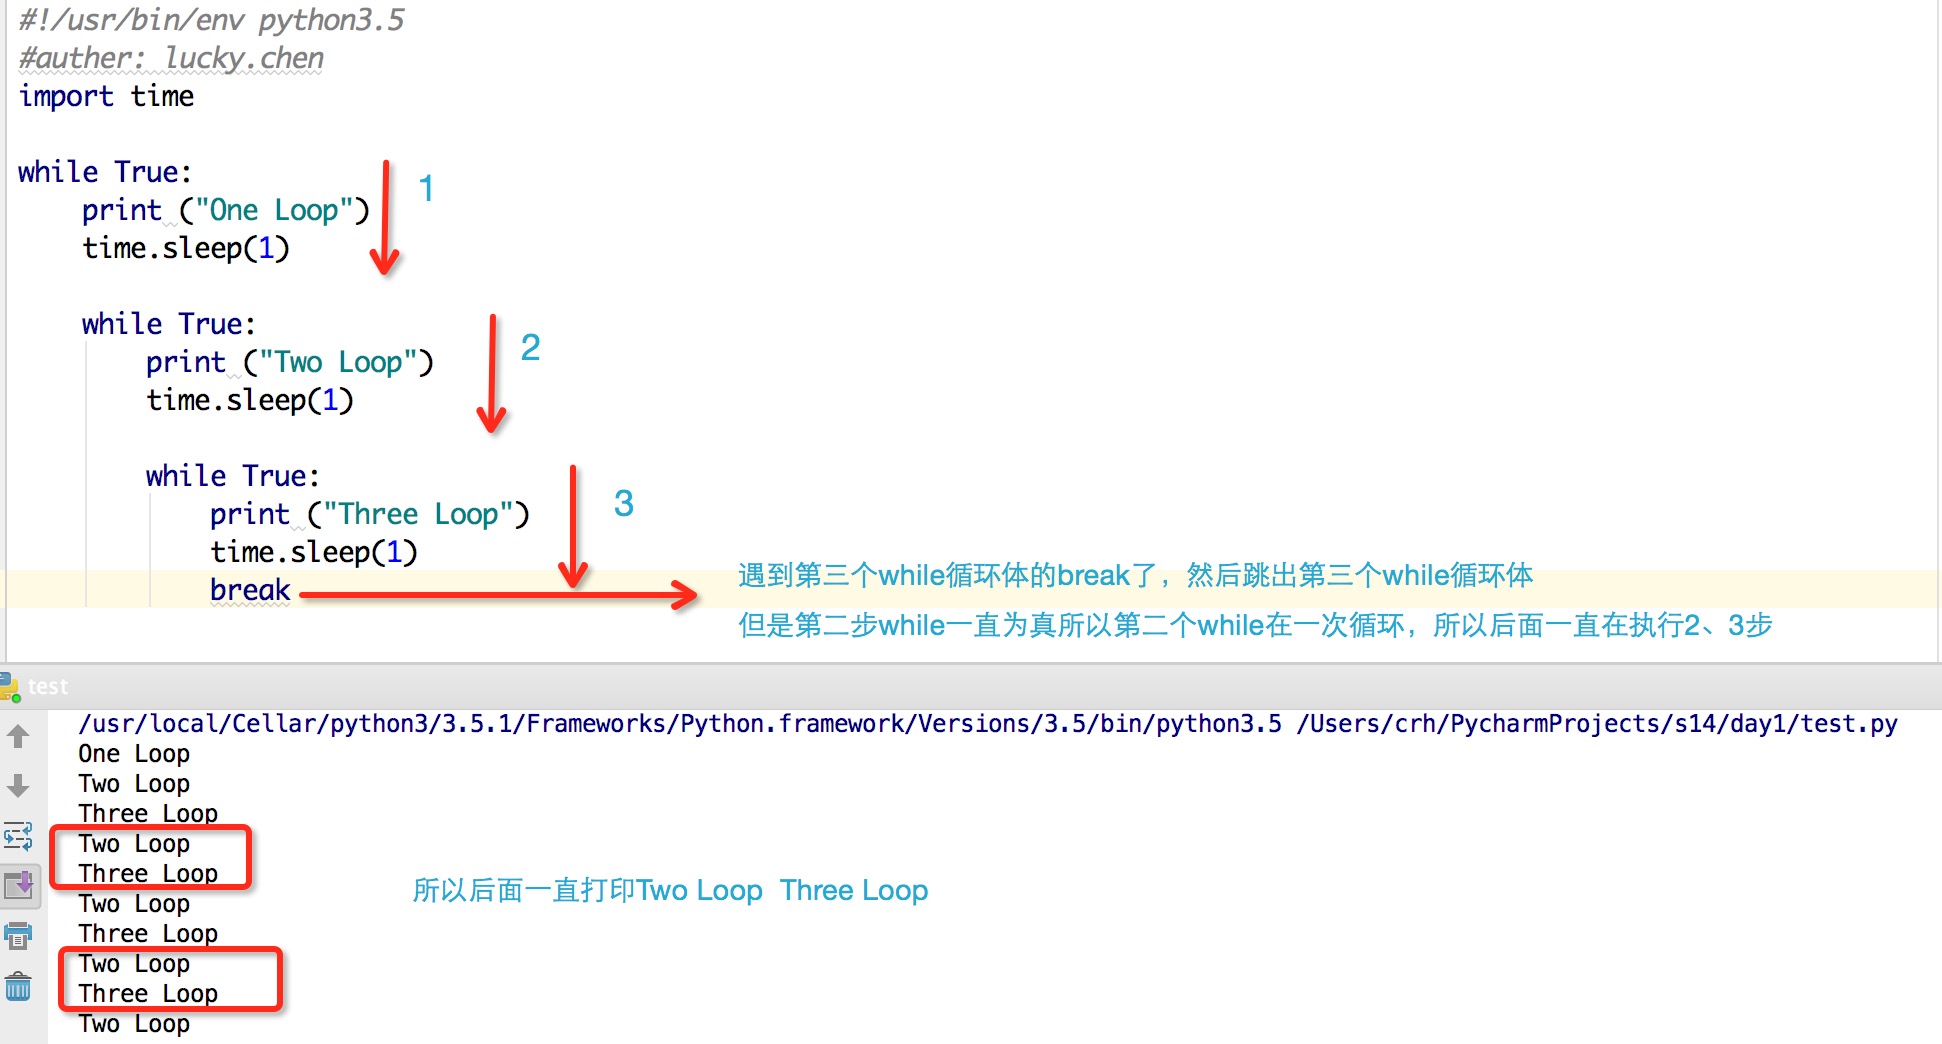
3、第三个while后加break分析
既然存在这种死循环的那我们有什么办法可以跳出呢?那就是打标志,标志位
Code:
#!/usr/bin/env python3.5分析和结果:
#auther: lucky.chen
count = 0
while True:
print ("我是第一层")
jump_1_flag = False
while True:
print ("我是第二层")
jump_2_flag = False
while True:
count += 1
print ("我是第三层")
if count > 3:
jump_2_flag = True
break
if jump_2_flag:
print ("第三层跳到我这里来了,我也要跳到第一层")
jump_1_flag = True
break
if jump_1_flag:
print ("第二层和第三层跳到第一层了,我也要跳")
break
教你认识Python(二)
空心菜 发表了文章 0 个评论 2633 次浏览 2016-07-25 17:51
Python的设计哲学和定位
Python的设计哲学是“优雅”、“明确”、“简单”。Python开发者的哲学是“用一种方法,最好是只有一种方法来做一件事”。在设计Python语言时,如果面临多种选择,Python开发者一般会拒绝花俏的语法,而选择明确没有或者很少有歧义的语法。这些准则被称为“ Python格言”。在Python解释器内运行import this可以获得完整的列表。
- []优美胜于丑陋(Python 以编写优美的代码为目标)[/][]明了胜于晦涩(优美的代码应当是明了的,命名规范,风格相似)[/][]简洁胜于复杂(优美的代码应当是简洁的,不要有复杂的内部实现)[/][]复杂胜于凌乱(如果复杂不可避免,那代码间也不能有难懂的关系,要保持接口简洁,多加注释!)[/][]扁平胜于嵌套(优美的代码应当是扁平的,不能有太多的嵌套)[/][]间隔胜于紧凑(优美的代码有适当的间隔,不要奢望一行代码解决问题,一行代码不能超过80个字符,你可以换行或起一个新的逻辑来写)[/][]可读性很重要(优美的代码是可读的)[/][]即便假借特例的实用性之名,也不可违背这些规则(这些规则至高无上),觉对不允许特列必须按照这个规则[/][]不要包容所有错误,除非你确定需要这样做(精准地捕获异常,不写 except:pass 风格的代码)[/][]当存在多种可能,不要尝试去猜测![/][]而是尽量找一种,最好是唯一一种明显的解决方案(如果不确定,就用穷举法)[/][]虽然这并不容易,因为你不是 Python 之父(这里的 Dutch 是指 Guido )[/][]做也许好过不做,但不假思索就动手还不如不做(动手之前要细思量)[/][]如果你无法向人描述你的方案,那肯定不是一个好方案;反之亦然(方案测评标准)[/][]命名空间是一种绝妙的理念,我们应当多加利用(倡导与号召)[/]
简单的拿php和python做对比:
python是综合性的语言,他不光可以做web开发。他俩的对比应该仅限于web开发方向。不见其phpweb开发别python好,php是先入为主,python的web框架在2000才有的比较晚了;没有相对的好和坏,只有某些方面,哪个更好!简单的拿C和python做对比:
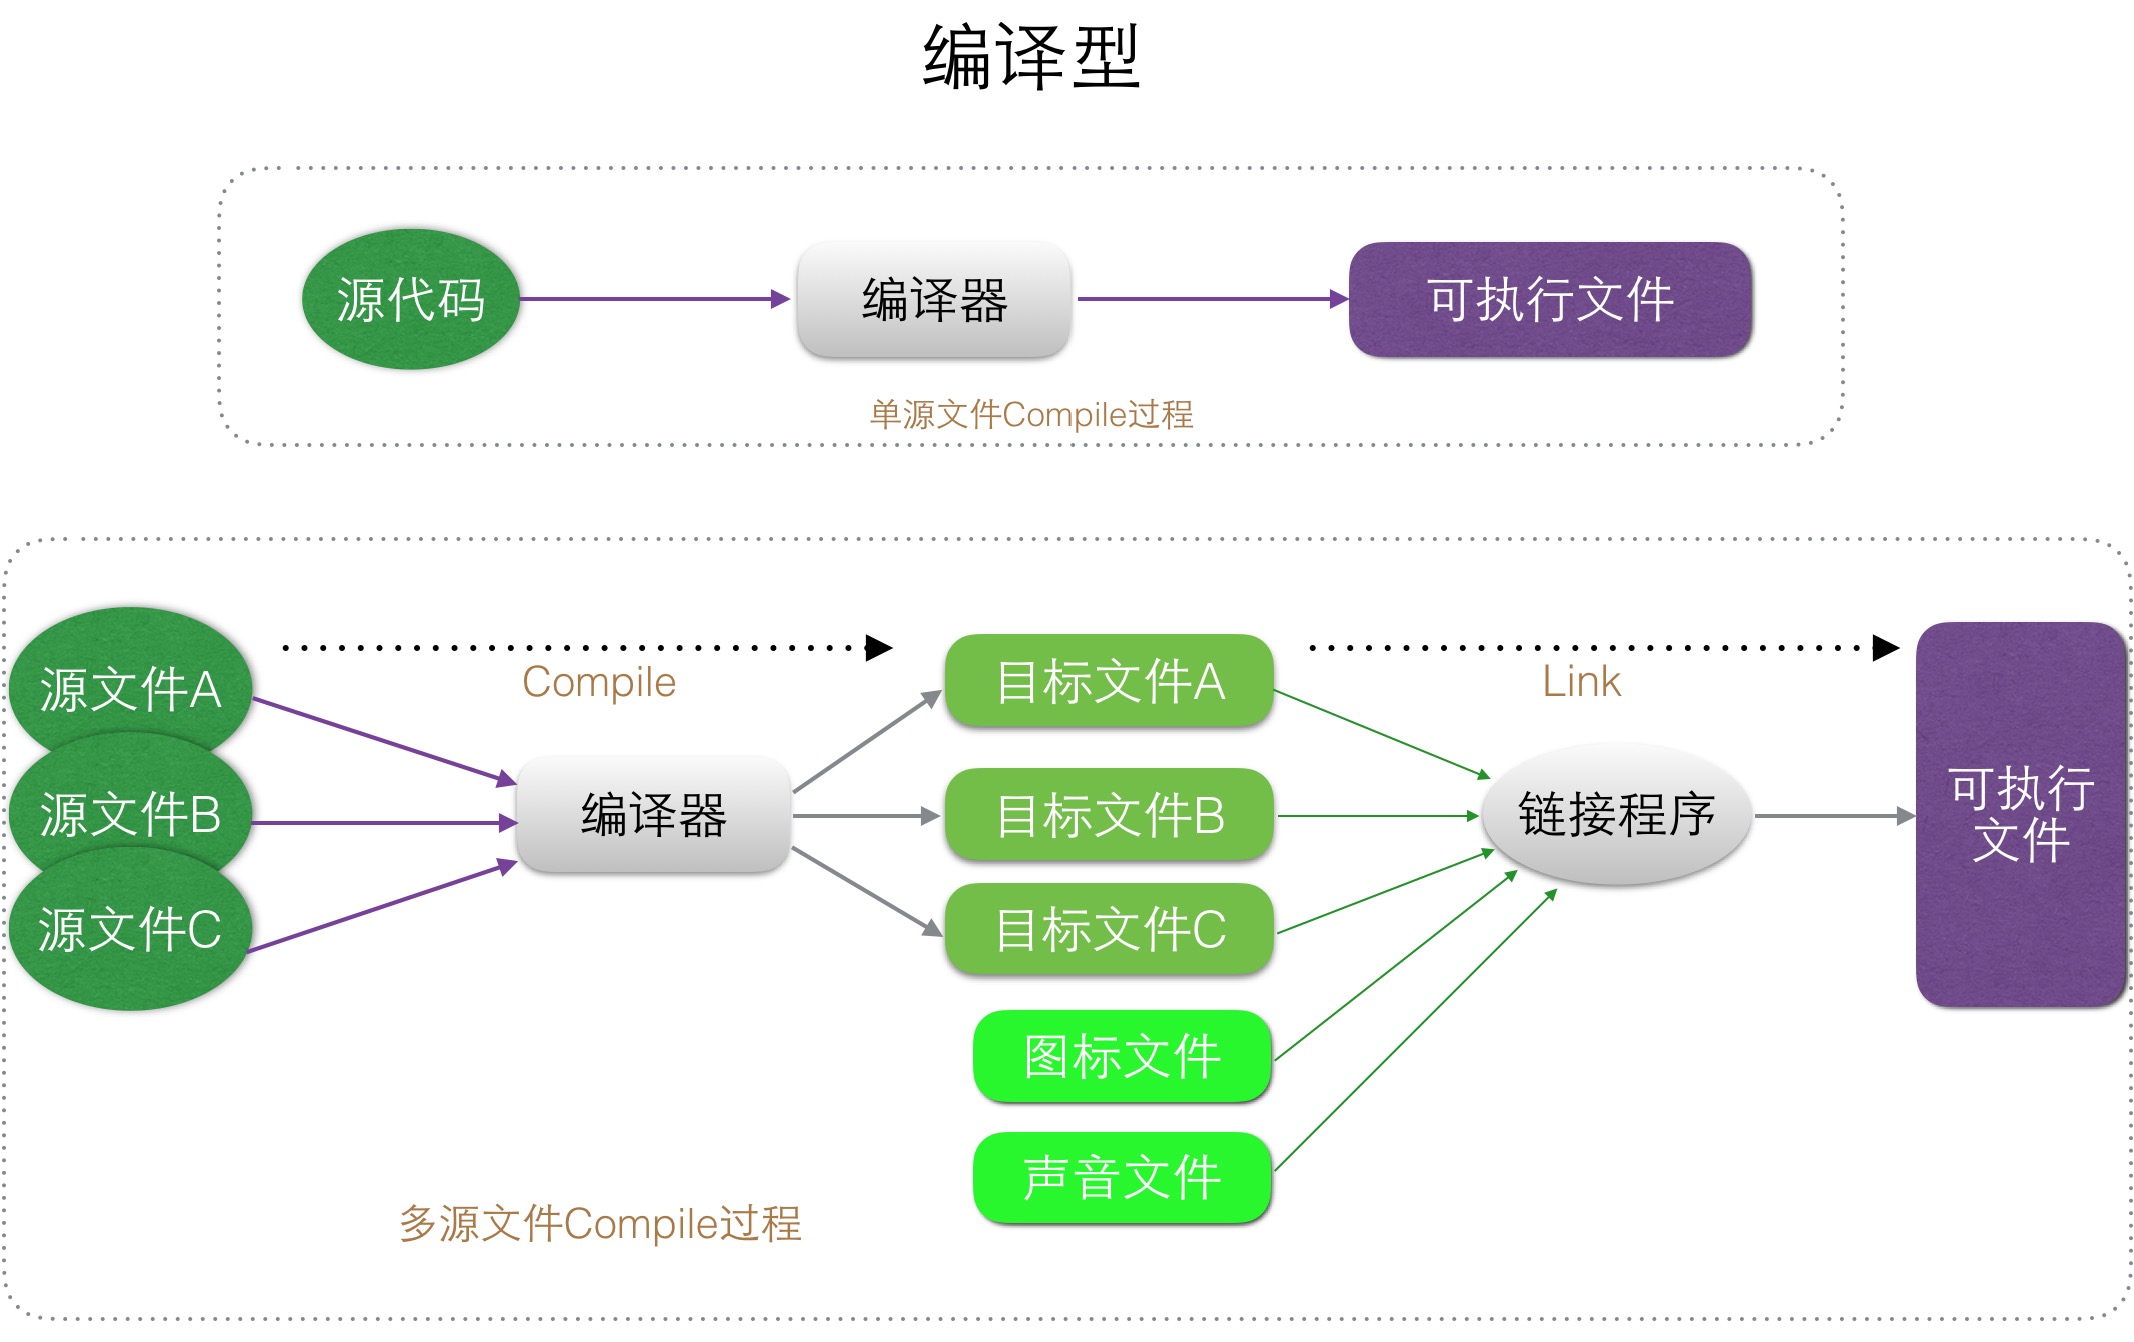
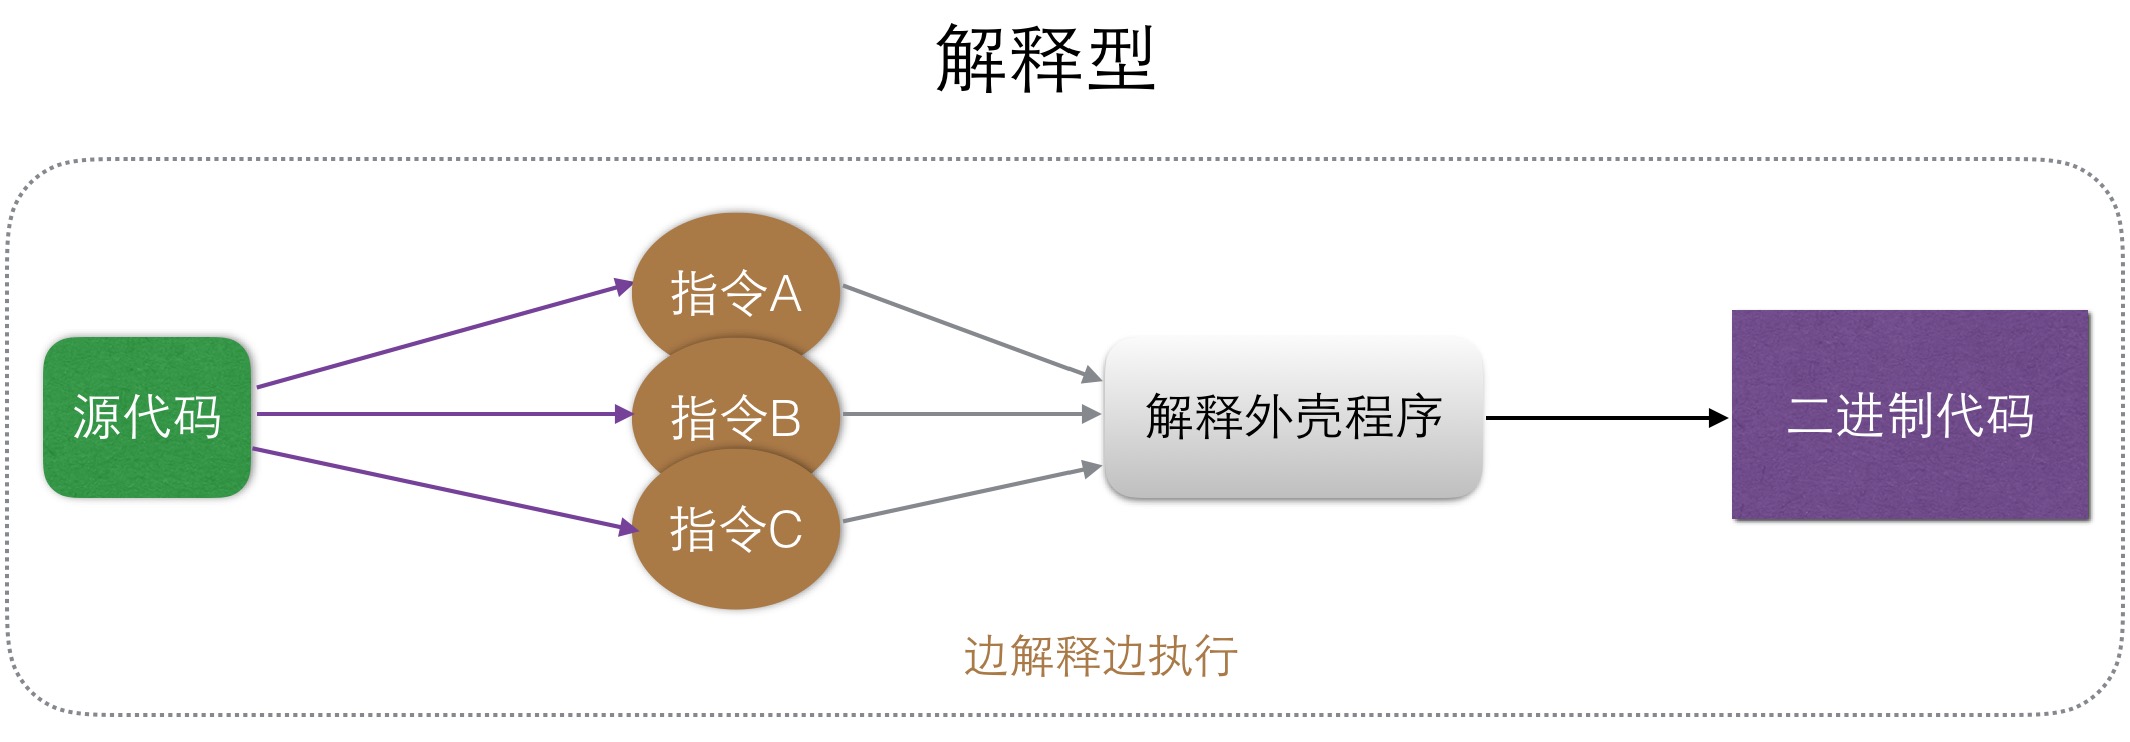
Python慢,慢的严重,慢出风格,慢出自信!!!相同的程序Python比C慢几百倍很正常,这是因为他们一个是编译型语言一个是解释型语言。


程序的快慢很大程度上程序员逻辑、SQL、算法,比起O(n)和O(n^2)的区别, 语言间的差异就显得微乎其微
Python的编码风格
1、语法
统一缩进:
同一级代码保持一致,所有的Python Code第一行顶格写,然后你的缩进最好保持一定的风格(保持2个空格、4个空格、8个空格,按照官方的推荐保持4个空格规范为好),一开始养成了一个好的编码模式编程起来都会很舒服,所以一定一开始就要严格要求自己。然后最好不要去用table去设置空格,因为在不同的操作系统下,不同的编辑器一个table键表达的空格数都有所不同,所以做好手敲空格!!


有句话说的好"工欲善其事,必先利其器",所以选择一把利器也会对你的编程有很大帮助(推荐:Pycharm、Eclipse with PyDev、Sublime Text、PyScripter等!)
2、变量
- []变量名只能是 字母、数字或下划线的任意组合不能有特殊字符( & ^ & $ # -),也不能有空格;[/*][]第一个字符必须是字母(大小写均可)或者是下划线('_')开头,不能是数字;[/][]有效的变量举例: _myname、name、file2、file_2、w1w2_xx001[/][]无效的变量举例: 2file、my name is crh 、mysql-pid[/]
small tip:
常量:数值不会变动的
变量:数值会变动的
在Python里面其实没有常量一说,所有的数值都可以改变,但是他依然有个常量的概念,但是是人为去定义它的,约定俗成的就是定义一个常量都是大写字母。
IDE="PyCharm" 这个IDE你就可以认为它是一个常量,但是你还是可以修改他,但是你既然有意识的把它定义为常量就不要去改动了。
Age=19 这个Age就是一个变量,你可以随时操作修改和引用。
****这里需要注意下,设置变量的时候不能设置python自带的内置方法比如type
以下关键字不能声明为变量名
['and', 'as', 'assert', 'break', 'class', 'continue', 'def', 'del', 'elif', 'else', 'except', 'exec', 'finally', 'for', 'from', 'global', 'if', 'import', 'in', 'is', 'lambda', 'not', 'or', 'pass', 'print', 'raise', 'return', 'try', 'while', 'with', 'yield']
3、字符编码
python解释器在加载 .py 文件中的代码时,会对内容进行编码(默认ascill)
ASCII(American Standard Code for Information Interchange,美国标准信息交换代码)是基于拉丁字母的一套电脑编码系统,主要用于显示现代英语和其他西欧语言,其最多只能用 8 位来表示(一个字节),即:2**8 = 256,所以,ASCII码最多只能表示 256 个符号
关于中文
为了处理汉字,程序员设计了用于简体中文的GB2312和用于繁体中文的big5。
GB2312(1980年)一共收录了7445个字符,包括6763个汉字和682个其它符号。汉字区的内码范围高字节从B0-F7,低字节从A1-FE,占用的码位是72*94=6768。其中有5个空位是D7FA-D7FE。
GB2312 支持的汉字太少。1995年的汉字扩展规范GBK1.0收录了21886个符号,它分为汉字区和图形符号区。汉字区包括21003个字符。2000年的 GB18030是取代GBK1.0的正式国家标准。该标准收录了27484个汉字,同时还收录了藏文、蒙文、维吾尔文等主要的少数民族文字。现在的PC平台必须支持GB18030,对嵌入式产品暂不作要求。所以手机、MP3一般只支持GB2312。
从ASCII、GB2312、GBK 到GB18030,这些编码方法是向下兼容的,即同一个字符在这些方案中总是有相同的编码,后面的标准支持更多的字符。在这些编码中,英文和中文可以统一地处理。区分中文编码的方法是高字节的最高位不为0。按照程序员的称呼,GB2312、GBK到GB18030都属于双字节字符集 (DBCS)。
有的中文Windows的缺省内码还是GBK,可以通过GB18030升级包升级到GB18030。不过GB18030相对GBK增加的字符,普通人是很难用到的,通常我们还是用GBK指代中文Windows内码。
显然ASCII码无法将世界上的各种文字和符号全部表示,所以,就需要新出一种可以代表所有字符和符号的编码,即:Unicode
Unicode(统一码、万国码、单一码)是一种在计算机上使用的字符编码。Unicode 是为了解决传统的字符编码方案的局限而产生的,它为每种语言中的每个字符设定了统一并且唯一的二进制编码,规定虽有的字符和符号最少由 16 位来表示(2个字节),即:2 **16 = 65536,
注:此处说的的是最少2个字节,可能更多
UTF-8,是对Unicode编码的压缩和优化,他不再使用最少使用2个字节,而是将所有的字符和符号进行分类:ascii码中的内容用1个字节保存、欧洲的字符用2个字节保存,东亚的字符用3个字节保存...
所以,python解释器在加载 .py 文件中的代码时,会对内容进行编码(默认ascill),如果是如下代码的话:
报错:ascii码无法表示中文
#!/usr/bin/env python改正:应该显示的告诉python解释器,用什么编码来执行源代码,即:
print "你好,世界"
#!/usr/bin/env python

# -[i]- coding: utf-8 -[/i]-


print "你好,世界"
4、注释
单行注释:#
多行注释:""" 被注释内容""" or '''被注释内容'''
Python安装
Windows:
1、下载安装包

    https://www.python.org/downloads/

2、安装

    默认安装路径:C:\python27

3、配置环境变量

    【右键计算机】--》【属性】--》【高级系统设置】--》【高级】--》【环境变量】--》【在第二个内容框中找到 变量名为Path 的一行,双击】 --> 【Python安装目录追加到变值值中,用 ; 分割】

    如:原来的值;C:\python27,切记前面有分号,如果安装的是Python3.X也是同样的方法,换汤不换药。
Linux Or Mac:
无需安装,一般自带不是Python2.6就是Python2.7


如果要安装Python3.X的话,Linux下如果你的系统版本较低的话,默认安装源里面是没有的,这样就需要你用源码安装。

如果是Mack系统可以直接:

$ sudo brew install python3
教你认识Python(一)
空心菜 发表了文章 0 个评论 3002 次浏览 2016-07-25 16:33
Python是什么类型的语言
编程语言一般以如下几个角度分类,编译型和解释型、静态语言和动态语言、强类型定义语言和弱类型定义语言,具体每个分类代表什么意思,下面一一介绍。
编译型:
我们先看看编译型,其实它和汇编语言是一样的:也是有一个负责翻译的程序来对我们的源代码进行转换,生成相对应的可执行代码。这个过程说得专业一点,就称为编译(Compile),而负责编译的程序自然就称为编译器(Compiler)。如果我们写的程序代码都包含在一个源文件中,那么通常编译之后就会直接生成一个可执行文件,我们就可以直接运行了。但对于一个比较复杂的项目,为了方便管理,我们通常把代码分散在各个源文件中,作为不同的模块来组织。这时编译各个文件时就会生成目标文件(Object file)而不是前面说的可执行文件。一般一个源文件的编译都会对应一个目标文件。这些目标文件里的内容基本上已经是可执行代码了,但由于只是整个项目的一部分,所以我们还不能直接运行。待所有的源文件的编译都大功告成,我们就可以最后把这些半成品的目标文件“打包”成一个可执行文件了,这个工作由另一个程序负责完成,由于此过程好像是把包含可执行代码的目标文件连接装配起来,所以又称为链接(Link),而负责链接的程序就叫……就叫链接程序(Linker)。链接程序除了链接目标文件外,可能还有各种资源,像图标文件啊、声音文件啊什么的,还要负责去除目标文件之间的冗余重复代码,等等,所以……也是挺累的。链接完成之后,一般就可以得到我们想要的可执行文件了。
解释型:
上面我们大概地介绍了编译型语言的特点,现在再看看解释型。从字面上看,“编译”和“解释”的确都有“翻译”的意思,它们的区别则在于翻译的时机安排不大一样。打个比方:假如你打算阅读一本外文书,而你不知道这门外语,那么你可以找一名翻译,给他足够的时间让他从头到尾把整本书翻译好,然后把书的母语版交给你阅读;或者,你也立刻让这名翻译辅助你阅读,让他一句一句给你翻译,如果你想往回看某个章节,他也得重新给你翻译。翻译型就是阅读一段,翻译一段,再阅读一段,翻译一段。
总结:
两种方式,前者就相当于我们刚才所说的编译型:一次把所有的代码转换成机器语言,然后写成可执行文件;而后者就相当于我们要说的解释型:在程序运行的前一刻,还只有源程序而没有可执行程序;而程序每执行到源程序的某一条指令,则会有一个称之为解释程序的外壳程序将源代码转换成二进制代码以供执行,总言之,就是不断地解释、执行、解释、执行……所以,解释型程序是离不开解释程序的。像早期的BASIC就是一门经典的解释型语言,要执行BASIC程序,就得进入BASIC环境,然后才能加载程序源文件、运行。解释型程序中,由于程序总是以源代码的形式出现,因此只要有相应的解释器,移植几乎不成问题。编译型程序虽然源代码也可以移植,但前提是必须针对不同的系统分别进行编译,对于复杂的工程来说,的确是一件不小的时间消耗,况且很可能一些细节的地方还是要修改源代码。而且,解释型程序省却了编译的步骤,修改调试也非常方便,编辑完毕之后即可立即运行,不必像编译型程序一样每次进行小小改动都要耐心等待漫长的Compiling…Linking…这样的编译链接过程。不过凡事有利有弊,由于解释型程序是将编译的过程放到执行过程中,这就决定了解释型程序注定要比编译型慢上一大截,像几百倍的速度差距也是不足为奇的。
编译型与解释型,两者各有利弊。前者由于程序执行速度快,同等条件下对系统要求较低,因此像开发操作系统、大型应用程序、数据库系统等时都采用它,像C/C++、Pascal/Object Pascal(Delphi)、VB等基本都可视为编译语言,而一些网页脚本、服务器脚本及辅助开发接口这样的对速度要求不高、对不同系统平台间的兼容性有一定要求的程序则通常使用解释性语言,如Java、JavaScript、VBScript、Perl、Python等等。
但既然编译型与解释型各有优缺点又相互对立,所以一批新兴的语言都有把两者折衷起来的趋势,例如Java语言虽然比较接近解释型语言的特征,但在执行之前已经预先进行一次预编译,生成的代码是介于机器码和Java源代码之间的中介代码,运行的时候则由JVM(Java的虚拟机平台,可视为解释器)解释执行。它既保留了源代码的高抽象、可移植的特点,又已经完成了对源代码的大部分预编译工作,所以执行起来比“纯解释型”程序要快许多。而像VB6(或者以前版本)、C#这样的语言,虽然表面上看生成的是.exe可执行程序文件,但VB6编译之后实际生成的也是一种中介码,只不过编译器在前面安插了一段自动调用某个外部解释器的代码(该解释程序独立于用户编写的程序,存放于系统的某个DLL文件中,所有以VB6编译生成的可执行程序都要用到它),以解释执行实际的程序体。C#(以及其它.net的语言编译器)则是生成.net目标代码,实际执行时则由.net解释系统(就像JVM一样,也是一个虚拟机平台)进行执行。当然.net目标代码已经相当“低级”,比较接近机器语言了,所以仍将其视为编译语言,而且其可移植程度也没有Java号称的这么强大,Java号称是“一次编译,到处执行”,而.net则是“一次编码,到处编译”。呵呵,当然这些都是题外话了。总之,随着设计技术与硬件的不断发展,编译型与解释型两种方式的界限正在不断变得模糊。
动态语言和静态语言
通常我们所说的动态语言、静态语言是指动态类型语言和静态类型语言。
- []动态类型语言:动态类型语言是指在运行期间才去做数据类型检查的语言,也就是说,在用动态类型的语言编程时,永远也不用给任何变量指定数据类型,该语言会在你第一次赋值给变量时,在内部将数据类型记录下来。Python和Ruby就是一种典型的动态类型语言,其他的各种脚本语言如VBScript也多少属于动态类型语言。[/][]静态类型语言:静态类型语言与动态类型语言刚好相反,它的数据类型是在编译其间检查的,也就是说在写程序时要声明所有变量的数据类型,C/C++是静态类型语言的典型代表,其他的静态类型语言还有C#、JAVA等。[/]
强类型定义语言和弱类型定义语言
- []强类型定义语言:强制数据类型定义的语言。也就是说,一旦一个变量被指定了某个数据类型,如果不经过强制转换,那么它就永远是这个数据类型了。举个例子:如果你定义了一个整型变量a,那么程序根本不可能将a当作字符串类型处理。强类型定义语言是类型安全的语言。[/][]弱类型定义语言:数据类型可以被忽略的语言。它与强类型定义语言相反, 一个变量可以赋不同数据类型的值。[/]
强类型定义语言在速度上可能略逊色于弱类型定义语言,但是强类型定义语言带来的严谨性能够有效的避免许多错误。另外,“这门语言是不是动态语言”与“这门语言是否类型安全”之间是完全没有联系的!
例如:Python是动态语言,是强类型定义语言(类型安全的语言); VBScript是动态语言,是弱类型定义语言(类型不安全的语言); JAVA是静态语言,是强类型定义语言(类型安全的语言)。
通过上面这些介绍,我们可以得出,Python是一门动态解释性的强类型定义语言。基于这些特点,Pyhton有哪些优缺点呢?
Python的优缺点
优点:
- []Python的定位是“优雅”、“明确”、“简单”,所以Python程序看上去总是简单易懂,初学者学Python,不但入门容易,而且将来深入下去,可以编写那些非常非常复杂的程序。[/][]开发效率非常高,Python有非常强大的第三方库,基本上你想通过计算机实现任何功能,Python官方库里都有相应的模块进行支持,直接下载调用后,在基础库的基础上再进行开发,大大降低开发周期,避免重复造轮子。[/][]高级语言————当你用Python语言编写程序的时候,你无需考虑诸如如何管理你的程序使用的内存一类的底层细节[/][]可移植性————由于它的开源本质,Python已经被移植在许多平台上(经过改动使它能够工 作在不同平台上)。如果你小心地避免使用依赖于系统的特性,那么你的所有Python程序无需修改就几乎可以在市场上所有的系统平台上运行[/][]可扩展性————如果你需要你的一段关键代码运行得更快或者希望某些算法不公开,你可以把你的部分程序用C或C++编写,然后在你的Python程序中使用它们。[/][]可嵌入性————你可以把Python嵌入你的C/C++程序,从而向你的程序用户提供脚本功能[/]
缺点:
- []速度慢,Python 的运行速度相比C语言确实慢很多,跟JAVA相比也要慢一些,因此这也是很多所谓的大牛不屑于使用Python的主要原因,但其实这里所指的运行速度慢在大多数情况下用户是无法直接感知到的,必须借助测试工具才能体现出来,比如你用C运一个程序花了0.1s,用Python是0.01s,这样C语言直接比Python快了10s,算是非常夸张了,但是你是无法直接通过肉眼感知的,因为一个正常人所能感知的时间最小单位是0.15-0.4s左右,哈哈。其实在大多数情况下Python已经完全可以满足你对程序速度的要求,除非你要写对速度要求极高的搜索引擎等,这种情况下,当然还是建议你用C去实现的。[/][]代码不能加密,因为PYTHON是解释性语言,它的源码都是以名文形式存放的,不过我不认为这算是一个缺点,如果你的项目要求源代码必须是加密的,那你一开始就不应该用Python来去实现。[/][]线程不能利用多CPU问题,这是Python被人诟病最多的一个缺点,GIL即全局解释器锁(Global Interpreter Lock),是计算机程序设计语言解释器用于同步线程的工具,使得任何时刻仅有一个线程在执行,Python的线程是操作系统的原生线程。在Linux上为pthread,在Windows上为Win thread,完全由操作系统调度线程的执行。一个python解释器进程内有一条主线程,以及多条用户程序的执行线程。即使在多核CPU平台上,由于GIL的存在,所以禁止多线程的并行执行。关于这个问题的折衷解决方法,我们在以后线程和进程章节里再进行详细探讨。[/]
总结:
当然,Python还有一些其它的小缺点,在这就不一一列举了,我想说的是,任何一门语言都不是完美的,都有擅长和不擅长做的事情,建议各位不要拿一个语言的劣势去跟另一个语言的优势来去比较,语言只是一个工具,是实现程序设计师思想的工具,就像我们之前中学学几何时,有的时候需要要圆规,有的时候需要用三角尺一样,拿相应的工具去做它最擅长的事才是正确的选择。之前很多人问我Shell和Python到底哪个好?我回答说Shell是个脚本语言,但Python不只是个脚本语言,能做的事情更多,然后又有钻牛角尖的人说完全没必要学Python, Python能做的事情Shell都可以做,只要你足够牛B,然后又举了用Shell可以写俄罗斯方块这样的游戏,对此我能说表达只能是,不要跟SB理论,SB会把你拉到跟他一样的高度,然后用充分的经验把你打倒。
Python发展史
- []1989年,为了打发圣诞节假期,Guido开始写Python语言的编译器。Python这个名字,来自Guido所挚爱的电视剧Monty Python’s Flying Circus。他希望这个新的叫做Python的语言,能符合他的理想:创造一种C和shell之间,功能全面,易学易用,可拓展的语言。[/][]1991年,第一个Python编译器诞生。它是用C语言实现的,并能够调用C语言的库文件。从一出生,Python已经具有了:类,函数,异常处理,包含表和词典在内的核心数据类型,以及模块为基础的拓展系统。[/][]Granddaddy of Python web frameworks, Zope 1 was released in 1999[/][]Python 1.0 - January 1994 增加了 lambda, map, filter and reduce.[/][]Python 2.0 - October 16, 2000,加入了内存回收机制,构成了现在Python语言框架的基础[/][]Python 2.4 - November 30, 2004, 同年目前最流行的WEB框架Django 诞生[/][]Python 2.5 - September 19, 2006[/][]Python 2.6 - October 1, 2008[/][]Python 2.7 - July 3, 2010[/][]In November 2014, it was announced that Python 2.7 would be supported until 2020, and reaffirmed that there would be no 2.8 release as users were expected to move to Python 3.4+ as soon as possible[/][]Python 3.0 - December 3, 2008[/][]Python 3.1 - June 27, 2009[/][]Python 3.2 - February 20, 2011[/][]Python 3.3 - September 29, 2012[/][]Python 3.4 - March 16, 2014[/][]Python 3.5 - September 13, 2015[/]
Python 2 or 3?
In summary : Python 2.x is legacy, Python 3.x is the present and future of the language
Python 3.0 was released in 2008. The final 2.x version 2.7 release came out in mid-2010, with a statement of
extended support for this end-of-life release. The 2.x branch will see no new major releases after that. 3.x is
under active development and has already seen over five years of stable releases, including version 3.3 in 2012,
3.4 in 2014, and 3.5 in 2015. This means that all recent standard library improvements, for example, are only
available by default in Python 3.x.
Guido van Rossum (the original creator of the Python language) decided to clean up Python 2.x properly, with less regard for backwards compatibility than is the case for new releases in the 2.x range. The most drastic improvement is the better Unicode support (with all text strings being Unicode by default) as well as saner bytes/Unicode separation.
Besides, several aspects of the core language (such as print and exec being statements, integers using floor division) have been adjusted to be easier for newcomers to learn and to be more consistent with the rest of the language, and old cruft has been removed (for example, all classes are now new-style, "range()" returns a memory efficient iterable, not a list as in 2.x).
到底是选择Python2.[i] 还是Python3.[/i] 我想看到上面的介绍你会知道Python2.[i] 官方只会维护到2020年,也就是说2020之后官网库里面的库包和一些使用方法,还有好些内置库的改变等,我想2.6、2.7只是一个过渡版本,3.[/i]必然是后续Python官网主推行的版本,所以你不需要纠结了,学习Python3就对了。
Python2和Python3的区别
Print是一个函数
The statement has been replaced with a print() function, with keyword arguments to replace most of the special syntax of the old statement (PEP 3105). Examples:
Old: print "The answer is", 2[i]2 New: print("The answer is", 2[/i]2)你也可以定制项目之间的分隔符,例如:
Old: print x, # Trailing comma suppresses newline New: print(x, end=" ") # Appends a space instead of a newline
Old: print # Prints a newline
New: print() # You must call the function!
Old: print >>sys.stderr, "fatal error" New: print("fatal error", file=sys.stderr)
Old: print (x, y) # prints repr((x, y))
New: print((x, y)) # Not the same as print(x, y)!
print("There are <", 2**32, "> possibilities!", sep="")Python3从此不再为讨厌的字符编码而烦恼
还可以这样玩: (A,[i]REST,B)=RANGE(5)
>>> a,[/i]rest,b = range(5)某些库名的更改:
[quote]>> a,rest,b
(0, [1, 2, 3], 4)
参考:http://www.cnblogs.com/alex3714/articles/5465198.html[/quote]
Python的前世今生
空心菜 发表了文章 0 个评论 2595 次浏览 2016-07-08 01:44
一、Python是什么
Python是一种计算机程序设计语言。你可能在之前听说过很多编程语言,比如难学的C语言(语法和实现难度),非常流行的JAVA语言(尤其是现在分布式存储和服务),非常有争议的PHP(常见 WordPress 大多网站),前端HTML、JavaScripts、Node.JS、还有最近随着容器风行的Golang等等。那Python是What?
Python是由吉多·范罗苏姆(Guido van Rossum)在1989年的圣诞期间为了打发在阿姆斯特丹无聊的时间,决心开发一个新的脚本解释程序,作为ABC语言的一种继承。
TIOBE 2016年6月编程语言排行榜,Python赶超PHP占据第四位!
前 10 名编程语言长期走势图:
由上图可见,Python整体呈上升趋势,反映出Python应用越来越广泛并且也逐渐得到编程人员的喜爱和认可!!
Python可以应用于众多领域,如:数据分析、组件集成、网络服务、图像处理、数值计算和科学计算等众多领域。目前业内几乎所有大中型互联网企业都在使用Python,如:Youtube、Dropbox、BT、Quora(中国知乎)、豆瓣、知乎、Google、Yahoo!、Facebook、NASA、百度、腾讯、汽车之家、美团等。互联网公司广泛使用Python来做的事一般有:自动化运维、自动化测试、大数据分析、爬虫、Web 等。
二、Python的分类
Cpython:
Python的官方版本,使用C语言实现,使用最为广泛,CPython实现会将源文件(py文件)转换成字节码文件(pyc文件),然后运行在Python虚拟机上。
Jyhton:
Python的Java实现,Jython会将Python代码动态编译成Java字节码,然后在JVM上运行。
IronPython:
Python的C#实现,IronPython将Python代码编译成C#字节码,然后在CLR上运行。(与Jython类似)
PyPy:
Python实现的Python,将Python的字节码字节码再编译成机器码。RubyPython、Brython ...等等
以上除PyPy之外,其他的Python的对应关系和执行流程如下:
PyPy,在Python的基础上对Python的字节码进一步处理,从而提升执行速度!
三、为什么要学Python
Python实用简单、高效、易入门(其实想深入还是挺难的)。不同的语言做相同的事情,编程的效率和代码数也不一样。比如完成同一个任务C语言可能需要写100行,Jave语言50行,但是Python可能 10行就能做到。
C 和 Python、Java、C#相比:
C语言: 代码编译得到 机器码 ,机器码在处理器上直接执行,每一条指令控制CPU工作
其他语言: 代码编译得到 字节码 ,虚拟机执行字节码并转换成机器码再后在处理器上执行
Python 和 C相比:(Python这门语言是由C开发而来)
对于使用:Python的类库齐全并且使用简洁,如果要实现同样的功能,Python 10行代码可以解决,C可能就需要100行甚至更多.
对于速度:Python的运行速度相较与C,绝逼是慢了。
Python 和 Java、C#相比:
对于使用:Linux原装Python,其他语言没有;以上几门语言都有非常丰富的类库支持
对于速度:Python在速度上可能稍显逊色
Python和PHP相比:
Python提供了丰富的数据结构,非常容易和c集成。相比较而言,php集中专注在web上。 php大多只提供了系统api的简单封装,但是python标准包却直接提供了很多实用的工具。python的适用性更为广泛,php在web更加专业,php的简单数据类型,完全是为web量身定做。所以,Python和其他语言没有什么本质区别,其他区别在于:擅长某领域、人才丰富、先入为主。还是那句话,不在于你用哪种语言,而在于用的人。
时间匆匆,选择一门你喜欢的语言就赶快学习吧,别等你老了!

