
通知设置 新通知
kvm虚拟机启动报错Unable to find security driver for model selinux
运维 OS小编 发表了文章 0 个评论 2104 次浏览 2022-05-17 15:46

好久没用kvm虚拟话了,之前有台物理机配置比较高,就借助kvm虚拟化技术虚拟了几台虚拟机做实验完,但是今天启动报如下错误:
[root@kvm-labs kvm]# virsh start centos7-lab-node1

error: Failed to start domain centos7-lab-node1

error: unsupported configuration: Unable to find security driver for model selinux
根据错误提示,怀疑是系统selinux的问题,但是发现selinux是disabled,难道要强制用selinux,不合理啊。重新梳理逻辑,kvm虚拟机是可被定义的,是不是定义的配置文件中有selinux相关定义,那是不是可以去掉,经过实验还真ok,解决步骤如下。
1. 进入虚拟机配置文件目录
cd /etc/libvirt/qemu/

# 如果你构建环境修改过默认路径,根据实际情况进入
2. 编辑虚拟机配置文件
vim  centos7-lab-node1.xml


  .....................

   <input type='tablet' bus='usb'>

      <address type='usb' bus='0' port='1'/>

    </input>

    <input type='mouse' bus='ps2'/>

    <input type='keyboard' bus='ps2'/>

    <graphics type='vnc' port='-1' autoport='yes' listen='0.0.0.0'>

      <listen type='address' address='0.0.0.0'/>

    </graphics>

    <video>

      <model type='cirrus' vram='16384' heads='1' primary='yes'/>

      <address type='pci' domain='0x0000' bus='0x00' slot='0x02' function='0x0'/>

    </video>

    <memballoon model='virtio'>

      <address type='pci' domain='0x0000' bus='0x00' slot='0x07' function='0x0'/>

    </memballoon>

    <rng model='virtio'>

      <backend model='random'>/dev/urandom</backend>

      <address type='pci' domain='0x0000' bus='0x00' slot='0x08' function='0x0'/>

    </rng>

  </devices>

 <seclabel type='dynamic' model='selinux' relabel='yes'/>

</domain>
如上,删除<seclabel type='dynamic' model='selinux' relabel='yes'/> , 然后保存退出。
3. 重新定义配置文件
virsh define ./centos7-lab-node1.xml
然后重新执行virsh start centos7-lab-node1 就可以了。
如果想迁移虚拟机的存储路径也可以关机,修改配置文件下的存储路径,并将.qcow2文件移动到相应的目录下即可.
<disk type='file' device='disk'>

      <driver name='qemu' type='qcow2'/>

      <source file='/data/kvmdata/centos7-lab-node1.qcow2'/>

      <target dev='vda' bus='virtio'/>

      <address type='pci' domain='0x0000' bus='0x00' slot='0x06' function='0x0'/>

</disk>
修改完成后,然后重新定义配置文件,重启虚拟机即可。
Centos系统进入单用户修改root用户密码
运维 OS小编 发表了文章 0 个评论 1628 次浏览 2022-05-16 17:15

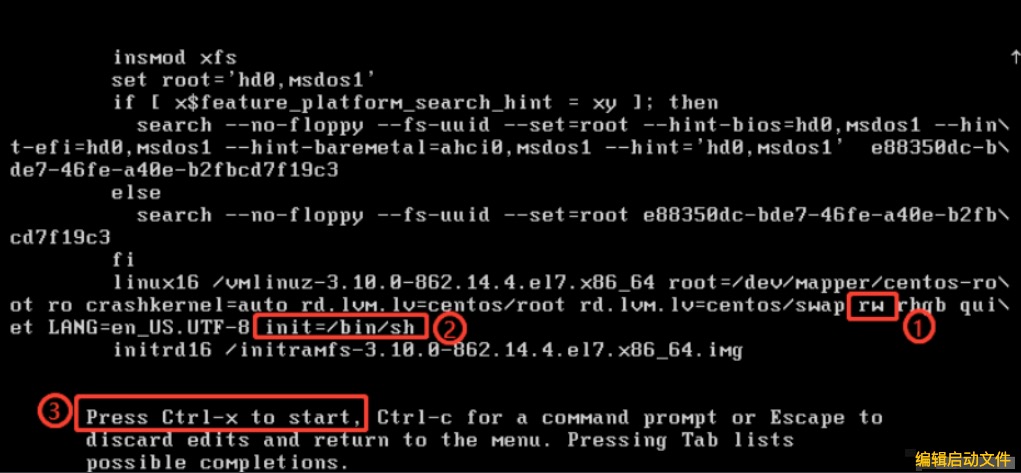
1. 重启系统,在选择进入系统界面按字母e

2. 在rhgb前添加’rw’ ,在行末添加 ‘init=/bin/sh’ ,按 ‘Ctrl+x’ 进入系统
进入系统后,修改密码
echo "www.baidu.com | passwd --stdin root

touch /.autorelabel

exec /sbin/init
等待一会,点击回车,进入重启。
漏洞风险评估CVSS介绍
运维 koyo 发表了文章 0 个评论 5318 次浏览 2021-11-06 17:29

什么是CVSS
通用弱点评价体系(CVSS)是由NIAC开发、FIRST维护的一个开放并且能够被产品厂商免费采用的标准。利用该标准,可以对弱点进行评分,进而帮助我们判断修复不同弱点的优先等级。
CVSS(Common Vulnerability Scoring System),即”通用漏洞评分系统”,是一个”行业公开标准,其被设计用来评测漏洞的严重程度,并帮助确定所需反应的紧急度和重要度”。
它的主要目的是帮助人们建立衡量漏洞严重程度的标准,使得人们可以比较漏洞的严重程度,从而确定处理它们的优先级。CVSS得分基于一系列维度上的测量结果,这些测量维度被称为量度(Metrics)。漏洞的最终得分最大为10,最小为0。
得分7~10的漏洞通常被认为比较严重,得分在4~6.9之间的是中级漏洞,0~3.9的则是低级漏洞。
CVSS系统包括三种类型的分数:基本分数、暂时分和环境分。
基本得分和临时得分通常由安全产品卖主、供应商给出,因为他们能够更加清楚的了解漏洞的详细信息;
环境得分通常由用户给出,因为他们能够在自己的使用环境下更好的评价该漏洞存在的潜在影响。
所以应该是基于漏洞库的扫描, 需要预先知道该漏洞的威胁值?
就是说漏洞应该预先有脆弱性等级,系统的安全性评估是综合各个漏洞来进行的?
CVSS 2.0 计算方法: 通用漏洞评估方法CVSS 3.0 计算公式及说明 - caya - 博客园 (cnblogs.com)
一些指标具有不确定性和复杂性,会导致完全的定量分析困难。3个客观性指标和11个主观性指标。下一步:指标量化(客观性指标量化和主观性指标量化)。
CVSS评分计算方法
A. 基本评价(Base Metric)
基本评价指的是该漏洞本身固有的一些特点及这些特点可能造成的影响的评价分值
| 序号 | 要素 | 可选值 | 评分 |
|---|---|---|---|
| 1 | 攻击途径 (AccessVector) | 本地/远程 | 0.7/1.0 |
| 2 | 攻击复杂度(AccessComplexity) | 高/中/低 | 0.6/0.8/1.0 |
| 3 | 认证(Authentication) | 需要/不需要 | 0.6/1.0 |
| 4 | 机密性(Conflmpact) | 不受影响/部分/完全 | 0/0.7/1 |
| 5 | 完整性(integlmpact) | 不受影响/部分/完全 | 0/0.7/1 |
| 6 | 可用性(Availlmpact) | 不受影响/部分/完全 | 0/0.7/1 |
| 7 | 权值倾向 | 平均/机密性/完整性/可用性 | 各0.333/权值倾向要素0.5另两个0.25 |
基础评价 = 四舍五入(10 * 攻击途径 攻击复杂度 认证 ((机密性 机密性权重) + (完整性 完整性权重) + (可用性 可用性权重)))
B.生命周期评价(Temporal Metric)
是针对最新类型漏洞(如: 0day漏洞)设置的评分项,因此SQL注入漏洞不用考虑。
因此这里也列举出三个与时间紧密关联的要素如下:
| 序号 | 要素 | 可选值 | 评分 |
|---|---|---|---|
| 1 | 可利用性 | 未证明/概念证明/功能性/完全代码 | 0.85/0.9/0.95/1.0 |
| 2 | 修复措施 | 官方补丁/临时补丁/临时解决方案/无 | 0.87/0.90/0.95/1.0 |
| 3 | 确认程度 | 不确认/未经确认/已确认 | 0.9/0.95/1.0 |
生命周期评价 =四舍五入(基础评价 可利用性 修复措施 * 未经确认)
C.环境评价(Environmental Metric)
每个漏洞会造成的影响大小都与用户自身的实际环境密不可分,因此可选项中也包括了环境评价,这可以由用户自评。(用户扫描配置时填写)
| 序号 | 要素 | 可选值 | 评分 |
|---|---|---|---|
| 1 | 危害影响程度 | 无/低/中/高 | 0/0.1/0.3/0.5 |
| 2 | 目标分布范围 | 无/低/中/高(0/1-15%/16-49%/50-100%) | 0/0.25/0.75/1.0 |
环境评价 = 四舍五入<(生命周期评价 + [(10 -生命周期评价) *危害影响程度]) *目标分布范围>
评分与危险等级
| 序号 | 评分 | 危险等级 |
|---|---|---|
| 1 | [0,4] | 低 |
| 2 | [4,7] | 中 |
| 3 | [7,10] | 高 |


